



rabbitmq
快来分享你的内容吧~
 2024-10-10·Java后端
- 2024-10-10·Java后端RabbitMQ是基于Erlang语言开发的开源消息通信中间件,官网地址:https://www.rabbitmq.com/查看全文编程导航_小y:小杰,可以看看编程导航的《消息队列专栏》:https://www.codefather.cn/course/1793910027205795841926分享






MQ知识点回顾: 1. 保证消息顺序性: a. 常见实现方式: i. 单一生产者->单个队列->单一消费者(性能瓶颈) ii. 支持分区的消息队列(RocketMQ&Kafka)可以通过将消息放到相同分区的方式保证消费顺序 iii. 支持顺序队列的消息队列(RabbitMQ)可以通过使用单个队列或者利用规则分配到不同顺序队列的方式保证顺序消费 b. RocketMQ i. 生产者:同步发送方式自定义MessageQueueSelector根据参数arg选择目标队列 ii. 消费者 1) 选择顺序消费模式从同一个队列中按顺序读取消息 2)MessageListenerOrderly三次加锁过程: a)ConsumeMessageOrderlyService初始化时会启动定时任务向Broker为当前客户端申请分布式锁,获取成功后Consumer就锁定了Broker上的MessageQueue,确定为唯一消费者 b)一次性拉取多条消息到ProcessQueue,同时提交到消费线程池执行 c)消费过程中申请MessageQueue锁,确保同一时间同一队列只有一个线程能够处理消息 d)对ProcessQueue加锁确保重平衡阶段不会出现重复消费,因为重平衡后消费者可能发生切换,此时之前消费者在Broker上的锁需要释放,释放锁的线程需要尝试对ProcessQueue加锁,如果失败证明消费还在进行中,消费位点信息还未提交,Broker上的锁不能释放,其他客户端此时消费可能会重复消费消息 c. Kafka:分区内有序(同一分区在一个日志文件中,文件读写有序) i. 生产者 1)直接指定分区partition 2)通过指定相同key 3)自定义partitioner重写partition方法通过自定义hash方法指定分区 ii. 消费者:单线程消费者 d. RabbitMQ i. 生产者: 1)Message Grouping根据相同属性将详细放到同一个顺序队列中 2)自定义路由策略将相同业务逻辑的消息放到同一个顺序队列中 ii. 消费者:每个队列仅对应一个消费者 2. 延时消息 a. RabbitMQ通过设置过期时间TTL监听死信队列实现,可设置任意时间,但是可能出现头部阻塞 b. RocketMQ通过延迟存储方式实现,消息先存储在内存中到达延时时间再存储磁盘的方式实现,不支持任意时长,存在大量任务时性能下降,RocketMQ 5.0之后采用了基于时间轮方式提高了投递性能,支持更小时间粒度
OJ 后端运行&部署教程
## 环境准备 + [OJ 在线判题源码](https://www.codefather.cn/course/1790980707917017089/section/1790992327498051585) + IDEA [你懂的教程](https://www.codefather.cn/essay/1837021571340648449) + Redis 安装包 链接: https://pan.baidu.com/s/1-QhCv0Crg2zvwG3ODxvv-Q 提取码: vmty + MySQL 5.7 [安装包链接](https://pan.baidu.com/s/1uIDAzBtxBXHq8YZOfhlI9w?pwd=bbr5) 提取码:bbr5 + MySQL8.0 [网盘安装包](https://pan.baidu.com/s/1O6TrRCpb66A5hdgy0EY9HA?pwd=g17s)提取码:g17s + RabbitMQ 3.1.2 安装包 [官方链接](https://github.com/rabbitmq/rabbitmq-server/releases/download/v3.12.13/rabbitmq-server-3.12.13.exe) + Erlang 安装包 OTP25.3 [官方链接](https://erlang.org/download/otp_versions_tree.html) + Nacos[官方下载链接](https://github.com/alibaba/nacos/releases/tag/2.2.0) + Nacos网盘链接 https://pan.baidu.com/s/16J46flMD86ZdEn9r-npbEA 提取码: `9m72` ## 本地启动 ### 初始化数据 连接本地 MySQL <img src="https://pic.code-nav.cn/post_picture/1608460212774109186/KE44ODUC9nJJhRxt.webp" alt="image-20241030155405801" width="674px" /> <img src="https://pic.code-nav.cn/post_picture/1608460212774109186/D2TciOxyoco9PJBw.webp" alt="image-20241030155543228" width="100%" /> > 点击 Download 下载 driver files <img src="https://pic.code-nav.cn/post_picture/1608460212774109186/TtwVMIogNCst0ApB.webp" alt="image-20241030155613559" width="100%" /> 输入,账号密码之后点击`Test Connection` 成功之后直接点击 `OK` <img src="https://pic.code-nav.cn/post_picture/1608460212774109186/zJWl5qWhpRoKS3VD.webp" alt="image-20241030155950071" width="100%" /> 找到根目录 `sql` 目录下面的 `create_table.sql` 微服务版本在根目录 `mysql-init` <img src="https://pic.code-nav.cn/post_picture/1608460212774109186/K66ljXkaaAnlsHfg.webp" alt="image-20241101144139040" width="100%" /> <img src="https://pic.code-nav.cn/post_picture/1608460212774109186/x8E4smudNjxMDHVJ.webp" alt="image-20241101130503929" width="100%" /> CTRL + A 右键选择 `Execute` <img src="https://pic.code-nav.cn/post_picture/1608460212774109186/tU3Fa2vkCtYpX2MO.webp" alt="image-20241101130928854" width="100%" /> <img src="https://pic.code-nav.cn/post_picture/1608460212774109186/df78RoYdFCS1PTx5.webp" alt="image-20241101131053215" width="100%" /> 创建成功之后,我们右侧的 DataBase 里面有 yuoj 数据库还有其他六个表,如果没有找到的话就看 `@localhost` 右侧的 `1 of 24` 点击看看里面有没有 `yuoj` <img src="https://pic.code-nav.cn/post_picture/1608460212774109186/mVfBEsYrmt6bARJr.webp" alt="image-20241101131312947" width="423px" /> ### 运行非微服务版本 + [后端源码](https://www.codefather.cn/course/1790980707917017089/section/1790992327498051585?type=) 下载非微服务 <img src="https://pic.code-nav.cn/post_picture/1608460212774109186/HTD2WLSUBhYw9TqD.webp" alt="ss" width="100%" /> + 设置 Maven 完成 https://www.codefather.cn/post/1836689783992958977 使用 IDEA 打开项目 <img src="https://pic.code-nav.cn/post_picture/1608460212774109186/1T1ucmwkC549EbOP.webp" alt="image-20241030153313475" width="100%" /> <img src="https://pic.code-nav.cn/post_picture/1608460212774109186/7JWVXqyEEyYKff24.webp" alt="image-20241030153800902" width="100%" /> <img src="https://pic.code-nav.cn/post_picture/1608460212774109186/27U9Lih6nsAWOmKw.webp" alt="image-20241030153859685" width="100%" /> #### 安装依赖 + 首先需要配置好本地 `Mavne`, 和`阿里云镜像`,要是没有配置的话可以看一下这篇[文章](https://www.codefather.cn/post/1836689783992958977) <img src="https://pic.code-nav.cn/post_picture/1608460212774109186/qO8Hk9gY04VjuCeE.webp" alt="image-20241101132208029" width="420px" /> 然后可以在 Build 看到正在下载依赖 <img src="https://pic.code-nav.cn/post_picture/1608460212774109186/HmBbAsPkl34pg5TH.webp" alt="image-20241101132248226" width="100%" /> #### 选择 Java 版本 <img src="https://pic.code-nav.cn/post_picture/1608460212774109186/reTg77hnKDDdEton.webp" alt="image-20241101132905013" width="398px" /> <img src="https://pic.code-nav.cn/post_picture/1608460212774109186/aSh1ZMRZ9002O08I.webp" alt="image-20241101133241046" width="100%" /> + 本地没有 JDK 可以直接 `Download JDK` + 本地有 JDK 但是没识别到 `Add JDK from disk` 选着对应目录即可 #### 修改配置文件 配置文件在 `resources` 目录 <img src="https://pic.code-nav.cn/post_picture/1608460212774109186/Jph1qiKis5ndJcMM.webp" alt="image-20241101133355503" width="100%" /> + application.yml 默认是本地运行时生效的配置 + application-prod.yml 当在服务器指定 ` --spring.profiles.active=prod` 才会生效,一般写线上配置,比如:线上 MySQL、Redis ... + application-test.yml 当在服务器指定 ` --spring.profiles.active=test` 才会生效 MySQL ```yml spring: # 数据库配置 # todo 需替换配置 datasource: driver-class-name: com.mysql.cj.jdbc.Driver url: jdbc:mysql://localhost:3306/yuoj # yuoj 是数据库的名称 如果是远程 MySQL 例如: jdbc:mysql://192.129.11.11:3306/yuoj username: root # 用户名 password: 123456 # MySQL 设置的密码 ``` Redis ```yml spring: redis: database: 1 host: localhost # 如果线上改成线上 IP port: 6379 # Redis 具体运行端口,默认安装 6379 timeout: 5000 # password: 123456 # 密码,默认安装没有密码,如果服务器 Redis 有密码就修改这个 ``` --- 可以设置 UTF-8 让配置文件中文正常显示,如果还是不行的话就把配置文件里面的中文删除即可 <img src="https://pic.code-nav.cn/post_picture/1608460212774109186/HdSDkCbR6KMy6r9h.webp" alt="image-20250225212643334" width="100%" /> #### 本地运行 <img src="https://pic.code-nav.cn/post_picture/1608460212774109186/zPais99ecVXYtwXD.webp" alt="image-20241101142811288" width="100%" /> 右下角会有 Lombok require enable annotation processing 直接点 `Enable annotation processing` 即可 <img src="https://pic.code-nav.cn/post_picture/1608460212774109186/kCDbqohRVqiu1OMA.webp" alt="image-20241101142832527" width="450px" /> 启动成功 <img src="https://pic.code-nav.cn/post_picture/1608460212774109186/eICmPW2kbMDpVWlh.webp" alt="image-20241101143152108" width="100%" /> ### 运行微服务版本 + [后端源码](https://www.codefather.cn/course/1790980707917017089/section/1790992327498051585?type=) 下载非微服务 <img src="https://pic.code-nav.cn/post_picture/1608460212774109186/DTreKr6z2HRzKkvZ.webp" alt="ss" width="100%" /> + 设置 Maven 完成 https://www.codefather.cn/post/1836689783992958977 #### 安装依赖 <img src="https://pic.code-nav.cn/post_picture/1608460212774109186/kKhWl9IsXpsRx5V7.webp" alt="image-20241102143841113" width="100%" /> #### 安装 Nacos 2.2.0 + [官方下载链接](https://github.com/alibaba/nacos/releases/tag/2.2.0) + 网盘链接 https://pan.baidu.com/s/16J46flMD86ZdEn9r-npbEA 提取码: `9m72` 下载之后解压到常用安装软件的目录 进入到 nacos/bin 目录下 ``` cd nacos/bin ``` <img src="https://pic.code-nav.cn/post_picture/1608460212774109186/BZF85lqhXnoLshVg.webp" alt="image-20241102171050965" width="100%" /> Windows ``` startup.cmd -m standalone ``` <img src="https://pic.code-nav.cn/post_picture/1608460212774109186/W2ZxBybAHAghIT3P.webp" alt="image-20241102171233978" width="100%" /> Linux/mac ``` sh startup.sh -m standalone ``` #### 安装 RabbitMQ + RabbitMQ 3.1.2 安装包 [官方链接](https://github.com/rabbitmq/rabbitmq-server/releases/download/v3.12.13/rabbitmq-server-3.12.13.exe) + Erlang 安装包 OTP25.3 [官方链接](https://erlang.org/download/otp_versions_tree.html) 1、安装 Erlang + RabbitMQ 先安装 `Erlang` <img src="https://pic.code-nav.cn/post_picture/1608460212774109186/LintN5uVUD4fPnWi.webp" alt="image-20240927005741030" width="449px" /> > 选择 是 <img src="https://pic.code-nav.cn/post_picture/1608460212774109186/xarf6WNlNvRUJA07.png" alt="image-20240927005735279" width="491px" /> <img src="https://pic.code-nav.cn/post_picture/1608460212774109186/FCXUViwPDgnAy8Ps.png" alt="image-20240927005819602" width="499px" /> <img src="https://pic.code-nav.cn/post_picture/1608460212774109186/e7Illjwt1co0BieX.png" alt="image-20240927005835856" width="499px" /> <img src="https://pic.code-nav.cn/post_picture/1608460212774109186/2IXtqRY8jiU1AaGA.png" alt="image-20240927005847403" width="499px" /> <img src="https://pic.code-nav.cn/post_picture/1608460212774109186/639MaMHX4OQY1DrJ.png" alt="image-20240927005941421" width="499px" /> 2、安装 RabbitMQ 直接双击 exe 程序即可安装 <img src="https://pic.code-nav.cn/post_picture/1608460212774109186/YXO3W4PHaiwHryoa.webp" alt="" width="449px" /> <img src="https://pic.code-nav.cn/post_picture/1608460212774109186/hxF9WlN8mgvVyPs4.png" alt="image-20240927010036491" width="499px" /> <img src="https://pic.code-nav.cn/post_picture/1608460212774109186/dXoynvutAT4s8WeJ.png" alt="image-20240927010100135" width="494px" /> <img src="https://pic.code-nav.cn/post_picture/1608460212774109186/HEuFoZV4t3W44hCt.png" alt="image-20240927010111401" width="499px" /> <img src="https://pic.code-nav.cn/post_picture/1608460212774109186/1YzOzXBVAns6f9Nl.webp" alt="image-20240927010146493" width="554px" /> <img src="https://pic.code-nav.cn/post_picture/1608460212774109186/lsWz9XNMkZEmGwBK.webp" alt="image-20240927010330897" width="623px" /> <img src="https://pic.code-nav.cn/post_picture/1608460212774109186/TwFxJiTERrj8MJiO.png" alt="image-20240927010355970" width="499px" /> <img src="https://pic.code-nav.cn/post_picture/1608460212774109186/gQcIXLQeVU2GWEbQ.png" alt="image-20240927010409998" width="499px" /> --- 3、启动 RabbitMQ 1)搜索 cmd -> 以管理员身份运行 <img src="https://pic.code-nav.cn/post_picture/1608460212774109186/nEhcLu9SVFn7JXMS.webp" alt="image-20240927013101415" width="100%" /> 2)进入 MQ 安装路径:`C:\Program Files\RabbitMQ Server\rabbitmq_server-3.12.13\sbin` ``` cd "C:\Program Files\RabbitMQ Server\rabbitmq_server-3.12.13\sbin" ``` 3)输入 `rabbitmq-plugins.bat enable rabbitmq_management` ``` rabbitmq-plugins.bat enable rabbitmq_management ``` <img src="https://pic.code-nav.cn/post_picture/1608460212774109186/LeUn6xr5hoeu2RFI.png" alt="image-20240927014128347" width="100%" /> 4)依次输入下面的命令 ``` rabbitmq-service.bat stop rabbitmq-service.bat install rabbitmq-service.bat start ``` <img src="https://pic.code-nav.cn/post_picture/1608460212774109186/bdiI9Qr4AhrAkPgS.png" alt="image-20240927014336375" width="100%" /> <img src="https://pic.code-nav.cn/post_picture/1608460212774109186/iQGswFU03HoagS6Q.png" alt="image-20240927014510092" width="100%" /> <img src="https://pic.code-nav.cn/post_picture/1608460212774109186/f5WP0JxCYo6aPwY0.png" alt="image-20240927014536826" width="100%" /> 5)然后可以直接在浏览器上 `http://localhost:15672/mgmt` 账号:`guest` 密码:`guest` <img src="https://pic.code-nav.cn/post_picture/1608460212774109186/ceNv9wNN4lOnNA58.webp" alt="image-20240927014655951" width="100%" /> 6)重启后这么启动呢?一般默认重启之后自启动 win + R 输入 `services.msc` 找到 `RabbitMQ ` 右键 `Start` <img src="https://pic.code-nav.cn/post_picture/1608460212774109186/aWu2CqaVhIHlhabd.webp" alt="image-20240927183034440" width="100%" /> 启动成功 <img src="https://pic.code-nav.cn/post_picture/1608460212774109186/KVn2xBPhcGaR4uRU.webp" alt="image-20240927183109001" width="100%" /> #### 修改配置文件 配置文件在下面项目的 `resources` 目录 + **yuoj-backend-judge-service** + **yuoj-backend-question-service** + **yuoj-backend-user-service** <img src="https://pic.code-nav.cn/post_picture/1608460212774109186/Jph1qiKis5ndJcMM.webp" alt="image-20241101133355503" width="100%" /> + application.yml 默认是本地运行时生效的配置 + application-prod.yml 当在服务器指定 ` --spring.profiles.active=prod` 才会生效,一般写线上配置,比如:线上 MySQL、Redis ... + application-test.yml 当在服务器指定 ` --spring.profiles.active=test` 才会生效 MySQL ```yml spring: # 数据库配置 # todo 需替换配置 datasource: driver-class-name: com.mysql.cj.jdbc.Driver url: jdbc:mysql://localhost:3306/yuoj # yuoj 是数据库的名称 如果是远程 MySQL 例如: jdbc:mysql://192.129.11.11:3306/yuoj username: root # 用户名 password: 123456 # MySQL 设置的密码 ``` Redis ```yml spring: redis: database: 1 host: localhost # 如果线上改成线上 IP port: 6379 # Redis 具体运行端口,默认安装 6379 timeout: 5000 # password: 123456 # 密码,默认安装没有密码,如果服务器 Redis 有密码就修改 ``` RabbitMQ ```yml spring: rabbitmq: host: localhost # 服务器换成对应 IP + 端口 port: 5672 password: guest # 密码 username: guest # 账号 ``` #### 修改 Judge 请求沙箱地址 YuojBackendJudgeServiceApplication 位置:`com.yupi.yuojbackendjudgeservice.judge.codesandbox.impl` <img src="https://pic.code-nav.cn/post_picture/1608460212774109186/KzhHD6X8hVJk0pgz.webp" alt="image-20250225210007861" width="100%" /> 修改成对应的虚拟机 IP 或者服务器 IP 地址 --- 查看虚拟机 IP ``` ifconfig ``` 结果 ``` eth0: flags=4163<UP,BROADCAST,RUNNING,MULTICAST> mtu 1500 inet 192.168.1.10 netmask 255.255.255.0 broadcast 192.168.1.255 inet6 fe80::a00:27ff:fe5c:ebac prefixlen 64 scopeid 0x20<link> ether 08:00:27:5c:eb:ac txqueuelen 1000 (Ethernet) RX packets 26284 bytes 2144348 (2.1 MB) RX errors 0 dropped 0 overruns 0 frame 0 TX packets 24776 bytes 1939930 (1.9 MB) TX errors 0 dropped 0 overruns 0 carrier 0 collisions 0 lo: flags=73<UP,LOOPBACK,RUNNING> mtu 65536 inet 127.0.0.1 netmask 255.0.0.0 inet6 ::1 prefixlen 128 scopeid 0x10<host> loop txqueuelen 1000 (Local Loopback) RX packets 1558 bytes 115900 (115.9 KB) RX errors 0 dropped 0 overruns 0 frame 0 TX packets 1558 bytes 115900 (115.9 KB) TX errors 0 dropped 0 overruns 0 carrier 0 collisions 0 ``` 这个 eth0 接口的 IP 地址是 192.168.1.10,也就虚拟机 IP 就是这个 **BUG:** 1、如果连接失败但确认虚拟机 sandbox 正常运行 运行下面 curl 检查是否运行成功 ``` curl -X POST "http://localhost:8090/executeCode" \ -H "Content-Type: application/json" \ -d '{ "code": "public class Main {\n public static void main(String[] args) {\n int a = Integer.parseInt(args[0]);\n int b = Integer.parseInt(args[1]);\n System.out.println(\"结果:\" + (a + b));\n }\n}", "language": "java", "inputList": ["1 2", "3 4"] }' ``` 或者使用 IDEA HttpClient 进行测试 ``` ### POST http://localhost:8090/executeCode Content-Type: application/json { "code": "public class Main {\n public static void main(String[] args) {\n int a = Integer.parseInt(args[0]);\n int b = Integer.parseInt(args[1]);\n System.out.println(\"结果:\" + (a + b));\n }\n}", "language": "java", "inputList": ["1 2", "3 4"] } ``` <img src="https://pic.code-nav.cn/post_picture/1608460212774109186/tYluRsgj5ViX7yWS.webp" alt="image.png" width="100%" /> > 当然使用这种方式如果不把对应的接口的权限认证先注释掉,请求会报错 > > <img src="https://pic.code-nav.cn/post_picture/1608460212774109186/zHX4FjpDrRyqBmqz.webp" alt="image.png" width="100%" /> 2、一般是防火墙的问题,首先确认自己的虚拟机是否开启防火墙 关闭 ufw 防火墙 ``` sudo ufw disable ``` #### 启动 > 必备环境 > > 1)MySQL > > 2)Redis > > 3)Nacos 运行状态 > > 4)RabbitMQ 打开之后可以按照一下顺序进行启动 1. YuojBackendGatewayApplication 2. YuojBackendJudgeServiceApplication 3. YuojBackendQuestionServiceApplication 4. YuojBackendUserServiceApplication <img src="https://pic.code-nav.cn/post_picture/1608460212774109186/AnRokIy5BRtbp69c.webp" alt="image-20241105113419057" width="100%" /> 启动成功效果 <img src="https://pic.code-nav.cn/post_picture/1608460212774109186/lJg1sLvJs0LO64IO.webp" alt="image-20241105111942910" width="100%" /> ### 运行 sandbox Linux 有两种选择 1、本地虚拟机 [安装教程](https://mp.weixin.qq.com/s?__biz=MzI1NDczNTAwMA==&mid=2247548860&idx=1&sn=7eadab7c8e29bea7d66d534b3ab2ccea&chksm=e9c2d84bdeb5515d5e3718353c27e5873e851d3eb567115ffc9419052e2861265e7a042f09d0&sessionid=1692665691&scene=126&subscene=91&clicktime=1692665703&enterid=1692665703&ascene=3&fasttmpl_type=0&fasttmpl_fullversion=6817439-zh_CN-zip) 2、远程服务器 我测试的远程服务器是 2 核 2G 但是开发不太卡,可能是我把能关的都关了的原因 + 再加上我设置了虚拟内存的缘故,但是有能力还是 2 核 4G > 下面是我未启动 SpringBoot + 还有一个 Docker 占用情况 <img src="https://pic.code-nav.cn/post_picture/1608460212774109186/8PQgzkBzrWWNqToX.webp" alt="image-20241030154450834" width="500px" /> #### IDEA 远程连接 Linux <img src="https://pic.code-nav.cn/post_picture/1608460212774109186/NIrxcLQUTsc1LISe.webp" alt="image-20241030145617724" width="396px" /> <img src="https://pic.code-nav.cn/post_picture/1608460212774109186/o0LNV2Y0eTFur8fN.webp" alt="image-20241030145708772" width="100%" /> <img src="https://pic.code-nav.cn/post_picture/1608460212774109186/Lty7ULcm2JnCUzOB.webp" alt="image-20241030150532066" width="100%" /> > 如果配置不高可能会报错,但是没大问题,直接选择 `Continue Anyway` > > 还有一个原因,我设置了Linux 的 `虚拟内存` <img src="https://pic.code-nav.cn/post_picture/1608460212774109186/nZDQebnfqIiAfgJr.webp" alt="image-20241030150726620" width="100%" /> 选着根目录可以选择 `/root/idea` 路径,输入下面命令创建 ``` mkdir -p /root/idea ``` <img src="https://pic.code-nav.cn/post_picture/1608460212774109186/VjOuW18YJ2Lm7yqo.webp" alt="image-20241030151550986" width="100%" /> --- 如何第二次打开呢? <img src="https://pic.code-nav.cn/post_picture/1608460212774109186/NIrxcLQUTsc1LISe.webp" alt="image-20241030145617724" width="396px" /> <img src="https://pic.code-nav.cn/post_picture/1608460212774109186/umb8DM1tWKWrglSF.webp" alt="image-20241030151740533" width="100%" /> <img src="https://pic.code-nav.cn/post_picture/1608460212774109186/lZEavMHVePtLPwUY.webp" alt="image-20241030152100328" width="100%" /> #### 安装 Java Ubuntu > 设置[Ubuntu阿里镜像](https://developer.aliyun.com/mirror/ubuntu?spm=a2c6h.13651102.0.0.3e221b11cBkIsz) 1、安装 Java 1)更新系统软件包 ``` sudo apt-get update ``` 2)安装 OpenJDK 8 ``` apt-get install openjdk-8-jdk ``` <img src="https://pic.code-nav.cn/post_picture/1608460212774109186/A3vrSw4y47hO8yWL.webp" alt="image-20241029223613203" width="100%" /> > 输入 `y` 回车 安装完成 <img src="https://pic.code-nav.cn/post_picture/1608460212774109186/ZfR3LnwSQyXdHawY.webp" alt="image-20241029223720069" width="100%" /> 2、验证是否安装成功 ``` java -version ``` <img src="https://pic.code-nav.cn/post_picture/1608460212774109186/W17wWcblor4ugaGM.png" alt="image-20241029223814933" width="580px" /> ``` javac -version ``` <img src="https://pic.code-nav.cn/post_picture/1608460212774109186/ZsGk3ctNB5vHCbEU.png" alt="image-20241029223931023" width="478px" /> --- CentOS 也是同理 > 设置[CentOS阿里镜像](https://developer.aliyun.com/mirror/centos?spm=a2c6h.13651102.0.0.3e221b11cBkIsz) 1、更新系统软件包 ``` sudo yum update -y ``` 2、安装 OpenJDK 8 ``` sudo yum install -y java-1.8.0-openjdk ``` 3、验证 Java 是否安装成功 ``` java -version ``` ``` javac -version ``` #### 安装 Maven 1、更新系统软件包 ``` sudo apt update ``` 2、安装 Maven ``` apt install maven -y ``` <img src="https://pic.code-nav.cn/post_picture/1608460212774109186/tHmC8uSgP2EW68Ey.webp" alt="image-20241029225400055" width="100%" /> 3、验证 maven 是否成功 ``` mvn -version ``` <img src="https://pic.code-nav.cn/post_picture/1608460212774109186/2ixaW1S93PXqLM0S.webp" alt="image-20241029225621875" width="100%" /> 4、设置`镜像` ``` vi /usr/share/maven/conf/settings.xml ``` 最后把 ```xml <mirror> <id>aliyunmaven</id> <mirrorOf>*</mirrorOf> <name>阿里云公共仓库</name> <url>https://maven.aliyun.com/repository/public</url> </mirror> ``` <img src="https://pic.code-nav.cn/post_picture/1608460212774109186/aUAeUM1Ok6oFsIl2.webp" alt="image-20241029231552258" width="100%" /> 之后切换到命令行模式输入 `:wq` 即可退出保存成功 #### 远程设置 Java 版本和 Maven 选择 Java 版本 <img src="https://pic.code-nav.cn/post_picture/1608460212774109186/njg782rr00V31oLW.webp" alt="image-20241029232642335" width="593px" /> <img src="https://pic.code-nav.cn/post_picture/1608460212774109186/0mybqtALvBn81MXN.webp" alt="image-20241029232736197" width="100%" /> 选择自己本地安装的 Maven <img src="https://pic.code-nav.cn/post_picture/1608460212774109186/kXgmXRv3N2Dt1Ji2.webp" alt="image-20241029230352354" width="100%" /> `/usr/share/maven` 选择自己安装的 `Maven` <img src="https://pic.code-nav.cn/post_picture/1608460212774109186/HTTLeR5GqHRpLpe2.webp" alt="image-20241029230907030" width="100%" /> 选择 User setting file 路径为 `/usr/share/maven/conf/setting.xml` <img src="https://pic.code-nav.cn/post_picture/1608460212774109186/IL9j6HCt5VKYloXT.webp" alt="image-20241029230721299" width="100%" /> 最后取消选择 `Use setting from .mvn/maven.config` <img src="https://pic.code-nav.cn/post_picture/1608460212774109186/ju2OZsnSna1puJDv.webp" alt="image-20241029231001319" width="100%" /> 在 `Terminal` 里面输入 ``` mvn install ``` <img src="https://pic.code-nav.cn/post_picture/1608460212774109186/m0nWwZt8xDi0cBu2.webp" alt="image-20241030143518918" width="100%" /> --- 如果没有找到 `Terminal` 的话,找到设置 `plugins` <img src="https://pic.code-nav.cn/post_picture/1608460212774109186/A3Q01dzpfOTptIvO.webp" alt="image-20241030144252694" width="360px" /> <img src="https://pic.code-nav.cn/post_picture/1608460212774109186/EdQJYZPT7PRMe467.webp" alt="image-20241030144300849" width="100%" /> --- <img src="https://pic.code-nav.cn/post_picture/1608460212774109186/61zj9SEG7SauMUaZ.webp" alt="image-20241030142733818" width="100%" /> <img src="https://pic.code-nav.cn/post_picture/1608460212774109186/oNuGUTBrcKcHRc8H.webp" alt="image-20241030142957504" width="100%" /> > 没用 IDEA 右侧的配置,是因为我配置不高很容易卡 <img src="https://pic.code-nav.cn/post_picture/1608460212774109186/m4FbG3fW9XRHvjzk.webp" alt="image-20241030143325959" width="100%" /> #### 安装 Docker 可以看鱼皮的文章,里面有安装虚拟机 Linux + 安装 Docker 的流程 [《搞台虚拟机玩玩》](https://mp.weixin.qq.com/s?__biz=MzI1NDczNTAwMA==&mid=2247548860&idx=1&sn=7eadab7c8e29bea7d66d534b3ab2ccea&chksm=e9c2d84bdeb5515d5e3718353c27e5873e851d3eb567115ffc9419052e2861265e7a042f09d0&sessionid=1692665691&scene=126&subscene=91&clicktime=1692665703&enterid=1692665703&ascene=3&fasttmpl_type=0&fasttmpl_fullversion=6817439-zh_CN-zip) #### 启动项目 上面都准备好之后,可以直接把 yuoj-code-sandbox 代码上传到虚拟机或者服务器上的 `/root/idea` 目录,就可以看到代码结构 <img src="https://pic.code-nav.cn/post_picture/1608460212774109186/Ht3CyQRRjE5nkanh.webp" alt="image-20241029232919502" width="100%" /> 启动成功 <img src="https://pic.code-nav.cn/post_picture/1608460212774109186/NwTHQiy5PtxQhYRC.webp" alt="image-20241029233045507" width="100%" /> --- #### 测试 sandbox 运行下面 curl 检查是否运行成功(当然 IP 不一定是 localhost 需要改成自己服务器的 IP 或者 虚拟机 的 IP) 1、首先需要把 sandbox 相关的权限校验注释掉 <img src="https://pic.code-nav.cn/post_picture/1608460212774109186/zHX4FjpDrRyqBmqz.webp" alt="image.png" width="100%" /> 2、发送请求,可以使用 curl 或者 IDEA HttpClient 进行测试 ``` curl -X POST "http://localhost:8090/executeCode" \ -H "Content-Type: application/json" \ -d '{ "code": "public class Main {\n public static void main(String[] args) {\n int a = Integer.parseInt(args[0]);\n int b = Integer.parseInt(args[1]);\n System.out.println(\"结果:\" + (a + b));\n }\n}", "language": "java", "inputList": ["1 2", "3 4"] }' ``` 或者使用 IDEA HttpClient 进行测试 ``` ### POST http://localhost:8090/executeCode Content-Type: application/json { "code": "public class Main {\n public static void main(String[] args) {\n int a = Integer.parseInt(args[0]);\n int b = Integer.parseInt(args[1]);\n System.out.println(\"结果:\" + (a + b));\n }\n}", "language": "java", "inputList": ["1 2", "3 4"] } ``` <img src="https://pic.code-nav.cn/post_picture/1608460212774109186/tYluRsgj5ViX7yWS.webp" alt="image.png" width="100%" /> 3、服务器上如果多次运行可能会有很多 container 把对应 sandbox 测试启动的全部删除,可以执行下面的命令 ``` docker ps -a --filter "ancestor=openjdk:8-alpine" -q | xargs -r docker rm -f ``` ## 部署上线 ### Linux 部署 Nacos #### 安装依赖环境 Ubuntu > 设置[Ubuntu阿里镜像](https://developer.aliyun.com/mirror/ubuntu?spm=a2c6h.13651102.0.0.3e221b11cBkIsz) 1)更新系统软件包 ``` sudo apt-get update ``` 2)安装对应的依赖 `wget` `unzip` `Java` ``` sudo apt-get install wget unzip openjdk-8-jdk ``` --- CentOS > 设置[CentOS阿里镜像](https://developer.aliyun.com/mirror/centos?spm=a2c6h.13651102.0.0.3e221b11cBkIsz) 1)更新系统软件包 ``` sudo yum update -y ``` 2)安装对应的依赖 `wget` `unzip` `Java` ``` sudo yum install -y wget unzip java-1.8.0-openjdk ``` #### 下载 Nacos 1、下载文件 1)进入工作目录 ``` cd ~ ``` 2)创建目录 ``` mkdir nacos ``` 3)进入目录,并且下载 zip 文件 ``` wget https://github.com/alibaba/nacos/releases/download/2.2.0/nacos-server-2.2.0.zip ``` > 这个速度可能会比较慢,可以本地下载好的上传到服务器上 2、解压文件 ``` unzip nacos-server-2.2.0.zip ``` <img src="https://pic.code-nav.cn/post_picture/1608460212774109186/RhPIPVEwRRboRIRK.webp" alt="image-20241103170938289" width="100%" /> 3、设置数据库 先创建一个数据库 ```mysql CREATE DATABASE nacos_config CHARACTER SET utf8mb4 COLLATE utf8mb4_general_ci; ``` 然后在对应数据库下执行 `nacos/conf/mysql-schema.sql` 建表语句 然后修改 `nacos/conf/application.properties` 的内容 > 下面是源文件内容 <img src="https://pic.code-nav.cn/post_picture/1608460212774109186/pWlDW58PmtyOYNkw.webp" alt="image-20241103225328866" width="100%" /> 修改成 ```properties ### If use MySQL as datasource: spring.datasource.platform=mysql ### Count of DB: # db.num=1 ### Connect URL of DB: db.url.0=jdbc:mysql://127.0.0.1:3306/nacos_config?characterEncoding=utf8&connectTimeout=1000&socketTimeout=3000&autoReconnect=true&useUnicode=true&useSSL=false&serverTimezone=UTC db.user.0=nacos # mysql 用户名 db.password.0=nacos # mysql 密码 ``` 4、进入 bin 目录启动 ``` cd nacos/bin ``` <img src="https://pic.code-nav.cn/post_picture/1608460212774109186/Zs2jGky8KVp75iL1.webp" alt="image-20241103171138299" width="492px" /> ``` sudo bash startup.sh -m standalone ``` <img src="https://pic.code-nav.cn/post_picture/1608460212774109186/QQOwKJeZwbMJBkX4.webp" alt="image-20241103171102914" width="100%" /> > 这里如果是 Ubuntu 的话一定要用 **bash** startup.sh -m standalone 如果是 sh 会报错 Caused by: java.net.UnknownHostException: jmenv.tbsite.net > at java.net.AbstractPlainSocketImpl.connect(AbstractPlainSocketImpl.java:184) 5、访问 web 管理页面 首先要把服务器的 `8848` 打开,如果有宝塔 `8848` http://服务器IP:8848/nacos/index.html 6、关闭 Nacos ``` sudo bash shutdown.sh ``` <img src="https://pic.code-nav.cn/post_picture/1608460212774109186/3TzdJDMhrzUO8E5b.png" alt="image-20241103214451131" width="531px" /> ### Linux 原生安装 RabbitMQ #### 安装 DNF 1、 ``` yum install epel-release ``` <img src="https://pic.code-nav.cn/post_picture/1608460212774109186/G9Ea0ciRuO8uv6id.webp" alt="image-20241009203545454" width="100%" /> 2、 ``` yum install dnf ``` <img src="https://pic.code-nav.cn/post_picture/1608460212774109186/OhWVJYadSZ1Trwbn.webp" alt="image-20241009203632789" width="100%" /> 安装成功 <img src="https://pic.code-nav.cn/post_picture/1608460212774109186/LZVgOmSTuzp2scBv.webp" alt="image-20241009203651254" width="100%" /> #### 安装 RabbitMQ 1、指定仓库 ``` sudo dnf install -y https://packagecloud.io/install/repositories/rabbitmq/rabbitmq-server/script.rpm ``` 2、安装 `rabbitmq` 默认会安装 `erlang` ``` sudo dnf install -y rabbitmq-server-3.3.5-34.el7 ``` <img src="https://pic.code-nav.cn/post_picture/1608460212774109186/DXpGARdf3DP09VY9.webp" alt="image-20241009211123061" width="100%" /> 3、开启 web 管理页面 ``` sudo rabbitmq-plugins enable rabbitmq_management ``` 4、启动 RabbitMQ ``` sudo systemctl start rabbitmq-server ``` 5、查看运行状态 ``` systemctl status rabbitmq-server ``` <img src="https://pic.code-nav.cn/post_picture/1608460212774109186/EK9Mdk13KDzIsw1k.webp" alt="image-20241009212252468" width="100%" /> 6、设置开机自启动 ``` sudo systemctl enable rabbitmq-server ``` #### 登录 web 管理界面 http://服务器IP:15672 <img src="https://pic.code-nav.cn/post_picture/1608460212774109186/kC6o14lhMaSnwUMW.png" alt="image-20241009214139890" width="100%" /> 默认账号、密码都是 `guest` 要是报错就自己再仔细看看是不是输入错误了 #### 创建用户&禁用默认用户远程访问 + 创建用户 + 允许远程连接 <img src="https://pic.code-nav.cn/post_picture/1608460212774109186/Oay9MYagUe056HnW.webp" alt="image-20241009200510767" width="100%" /> <img src="https://pic.code-nav.cn/post_picture/1608460212774109186/eXQkhu6jl3ohnn8M.webp" alt="image-20241009200822956" width="100%" /> <img src="https://pic.code-nav.cn/post_picture/1608460212774109186/ta1IB8L2LhSosHR7.webp" alt="image-20241009200851259" width="100%" /> --- **重要** 关闭允许 `guest` 用户远程访问,为了安全 <img src="https://pic.code-nav.cn/post_picture/1608460212774109186/WEK3UPRgpsmeomsb.webp" alt="image-20241009201040420" width="100%" /> <img src="https://pic.code-nav.cn/post_picture/1608460212774109186/hPAUn57pYcAz5eAr.webp" alt="image-20241009201140735" width="100%" /> ### Docker 部署 Nacos > 如果速度比较慢的话可以设置一下 register [教程](https://gist.github.com/y0ngb1n/7e8f16af3242c7815e7ca2f0833d3ea6) 1、下载镜像 ```dockerfile docker pull nacos/nacos-server:v2.2.0 ``` <img src="https://pic.code-nav.cn/post_picture/1608460212774109186/9xI2UERvWaJT76Ye.webp" alt="image-20241105000313361" width="100%" /> 2、查看 image ```dockerfile docker images ``` 3、初始化数据库 可以找到本地 `nacos/conf/mysql-schema.sql` 先创建数据,在使用数据库进行创建 sql ``` CREATE DATABASE nacos_config CHARACTER SET utf8mb4 COLLATE utf8mb4_general_ci; ``` <img src="https://pic.code-nav.cn/post_picture/1608460212774109186/un44a0pw0BN3Inb5.webp" alt="image-20241105004509708" width="325px" /> 4、启动 `Nacos` ```dockerfile docker run \ --name nacos \ -d \ -p 8848:8848 \ -p 9848:9848 \ -p 9849:9849 \ --restart=always \ -e MYSQL_SERVICE_USER=root \ -e MYSQL_SERVICE_PASSWORD=密码 \ -e MYSQL_SERVICE_HOST=127.0.0.1 \ -e MYSQL_SERVICE_DB_NAME=nacos_config \ -e MODE=standalone \ nacos/nacos-server:v2.2.0 ``` 启动成功! <img src="https://pic.code-nav.cn/post_picture/1608460212774109186/xVOLyP7neZhuZKmm.webp" alt="image-20241105010150373" width="100%" /> ### Docker 安装 RabbitMQ Docker 安装就**相对简单**很多了! 1、下载 rabbitmq ``` docker pull rabbitmq:3.12.13-management ``` 2、运行 rabbitmq ``` docker run -d --name=rabbitmq -p 15672:15672 -p 5672:5672 rabbitmq:3.12.13-management ``` <img src="https://pic.code-nav.cn/post_picture/1608460212774109186/kgvBVOWkktvxJ49A.png" alt="image-20241009213651818" width="100%" /> 3、登录 web 管理界面 地址: `http://服务器IP:15672` 账号、密码默认 `guest` <img src="https://pic.code-nav.cn/post_picture/1608460212774109186/tzUoWYBWoa2TqiuB.png" alt="image-20241009214146062" width="100%" /> 4、看上面关于 创建用户&禁用默认用户远程访问 章节 ### 上线 修改配置文件,参考上面本地运行【修改配置文件】 后面参考这个 [『 后端部署(通用) 』](https://www.codefather.cn/post/1837499403858690049)
6、RabbitMQ集群
# RabbitMQ集群 今天我们来学习如何避免单点的MQ故障而导致的不可用问题,这个就要靠MQ的集群去实现了。 # 1、集群分类 > **RabbitMQ**的是基于**Erlang**语言编写,而**Erlang**又是一个面向并发的语言,天然支持集群模式。**RabbitMQ**的集群有两种模式: ## 1.1 普通集群 > 是一种分布式集群,将队列分散到集群的各个节点,从而提高整个集群的并发能力。 > > 这种集群有一个问题,一旦集群中某个节点出现了故障,那这个节点上的队列,以及上面的消息就全都没了,所以它会存在一定的安全问题。 ### 1.1.1 集群结构和特征 普通集群,或者叫标准集群(classic cluster),具备下列特征: > 1. 会在集群的各个节点间共享部分数据,包括:交换机、队列元信息(队列的描述信息,包括队列名字,队列节点,队列有什么消息)。不包含消息本身。 > 2. 当访问集群某节点时,如果队列不在该节点,会从数据所在节点传递到当前节点并返回 > 3. 队列所在节点宕机,队列中的消息就会丢失 结构如图: <img src="https://pic.code-nav.cn/post_picture/1620630456775032833/oKwC4Q1ZvYC6LGts.webp" alt="1" width="100%" /> ### 1.1.2 部署 我们的计划部署3节点的mq集群: <img src="https://pic.code-nav.cn/post_picture/1620630456775032833/plUTXJswHjIWQ5hL.webp" alt="2" width="869px" /> 这里三个主机就是三台机器,这里我用三个Docker代替了。 集群中的节点标示默认都是:`rabbit@[hostname]`,因此以上三个节点的名称分别为: > - rabbit@mq1 > - rabbit@mq2 > - rabbit@mq3 > #### 1、获取cookie > RabbitMQ底层依赖于Erlang,而Erlang虚拟机就是一个面向分布式的语言,默认就支持集群模式。集群模式中的每个RabbitMQ 节点使用 cookie 来确定它们是否被允许相互通信。 > > 要使两个节点能够通信,它们必须具有相同的共享秘密,称为**Erlang cookie**。cookie 只是一串最多 255 个字符的字母数字字符。 > > 每个集群节点必须具有**相同的 cookie**。实例之间也需要它来相互通信。 我们先在之前启动mq容器中获取一个cookie值,作为集群的cookie。执行下面的命令: ```shell docker exec -it mq cat /var/lib/rabbitmq/.erlang.cookie ``` 可以看到我的cookie值如下: <img src="https://pic.code-nav.cn/post_picture/1620630456775032833/rEFcSdLbh57r5Qty.png" alt="3" width="868px" /> 接下来,停止并删除当前的mq容器,我们重新搭建集群。 ```shell docker rm -f mq ``` <img src="https://pic.code-nav.cn/post_picture/1620630456775032833/FtTWRlzfLUx0WfQZ.png" alt="4" width="421px" /> #### 2、准备集群配置 在/tmp目录新建一个配置文件 rabbitmq.conf: ```shell cd /tmp # 创建文件 touch rabbitmq.conf ``` <img src="https://pic.code-nav.cn/post_picture/1620630456775032833/6HxcKCppwvYgyTDi.webp" alt="5" width="100%" /> 文件内容如下: <img src="https://pic.code-nav.cn/post_picture/1620630456775032833/mjnZueUMbd62mdPT.webp" alt="6" width="100%" /> ```shell loopback_users.guest = false listeners.tcp.default = 5672 cluster_formation.peer_discovery_backend = rabbit_peer_discovery_classic_config cluster_formation.classic_config.nodes.1 = rabbit@mq1 cluster_formation.classic_config.nodes.2 = rabbit@mq2 cluster_formation.classic_config.nodes.3 = rabbit@mq3 ``` > 文件解析: > > **loopback_users.guest =false**:禁用guest用户,因为RabbitMQ客户端有一个guest用户,所以我们把它禁用掉,防止有些不法分子来访问我们。 > > **listeners.tcp.default = 5672**:监听端口,用于消息通信 > > 最重要的是下面三个: > > cluster_formation.classic_config.nodes.1 = rabbit@mq1 > cluster_formation.classic_config.nodes.2 = rabbit@mq2 > cluster_formation.classic_config.nodes.3 = rabbit@mq3 > > 这里配置的分别集群中的节点信息。 再创建一个文件,记录cookie ```shell cd /tmp # 创建cookie文件 touch .erlang.cookie # 写入cookie echo "NEHXVEBVVLVHYDWCAFVH" > .erlang.cookie # 修改cookie文件的权限 chmod 600 .erlang.cookie ``` 准备三个目录,mq1、mq2、mq3: ```shell cd /tmp # 创建目录 mkdir mq1 mq2 mq3 ``` 然后拷贝rabbitmq.conf、cookie文件到mq1、mq2、mq3: ```shell # 进入/tmp cd /tmp # 拷贝 cp rabbitmq.conf mq1 cp rabbitmq.conf mq2 cp rabbitmq.conf mq3 cp .erlang.cookie mq1 cp .erlang.cookie mq2 cp .erlang.cookie mq3 ``` #### 3、启动集群 创建一个网络: ```shell docker network create mq-net ``` <img src="https://pic.code-nav.cn/post_picture/1620630456775032833/tudmQa0syecuff6q.png" alt="7" width="753px" /> 运行命令 mq1: ```shell docker run -d --net mq-net \ -v ${PWD}/mq1/rabbitmq.conf:/etc/rabbitmq/rabbitmq.conf \ -v ${PWD}/.erlang.cookie:/var/lib/rabbitmq/.erlang.cookie \ -e RABBITMQ_DEFAULT_USER=jie \ -e RABBITMQ_DEFAULT_PASS=123456 \ --name mq1 \ --hostname mq1 \ -p 8071:5672 \ -p 8081:15672 \ rabbitmq:3.8-management ``` mq2: ```shell docker run -d --net mq-net \ -v ${PWD}/mq2/rabbitmq.conf:/etc/rabbitmq/rabbitmq.conf \ -v ${PWD}/.erlang.cookie:/var/lib/rabbitmq/.erlang.cookie \ -e RABBITMQ_DEFAULT_USER=jie \ -e RABBITMQ_DEFAULT_PASS=123456 \ --name mq2 \ --hostname mq2 \ -p 8072:5672 \ -p 8082:15672 \ rabbitmq:3.8-management ``` mq3: ```shell docker run -d --net mq-net \ -v ${PWD}/mq3/rabbitmq.conf:/etc/rabbitmq/rabbitmq.conf \ -v ${PWD}/.erlang.cookie:/var/lib/rabbitmq/.erlang.cookie \ -e RABBITMQ_DEFAULT_USER=jie \ -e RABBITMQ_DEFAULT_PASS=123456 \ --name mq3 \ --hostname mq3 \ -p 8073:5672 \ -p 8083:15672 \ rabbitmq:3.8-management ``` 打开浏览器 <img src="https://pic.code-nav.cn/post_picture/1620630456775032833/VTPoZLuKUfhTBEMV.webp" alt="9" width="100%" /> #### 4.测试 在mq1这个节点上添加一个队列: <img src="https://pic.code-nav.cn/post_picture/1620630456775032833/DRCVhsJVMXu0WiSF.webp" alt="10" width="100%" /> 然后我们去mq2和mq3那里也能看到这个队列。 <img src="https://pic.code-nav.cn/post_picture/1620630456775032833/5CcC1RGOwYXyk4MS.webp" alt="11" width="100%" /> ##### 4.1 数据共享测试 点击这个队列,进入管理页面: <img src="https://pic.code-nav.cn/post_picture/1620630456775032833/2F1H43wEG0QaTr7r.webp" alt="12" width="100%" /> 然后利用控制台发送一条消息到这个队列: <img src="https://pic.code-nav.cn/post_picture/1620630456775032833/TI9nxNV9jXam0OJu.webp" alt="13" width="100%" /> 结果在mq2、mq3上都能看到这条消息: <img src="https://pic.code-nav.cn/post_picture/1620630456775032833/cbwS1hKxZCEvb7OR.webp" alt="14" width="100%" /> ##### 4.2 可用性测试 我们让其中一台节点mq1宕机: ```shell docker stop mq1 ``` <img src="https://pic.code-nav.cn/post_picture/1620630456775032833/mewvwocAcPFALhPs.png" alt="15" width="441px" /> 然后登录mq2或mq3的控制台,发现simple.queue也不可用了: <img src="https://pic.code-nav.cn/post_picture/1620630456775032833/sdmuyV2Yl0qolq7u.webp" alt="16" width="100%" /> 说明数据并没有拷贝到mq2和mq3。 ## 1.2 镜像集群 在刚刚的案例中,一旦创建队列的主机宕机,队列就会不可用。不具备高可用能力。如果要解决这个问题,必须使用官方提供的镜像集群方案。 官方文档地址:https://www.rabbitmq.com/ha.html > 镜像集群是一种主从集群,普通集群的基础上,添加了主从备份功能,提高集群的数据可用性。 > > 这种集群有一个问题,主从数据源要同步,要从主节点同步到从节点,但是这个主从同步它不是强一致的,存在一定的延迟,如果在主从同步期间出现了一点故障,就可能导致**数据丢失**。 > > 因此在**RabbitMQ**的**3.8**版本以后,推出了新的功能:**仲裁队列**来代替镜像集群,底层采用Raft协议确保主从的数据一致性。 ### 1.2.1 集群结构和特征 > - 交换机、队列、队列中的消息会在各个mq的镜像节点之间同步备份。 > - 创建队列的节点被称为该队列的**主节点,**备份到的其它节点叫做该队列的**镜像**节点。 > - 一个队列的主节点可能是另一个队列的镜像节点。 > - 不具备负载均衡功能,因为所有操作都是主节点完成,然后同步给镜像节点。 > - 主宕机后,镜像节点会替代成新的主节点。 结构如图: <img src="https://pic.code-nav.cn/post_picture/1620630456775032833/ZzU5cKbY6ZN51qmB.webp" alt="17" width="100%" /> ### 1.2.2 部署 镜像集群的配置有3种模式: <img src="https://pic.code-nav.cn/post_picture/1620630456775032833/xsYuOykGz7r6Yt53.webp" alt="18" width="100%" /> 这里我们以rabbitmqctl命令作为案例来讲解配置语法。 语法示例: #### 1、exactly模式 首先进入任意一个节点 ```shell rabbitmqctl set_policy ha-two "^two\." '{"ha-mode":"exactly","ha-params":2,"ha-sync-mode":"automatic"}' ``` <img src="https://pic.code-nav.cn/post_picture/1620630456775032833/W6z5NYfcSK1bUnTW.png" alt="20" width="100%" /> > - rabbitmqctl set_policy`:固定写法 > - `ha-two`:策略名称,自定义 > - `"^two\."`:匹配队列的正则表达式,符合命名规则的队列才生效,这里是任何以`two.`开头的队列名称 > - `'{"ha-mode":"exactly","ha-params":2,"ha-sync-mode":"automatic"}'`: 策略内容 > - `"ha-mode":"exactly"`:策略模式,此处是exactly模式,指定副本数量 > - `"ha-params":2`:策略参数,这里是2,就是副本数量为2,1主1镜像 > - `"ha-sync-mode":"automatic"`:同步策略,默认是manual,即新加入的镜像节点不会同步旧的消息。如果设置为automatic,则新加入的镜像节点会把主节点中所有消息都同步,会带来额外的网络开销 然后退出 exit,我们进入浏览器查看。 <img src="https://pic.code-nav.cn/post_picture/1620630456775032833/83rvOlGLay0dJzM7.webp" alt="21" width="100%" /> 我们创建一个新的队列: <img src="https://pic.code-nav.cn/post_picture/1620630456775032833/szXlhVrP9CpDI3cp.webp" alt="22" width="100%" /> 在任意一个mq控制台查看队列: <img src="https://pic.code-nav.cn/post_picture/1620630456775032833/rRg6Xjvkhh0HutuX.webp" alt="23" width="100%" /> 测试数据共享,给two.queue发送一条消息: <img src="https://pic.code-nav.cn/post_picture/1620630456775032833/BBiOWfXjM3phwtEs.webp" alt="24" width="100%" /> 然后在mq1、mq2、mq3的任意控制台查看消息: <img src="https://pic.code-nav.cn/post_picture/1620630456775032833/qaxKqPdiUc7zgHfU.webp" alt="25" width="100%" /> 测试高可用,现在,我们让two.queue的主节点mq1宕机: ```shell docker stop mq1 ``` 然后我们先看集群状态 <img src="https://pic.code-nav.cn/post_picture/1620630456775032833/AQokp6QiSKRd0Ik0.webp" alt="27" width="100%" /> 再看队列状态: <img src="https://pic.code-nav.cn/post_picture/1620630456775032833/63hlSYqnypcBSfuJ.webp" alt="26" width="100%" /> 发现依然是健康的!并且其主节点切换到了rabbit@mq2上。 剩下的模式,大家可以自己去试试,大同小异。 #### 2、all模式 ```shell rabbitmqctl set_policy ha-all "^all\." '{"ha-mode":"all"}' ``` - `ha-all`:策略名称,自定义 - `"^all\."`:匹配所有以`all.`开头的队列名 - `'{"ha-mode":"all"}'`:策略内容 - `"ha-mode":"all"`:策略模式,此处是all模式,即所有节点都会称为镜像节点 #### 3、nodes模式 ```shell rabbitmqctl set_policy ha-nodes "^nodes\." '{"ha-mode":"nodes","ha-params":["rabbit@nodeA", "rabbit@nodeB"]}' ``` - `rabbitmqctl set_policy`:固定写法 - `ha-nodes`:策略名称,自定义 - `"^nodes\."`:匹配队列的正则表达式,符合命名规则的队列才生效,这里是任何以`nodes.`开头的队列名称 - `'{"ha-mode":"nodes","ha-params":["rabbit@nodeA", "rabbit@nodeB"]}'`: 策略内容 - `"ha-mode":"nodes"`:策略模式,此处是nodes模式 - `"ha-params":["rabbit@mq1", "rabbit@mq2"]`:策略参数,这里指定副本所在节点名称 # 2、仲裁队列 > 从RabbitMQ 3.8版本开始,引入了新的仲裁队列,他具备与镜像队里类似的功能,但使用更加方便,它具备以下特征。 - 与镜像队列一样,都是主从模式,支持主从数据同步 - 使用非常简单,没有复杂的配置 - 主从同步基于Raft协议,强一致 ## 2.1 部署 在任意控制台添加一个队列,一定要选择队列类型为Quorum类型。 <img src="https://pic.code-nav.cn/post_picture/1620630456775032833/ZPXaq4HB2YU8XMCJ.webp" alt="28" width="100%" /> 在任意控制台查看队列: <img src="https://pic.code-nav.cn/post_picture/1620630456775032833/aUKqXFVgKFarMMZC.webp" alt="29" width="100%" /> 可以看到,仲裁队列的 + 2字样。代表这个队列有2个镜像节点。 因为仲裁队列默认的镜像数为5。如果你的集群有7个节点,那么镜像数肯定是5;而我们集群只有3个节点,因此镜像数量就是3. 测试参考镜像集群的方式,效果是一样的。 ## 2.2 .Java代码创建仲裁队列 要创建仲裁队列记得先去配置集群。 ```java @Bean public Queue quorumQueue() { return QueueBuilder .durable("quorum.queue") // 持久化 .quorum() // 仲裁队列 .build(); } ``` ## 2.3 SpringAMQP连接MQ集群 注意,这里用address来代替host、port方式 ```java spring: rabbitmq: addresses: 192.168.58.149:8081, 192.168.58.149:8082, 192.168.58.149:8083 username: jie password: 123456 virtual-host: / ```
5、RabbitMQ消息堆积问题
当生产者发送消息的速度超过了消费者处理消息的速度,就会导致队列中的消息堆积,直到队列存储消息达到上限。最早接收到的消息,可能就会成为死信,会被丢弃,这就是消息堆积问题。 解决消息堆积有三种思路: > 1. 增加更多消费者,提高消费速度 > 2. 在消费者内开启线程池加快消息处理速度 > 3. 扩大队列容积,提高堆积上限 # 1、惰性队列 上面呢,我们已经 知道解决消息队列的常见三种解决方案,其中一种方案就是想办法去提高一个队列它能存储一个消息量的上限。 但是RabbitMQ呢是内存存储的,如果说在高并发的情况下消息量非常的大,这些消息我们如果都给它丢到内存当中,显然是不合适的,所以我们就要学习一个**惰性队列**来解决这个问题! 从RabbitMQ的3.6.0版本开始,就增加了Lazy Queues的概念,也就是惰性队列。惰性队列的特征如下: > 1. 接收到消息后直接存入磁盘而非内存 > 2. 消费者要消费消息时才会从磁盘中读取并加载到内存 > 3. 支持数百万条的消息存储 ## 1.1 基于@Bean声明lazy-queue <img src="https://pic.code-nav.cn/post_picture/1620630456775032833/1mh7PTLxvKqsOpH6.webp" alt="1" width="865px" /> ```java package com.jie.mq.config; import org.springframework.amqp.core.Queue; import org.springframework.amqp.core.QueueBuilder; import org.springframework.context.annotation.Bean; import org.springframework.context.annotation.Configuration; @Configuration public class LazyConfig { /** * @description:惰性队列 * @author: jie * @time: 2022/3/13 11:06 */ @Bean public Queue lazyQueue(){ return QueueBuilder.durable("lazy.queue") .lazy() .build(); } /** * @description:普通队列 * @author: jie * @time: 2022/3/13 11:06 */ @Bean public Queue normalQueue(){ return QueueBuilder.durable("normal.queue") .build(); } } ``` 运行,查看浏览器。 <img src="https://pic.code-nav.cn/post_picture/1620630456775032833/R8VZXmCyyqU1JhEl.webp" alt="2" width="100%" /> ## 1.2 基于@RabbitListener声明LazyQueue ```java /** * @description:声明惰性队列 * @author: jie * @time: 2022/3/13 14:37 */ @RabbitListener(queuesToDeclare = @Queue( name = "lazy.queue", durable = "true", arguments = @Argument(name = "x-queue-mode",value = "lazy") )) public void listenLazyQueue(String msg){ System.out.println("消费者接收到simple.queue的消息:【" + msg + "】"); } ``` ## <img src="https://pic.code-nav.cn/post_picture/1620630456775032833/W0wXE0HcqwrhQMbE.webp" alt="3" width="100%" />1.3 发送消息 ```java package com.jie.mq.spring; import lombok.extern.slf4j.Slf4j; import org.junit.Test; import org.junit.runner.RunWith; import org.springframework.amqp.core.Message; import org.springframework.amqp.core.MessageBuilder; import org.springframework.amqp.core.MessageDeliveryMode; import org.springframework.amqp.rabbit.core.RabbitTemplate; import org.springframework.beans.factory.annotation.Autowired; import org.springframework.boot.test.context.SpringBootTest; import org.springframework.test.context.junit4.SpringRunner; import java.nio.charset.StandardCharsets; @Slf4j @RunWith(SpringRunner.class) @SpringBootTest public class SpringAmqpTest { @Autowired private RabbitTemplate rabbitTemplate; @Test public void testLazyQueue() throws InterruptedException { for (int i = 0; i < 1000000; i++) { String routingKey = "delay"; //1、准备消息 Message message = MessageBuilder .withBody("hell,Spring".getBytes(StandardCharsets.UTF_8)) .setDeliveryMode(MessageDeliveryMode.NON_PERSISTENT) .build(); //2、发送消息 rabbitTemplate.convertAndSend("lazy.queue", message); } } @Test public void testNormaQueue() throws InterruptedException { for (int i = 0; i < 1000000; i++) { String routingKey = "delay"; //1、准备消息 Message message = MessageBuilder .withBody("hell,Spring".getBytes(StandardCharsets.UTF_8)) .setDeliveryMode(MessageDeliveryMode.NON_PERSISTENT) .build(); //2、发送消息 rabbitTemplate.convertAndSend("normal.queue", message); } } } ``` # 2、总结 消息堆积问题的解决方案? > 1. 队列上绑定多个消费者,提高消费速度 > 2. 使用惰性队列,可以再mq中保存更多消息 惰性队列的优点有哪些? > 1. 基于磁盘存储,消息上限高 > 2. 没有间歇性的page-out,性能比较稳定 惰性队列的缺点有哪些? > 1. 基于磁盘存储,消息时效性会降低 > 2. 性能受限于磁盘的IO
4、RabbitMQ延迟消息问题(含Demo工程)
> 本篇博客带大家研究MQ的延迟消息问题,在此之前先了解一下死信交换机。 ## 1、什么是死信交换机 首先我们要知道什么是死信? 当一个队列中的消息满足下列情况之一时,可以成为死信(dead letter): > 1. 消费者使用basic.reject或 basic.nack声明消费失败,并且消息的requeue参数设置为false。 > 2. 消息是一个过期消息,超时无人消费。 > 3. 要投递的队列消息堆积满了,最早的消息可能成为死信。 一般呢?一旦消息变成死信是会被我们丢弃的,但是有了死信交换机就不一样了。 > 如果这个包含死信的队列配置了`dead-letter-exchange`属性,指定了一个交换机,那么队列中的死信就会投递到这个交换机中,而这个交换机称为**死信交换机**(Dead Letter Exchange,简称DLX)。 其实呢,所谓的死信交换机就是一个普通交换机,只不过是某个队列用dead-letter-exchange这个属性绑定到一起了,当这个队列出现了死信,就会丢到我们这个死信交换机里了,就有点像垃圾桶一样的了。 如图,一个消息被消费者拒绝了,变成了死信:<img src="https://pic.code-nav.cn/post_picture/1620630456775032833/0gjf1c9h1gpyBhi3.webp" alt="" width="895px" /> 因为simple.queue绑定了死信交换机 dl.direct,因此死信会投递给这个交换机:<img src="https://pic.code-nav.cn/post_picture/1620630456775032833/MNXJ97WgyOwPhNte.webp" alt="" width="903px" /> 如果这个死信交换机也绑定了一个队列,则消息最终会进入这个存放死信的队列: <img src="https://pic.code-nav.cn/post_picture/1620630456775032833/ffrI5x2wT1ojJQV5.webp" alt="" width="921px" /> 另外,队列将死信投递给死信交换机时,必须知道两个信息: > - 死信交换机名称 > - 死信交换机与[死信队列](https://so.csdn.net/so/search?q=%E6%AD%BB%E4%BF%A1%E9%98%9F%E5%88%97&spm=1001.2101.3001.7020)绑定的RoutingKey 这样才能确保投递的消息能到达死信交换机,并且正确的路由到死信队列。 小结: 什么样的消息会成为死信? > 1. 消息被消费者reject或者返回nack。 > 2. 消息超时未消费。 > 3. 队列满了。 ## 2、TTL TTL,也就是Time-To-Live。如果一个队列中的消息TTL结束仍未消费,则会变为死信,TTL超时分为两种情况: > - 消息所在的队列设置了超时时间 > - 消息本身设置了超时时间 <img src="https://pic.code-nav.cn/post_picture/1620630456775032833/Yytjvk1IUhoblmlH.webp" alt="" width="902px" /> ### 2.1 Demo #### 1、准备接收超时死信的死信交换机 在consumer服务的SpringRabbitListener中,定义一个新的消费者,并且声明 死信交换机、死信队列: ```java @RabbitListener(bindings = @QueueBinding( //队列,持久化为true value = @Queue(name = "dl.ttl.queue", durable = "true"), //交换机 exchange = @Exchange(name = "dl.ttl.direct"), //Routing Key key = "ttl" ))public void listenDlQueue(String msg){ log.info("接收到 dl.ttl.queue的延迟消息:{}", msg);} ``` #### 2、声明一个队列,并且指定TTL ```java package com.jie.mq.config;import org.springframework.amqp.core.*;import org.springframework.context.annotation.Bean;import org.springframework.context.annotation.Configuration;@Configurationpublic class TTLMessageConfig {@Beanpublic DirectExchange ttlDirectExchange(){return new DirectExchange("ttl.direct"); }@Beanpublic Queue ttlQueue(){return QueueBuilder .durable("ttl.queue") .ttl(10000) .deadLetterExchange("dl.ttl.direct") .deadLetterRoutingKey("dl") .build(); }@Beanpublic Binding ttlBinding(){return BindingBuilder.bind(ttlQueue()).to(ttlDirectExchange()).with("ttl"); }} ``` #### 3、发送消息 3.1 不指定TTL。 ```java @Testpublic void testTTLQueue() {String message = "hello, ttl queue";CorrelationData correlationData = new CorrelationData(UUID.randomUUID().toString()); rabbitTemplate.convertAndSend("ttl.direct", "ttl", message, correlationData); log.error("发送消息成功"); } ``` 消息发送时间: <img src="https://pic.code-nav.cn/post_picture/1620630456775032833/KBseM736BUvrWNbZ.webp" alt="" width="100%" /> 接受消息的时间:<img src="https://pic.code-nav.cn/post_picture/1620630456775032833/YDfe5a4BksFyBlUW.webp" alt="" width="100%" /> > 因为队列的TTL值是10000ms,也就是10秒。可以看到消息发送与接收之间的时差刚好是10秒。 我们这个是基于队列去设置延迟时间,我们给队列设置了10秒钟,我们也可以给消息设置延迟。 3.2 指定TTL ```java public void testTTLMessage() {Message message = MessageBuilder .withBody("hell,TTL".getBytes(StandardCharsets.UTF_8)) .setDeliveryMode(MessageDeliveryMode.PERSISTENT) .setExpiration("5000") .build(); rabbitTemplate.convertAndSend("ttl.direct","ttl",message); log.info("消息已经成功发送!"); } ``` 这里呢?我们的队列是10秒,而消息是5秒,到底是哪个优先呢?还是15秒呢? 消息发送时间:<img src="https://pic.code-nav.cn/post_picture/1620630456775032833/A6x1ktHTCvfxY2QC.png" alt="" width="100%" /> 消息接受时间:<img src="https://pic.code-nav.cn/post_picture/1620630456775032833/h469wqy0eMT42SMG.webp" alt="" width="100%" /> 这里我们可以看出,当两个都有延迟的时候,它会以较短的时间为准。 #### 4、小结 消息超时的两种方式是? > - 给队列设置ttl属性,进入队列后超过ttl时间的消息变为死信 > - 给消息设置ttl属性,队列接收到消息超过ttl时间后变为死信 如何实现发送一个消息20秒后消费者才收到消息? > - 给消息的目标队列指定死信交换机 > - 将消费者监听的队列绑定到死信交换机 > - 发送消息时给消息设置超时时间为20秒 ## 3、[延迟队列](https://so.csdn.net/so/search?q=%E5%BB%B6%E8%BF%9F%E9%98%9F%E5%88%97&spm=1001.2101.3001.7020) 概念: > 利用TTL结合死信交换机,我们实现了消息发出后,消费者延迟收到消息的效果。这种消息模式就称为延迟队列(Delay Queue)模式。 延迟队列的使用场景包括: > 1、延迟发送短信。 > > 2、用户下单,如果用户在15 分钟内未支付,则自动取消。 > > 3、预约工作会议,20分钟后自动通知所有参会人员。 因为延迟队列的需求非常多,所以RabbitMQ的官方也推出了一个插件,原生支持延迟队列效果。 > 这个插件就是DelayExchange插件。参考RabbitMQ的插件列表页面:[Community Plugins — RabbitMQ](https://www.rabbitmq.com/community-plugins.html "Community Plugins — RabbitMQ") > 使用方式可以参考官网地址:[Scheduling Messages with RabbitMQ | RabbitMQ - Blog](https://blog.rabbitmq.com/posts/2015/04/scheduling-messages-with-rabbitmq "Scheduling Messages with RabbitMQ | RabbitMQ - Blog") ### 3.1 安装DelayExchange插件 > 官方的安装指南地址为:[Scheduling Messages with RabbitMQ | RabbitMQ - Blog](https://blog.rabbitmq.com/posts/2015/04/scheduling-messages-with-rabbitmq "Scheduling Messages with RabbitMQ | RabbitMQ - Blog") 上述文档是基于linux原生安装RabbitMQ,然后安装插件。 因为我是基于Docker安装RabbitMQ,所以下面我会讲解基于Docker来安装RabbitMQ插件。 > RabbitMQ有一个官方的插件社区,地址为:[Community Plugins — RabbitMQ](https://www.rabbitmq.com/community-plugins.html "Community Plugins — RabbitMQ") 其中包含各种各样的插件,包括我们要使用的DelayExchange插件: <img src="https://pic.code-nav.cn/post_picture/1620630456775032833/uzbe8ueKTBi1Aftr.webp" alt="" width="100%" /> 下载好后,就会获得一个ez文件。 <img src="https://pic.code-nav.cn/post_picture/1620630456775032833/MBWoZSLTsiS31mt7.png" alt="" width="1013px" /> #### 1、上传插件 因为我们是基于Docker安装,所以需要先查看RabbitMQ的插件目录对应的数据卷。 我之前设定的RabbitMQ的数据卷名称为`mq-plugins`,所以我使用下面命令查看数据卷: ```cobol docker volume inspect mq-plugins ``` 可以得到下面结果:<img src="https://pic.code-nav.cn/post_picture/1620630456775032833/46E9lTlNjtxBRpRU.webp" alt="" width="100%" /> 接下来,将插件上传到这个目录即可:<img src="https://pic.code-nav.cn/post_picture/1620630456775032833/vi6ahbzViF8ycRQz.webp" alt="" width="100%" /> #### 2、安装插件 最后就是安装了,需要进入MQ容器内部来执行安装。我的容器名为`mq`,所以执行下面命令: ```perl docker exec -it mq bash ``` 执行时,请将其中的 `-it` 后面的`mq`替换为你自己的容器名. 进入容器内部后,执行下面命令开启插件: ```bash rabbitmq-plugins enable rabbitmq_delayed_message_exchange ``` <img src="https://pic.code-nav.cn/post_picture/1620630456775032833/ZCTLbRU43jmtZBAX.webp" alt="" width="863px" /> ### 3.2 DelayExchange原理 DelayExchange的本质还是官方的三种交换机,只是添加了延迟功能。因此使用时只需要声明一个交换机,交换机的类型可以是任意类型,然后设定delayed属性为true即可。 > 1. 接收消息。 > 2. 判断消息是否具备x-delay属性。 > 3. 如果有x-delay属性,说明是延迟消息,持久化到硬盘,读取x-delay值,作为延迟时间。 > 4. 返回routing not found结果给消息发送者。 > 5. x-delay时间到期后,重新投递消息到指定队列。 ### 3.3 使用DelayExchange 1、基于注解的方式(推荐)<img src="https://pic.code-nav.cn/post_picture/1620630456775032833/LXZ3kAy0HIoIC2Bl.webp" alt="" width="970px" /> 2、基于Bean的方式<img src="https://pic.code-nav.cn/post_picture/1620630456775032833/pBrAM40FLRp64rPN.webp" alt="" width="100%" /> ### 3.4 发送消息 发送消息时,一定要携带x-delay属性,指定延迟的时间:<img src="https://pic.code-nav.cn/post_picture/1620630456775032833/HVjsR6fOKwlTBvVQ.webp" alt="" width="100%" /> 发送消息时间:<img src="https://pic.code-nav.cn/post_picture/1620630456775032833/CWO3DMVvZVuqZf7L.png" alt="" width="100%" /> 接受消息时间:<img src="https://pic.code-nav.cn/post_picture/1620630456775032833/3hgNi13dOsl2VM2f.webp" alt="" width="100%" /> 相差五秒,说明是有用的。 ### 3.5 小结 延迟队列插件的使用步骤包括哪些? > •声明一个交换机,添加delayed属性为true > > •发送消息时,添加x-delay头,值为超时时间 ## 4、项目Demo地址 [无聊的英杰/RabbitMQ延迟消息问题](https://gitee.com/boring-yingjie/mq-deadletter-demo.git "无聊的英杰/RabbitMQ延迟消息问题")
3、RabbitMQ之消息可靠性问题(含Demo工程)
消息从发送,到消费者接收,会经历多个过程: 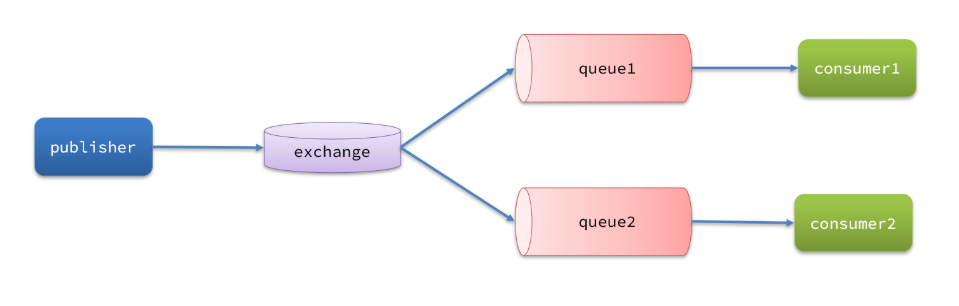 其中的每一步都可能导致消息丢失,常见的丢失原因包括: > - 发送时丢失: > - 生产者发送的消息未送达exchange > - 消息到达exchange后未到达queue > - MQ宕机,queue将消息丢失 > - consumer接收到消息后未消费就宕机 > 针对这些问题,RabbitMQ分别给出了解决方案: > - 生产者确认机制 > - mq持久化 > - 消费者确认机制 > - 失败重试机制 本篇博客就来带大家解决消息的可靠性。 # 1、导入Demo工程 导入Demo课程。 https://gitee.com/boring-yingjie/rabbit-mq-message-confirmation.git 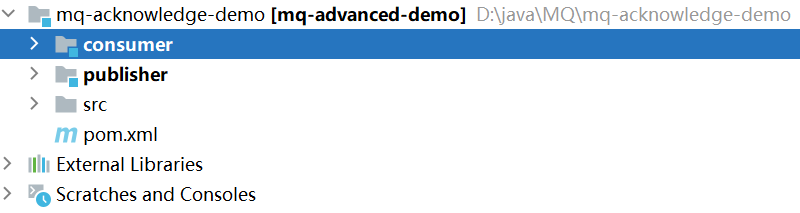 把配置文件**application.yml**配置修改完毕。 然后我们在consumer 的config包的通用配置类创建一个队列。 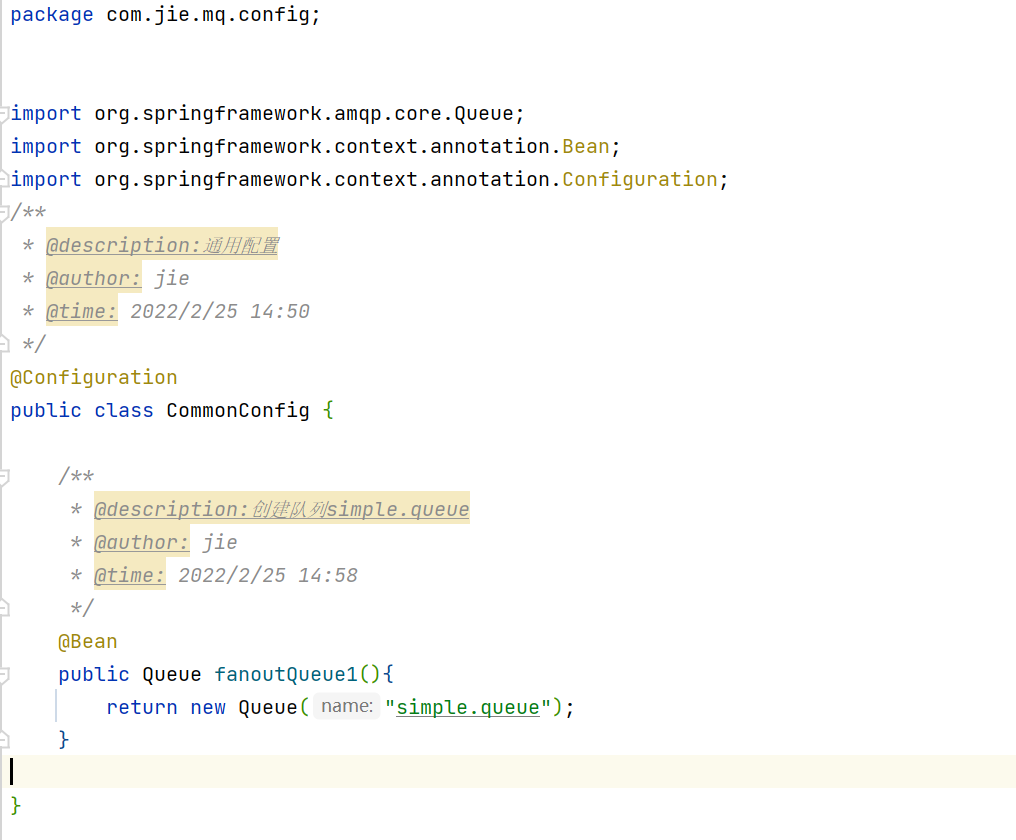 运行consumer的启动类。 <img src="https://pic.code-nav.cn/post_picture/1620630456775032833/6wcn2wsqD3coiTko.webp" alt="5" width="100%" /> # 2、生产者消息确认 生产者确认机制: > **RabbitMQ**提供了**publisher** **confirm**机制来避免消息发送到**MQ**过程中丢失。消息发送到**MQ**以后,会返回一个结果给发送者,表示消息是否处理成功。结果有两种请求: > **1. publisher-confirm**,发送者确认 > > 1. 消息成功投递到交换机,返回**Ack**(acknowledge 告知已收到)。 > 2. 消息未投递到交换机,返回**Nack(未收到)。** > > **2. publisher-return**,发送者回执 > 消息投递到交换机了,但是没有路由到队列。返回ACK,及路由失败原因。  注: > 确认机制发送消息时,需要给每个消息设置一个全局唯一id以区分不同消息,避免ACK冲突。 ## 2.1 修改配置 首先,修改publisher服务中的application.yml文件,添加下面的内容: ```yaml spring: rabbitmq: publisher-confirm-type: correlated publisher-returns: true template: mandatory: true ``` 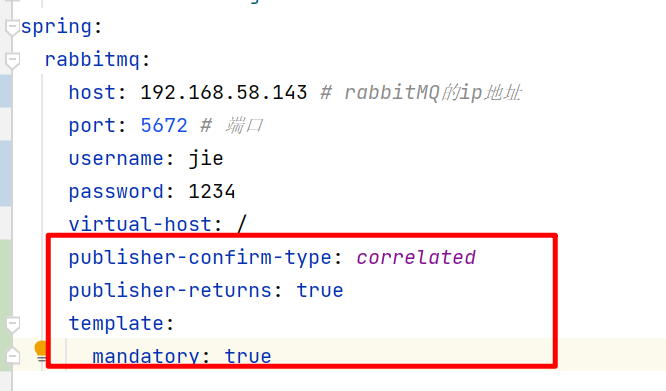 配置说明: > - `publish-confirm-type`:开启publisher-confirm,这里支持两种类型: > - `simple`:同步等待confirm结果,直到超时(可能会导致消息堵塞,不推荐)。 > - `correlated`:异步回调,定义ConfirmCallback,MQ返回结果时会回调这个ConfirmCallback。(推荐) > - `publish-returns`:开启publish-return功能,同样是基于callback机制,不过是定义ReturnCallback。 > - `template.mandatory`:定义消息路由失败时的策略。true,则调用ReturnCallback;false:则直接丢弃消息。 > ## 2.2 定义Return回调 每个RabbitTemplate只能配置一个ReturnCallback,因此需要在项目加载时配置 修改publisher服务,添加一个: 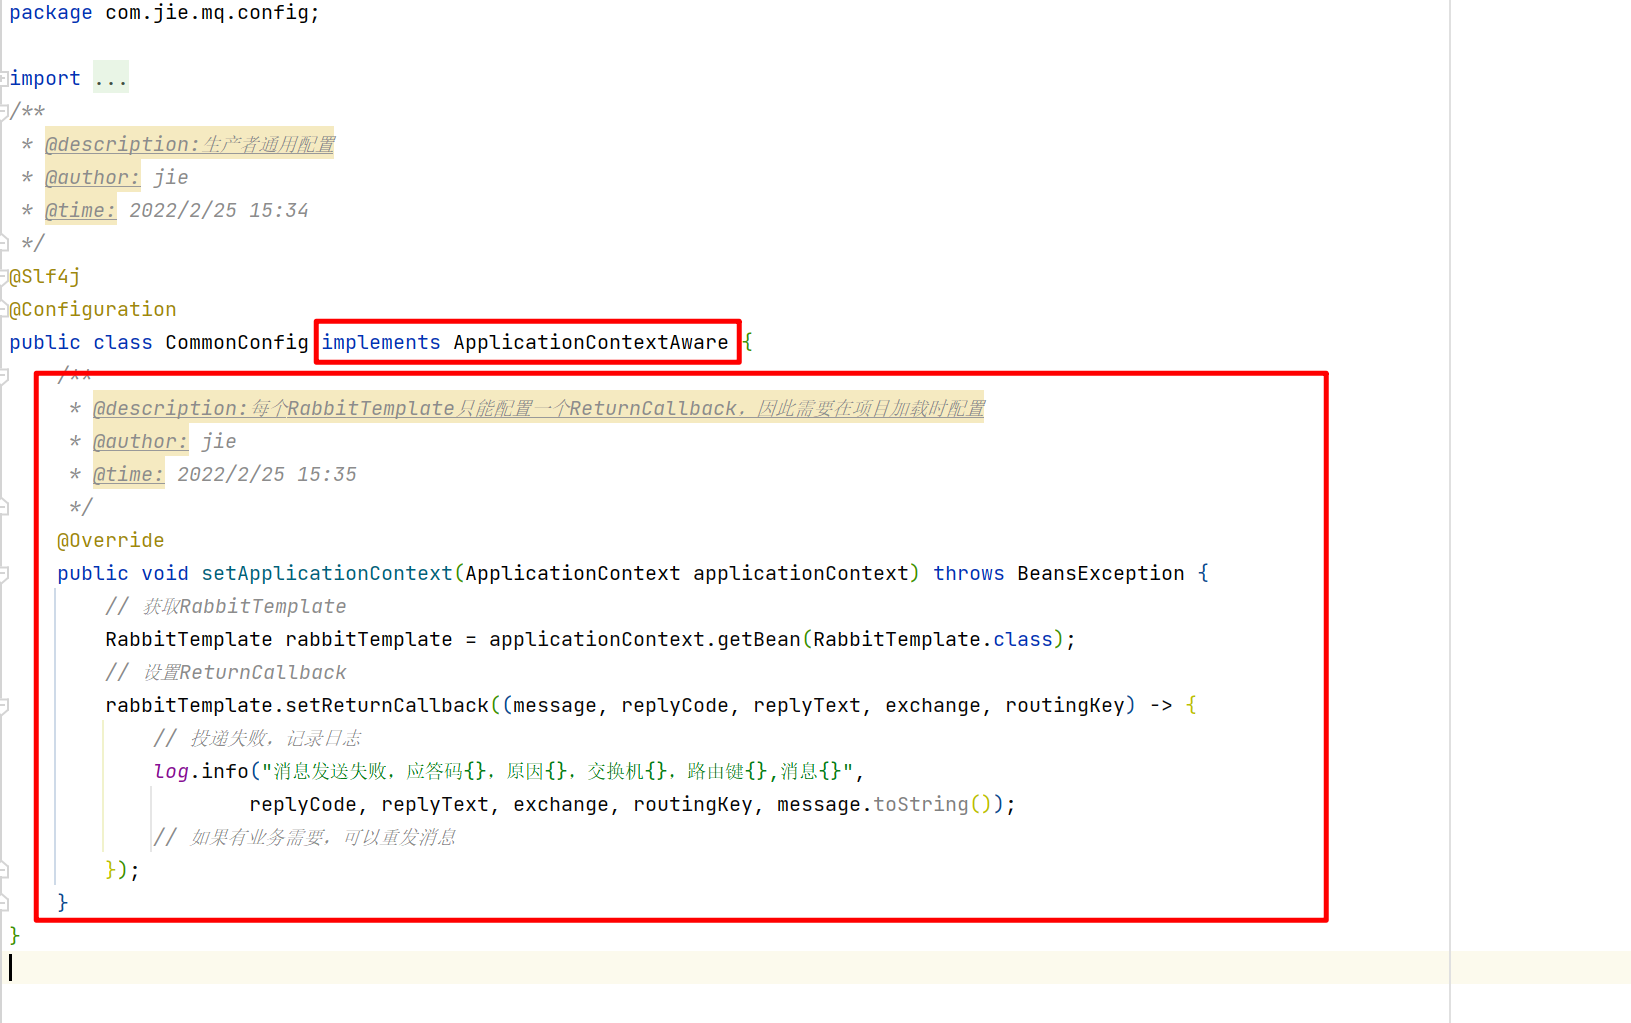 ```java package com.jie.mq.config; import lombok.extern.slf4j.Slf4j; import org.springframework.amqp.rabbit.core.RabbitTemplate; import org.springframework.amqp.support.converter.Jackson2JsonMessageConverter; import org.springframework.amqp.support.converter.MessageConverter; import org.springframework.beans.BeansException; import org.springframework.context.ApplicationContext; import org.springframework.context.ApplicationContextAware; import org.springframework.context.annotation.Bean; import org.springframework.context.annotation.Configuration; /** * @description:生产者通用配置 * @author: jie * @time: 2022/2/25 15:34 */ @Slf4j @Configuration public class CommonConfig implements ApplicationContextAware { /** * @description:每个RabbitTemplate只能配置一个ReturnCallback,因此需要在项目加载时配置 * @author: jie * @time: 2022/2/25 15:35 */ @Override public void setApplicationContext(ApplicationContext applicationContext) throws BeansException { // 获取RabbitTemplate RabbitTemplate rabbitTemplate = applicationContext.getBean(RabbitTemplate.class); // 设置ReturnCallback rabbitTemplate.setReturnCallback((message, replyCode, replyText, exchange, routingKey) -> { // 投递失败,记录日志 log.info("消息发送到队列失败,响应码{},失败原因{},交换机{},路由键{},消息{}", replyCode, replyText, exchange, routingKey, message.toString()); // 如果有业务需要,可以重发消息 }); } } ``` ## 2.3 发送消息 我们发送消息通过一个单元测试来发。 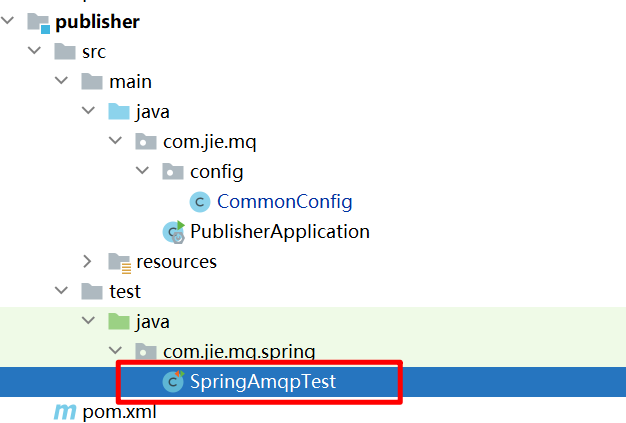 这里面有一个最简单的消息发送代码。 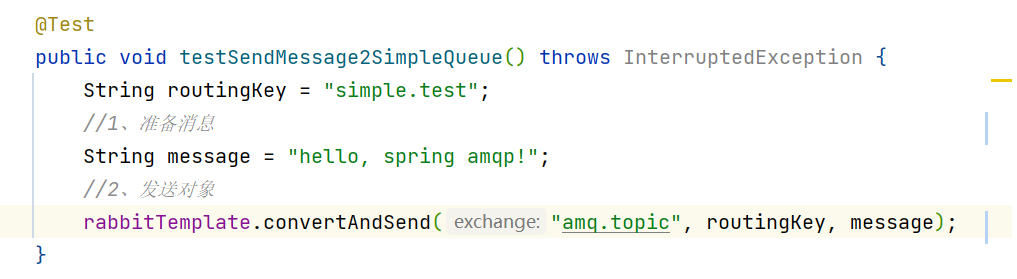 我们要去为amq.topic这个交换机绑定一下simple.queue这个队列。这里我用的是手动的方式,大家可以选择使用代码的方式。 打开浏览器 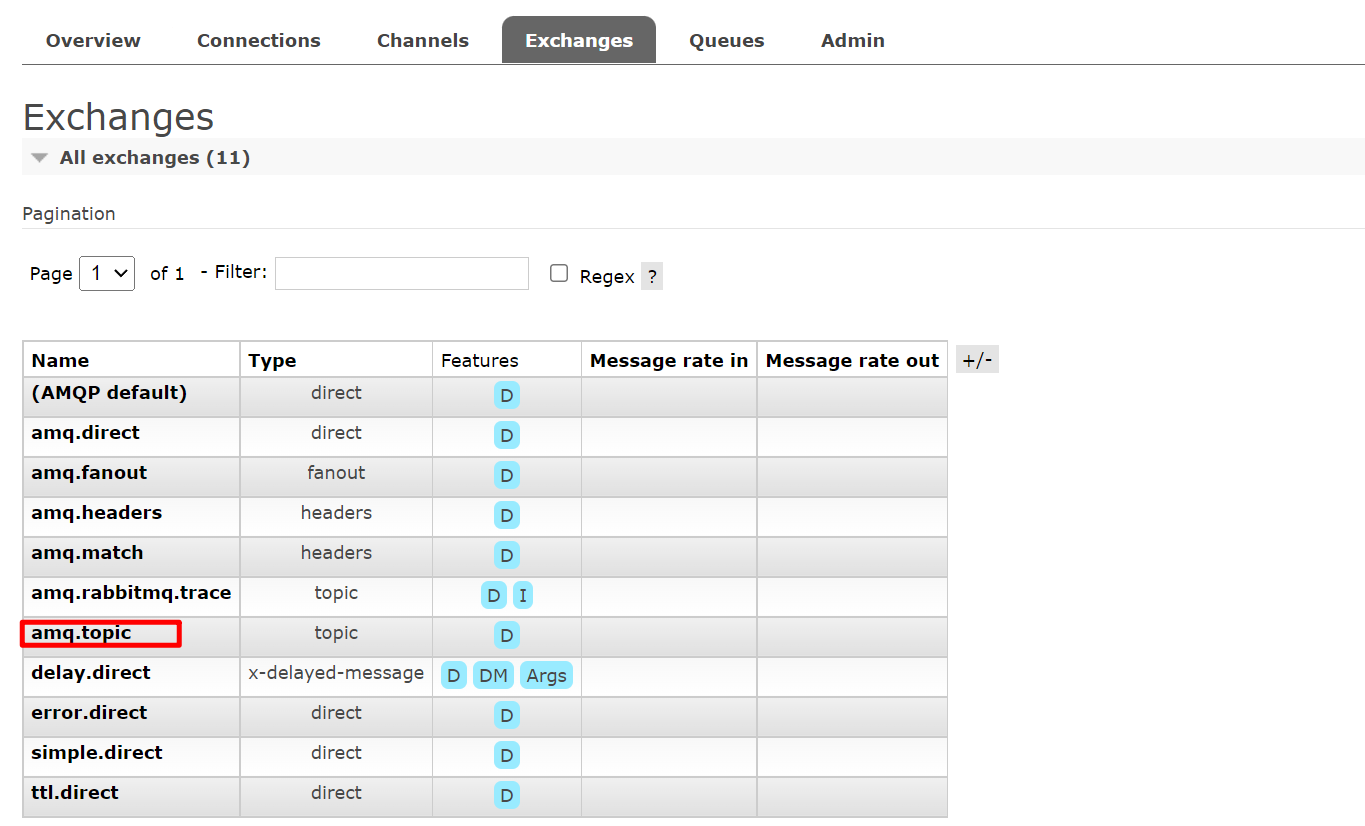 点击进去 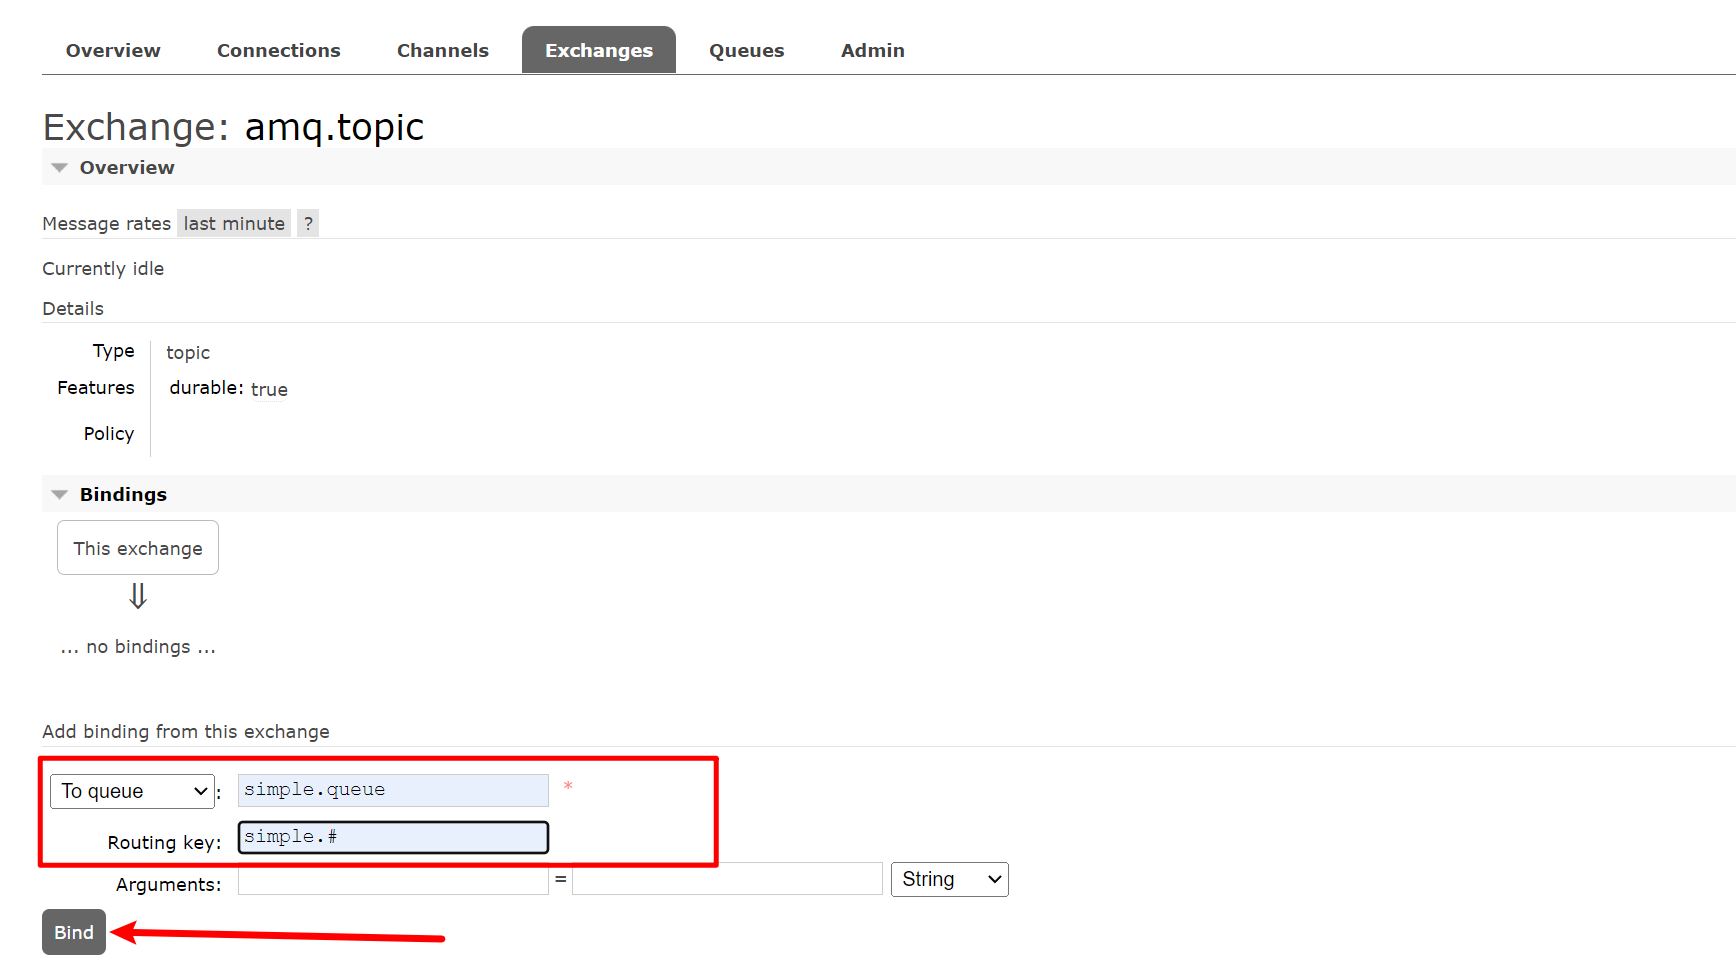 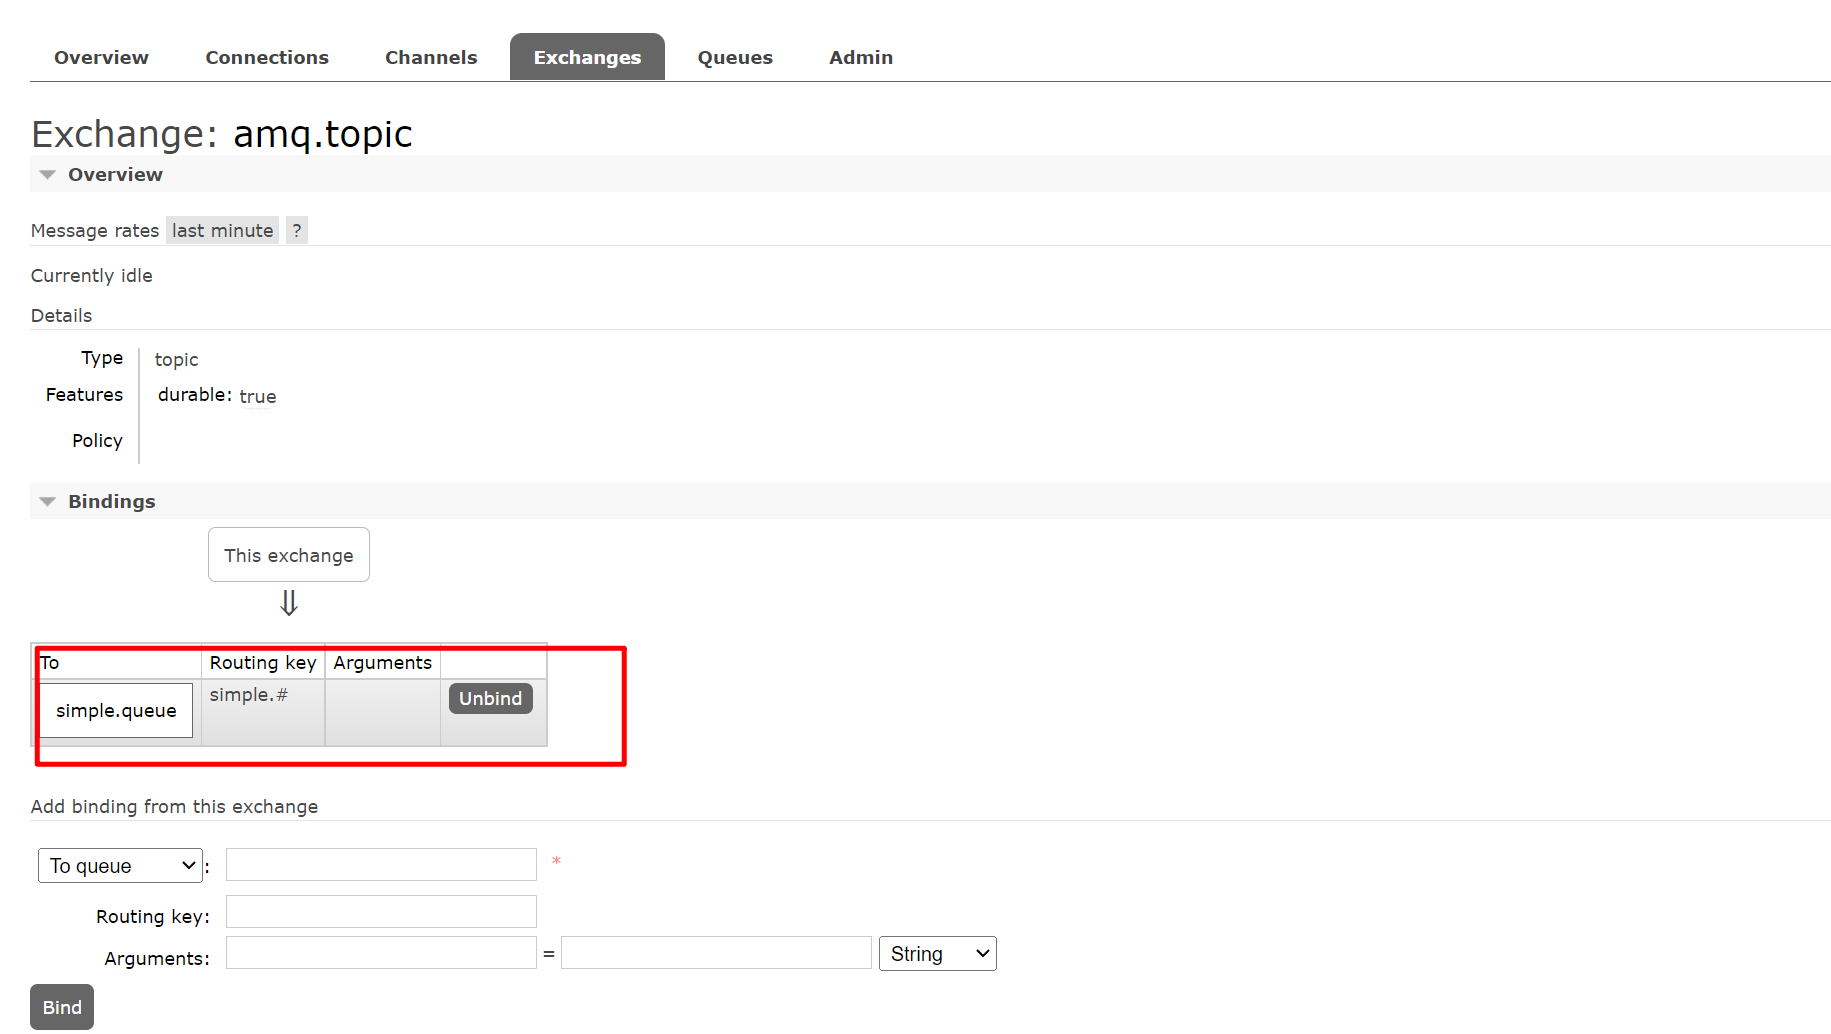 绑定完成,回到代码区,我现在发送消息,符合要求,那一定能发送成功,所以我们要修改一下代码。 ```java @Test public void testSendMessage2SimpleQueue() throws InterruptedException { String routingKey = "simple.test"; //1、准备消息 String message = "hello, spring amqp!"; //2、准备CorrelationData //2.1 消息ID CorrelationData correlationData = new CorrelationData(UUID.randomUUID().toString()); //2.2 准备ConfirmCallback //成功回调 correlationData.getFuture().addCallback(confirm -> { //判断结果 if(confirm.isAck()){ //ACK 消息成功 log.error("消息成功投递到交换机!消息ID:{}",correlationData.getId()); }else { //NACK 消息失败 log.error("消息投递到交换机失败!消息ID:{}",correlationData.getId()); //重发消息 } //失败回调 }, throwable -> { //记录日志 log.error("消息发送失败!",throwable); }); //3、发送消息 rabbitTemplate.convertAndSend("amq.topic", routingKey, message,correlationData); } ``` 我们可以先运行代码查看控制消息。 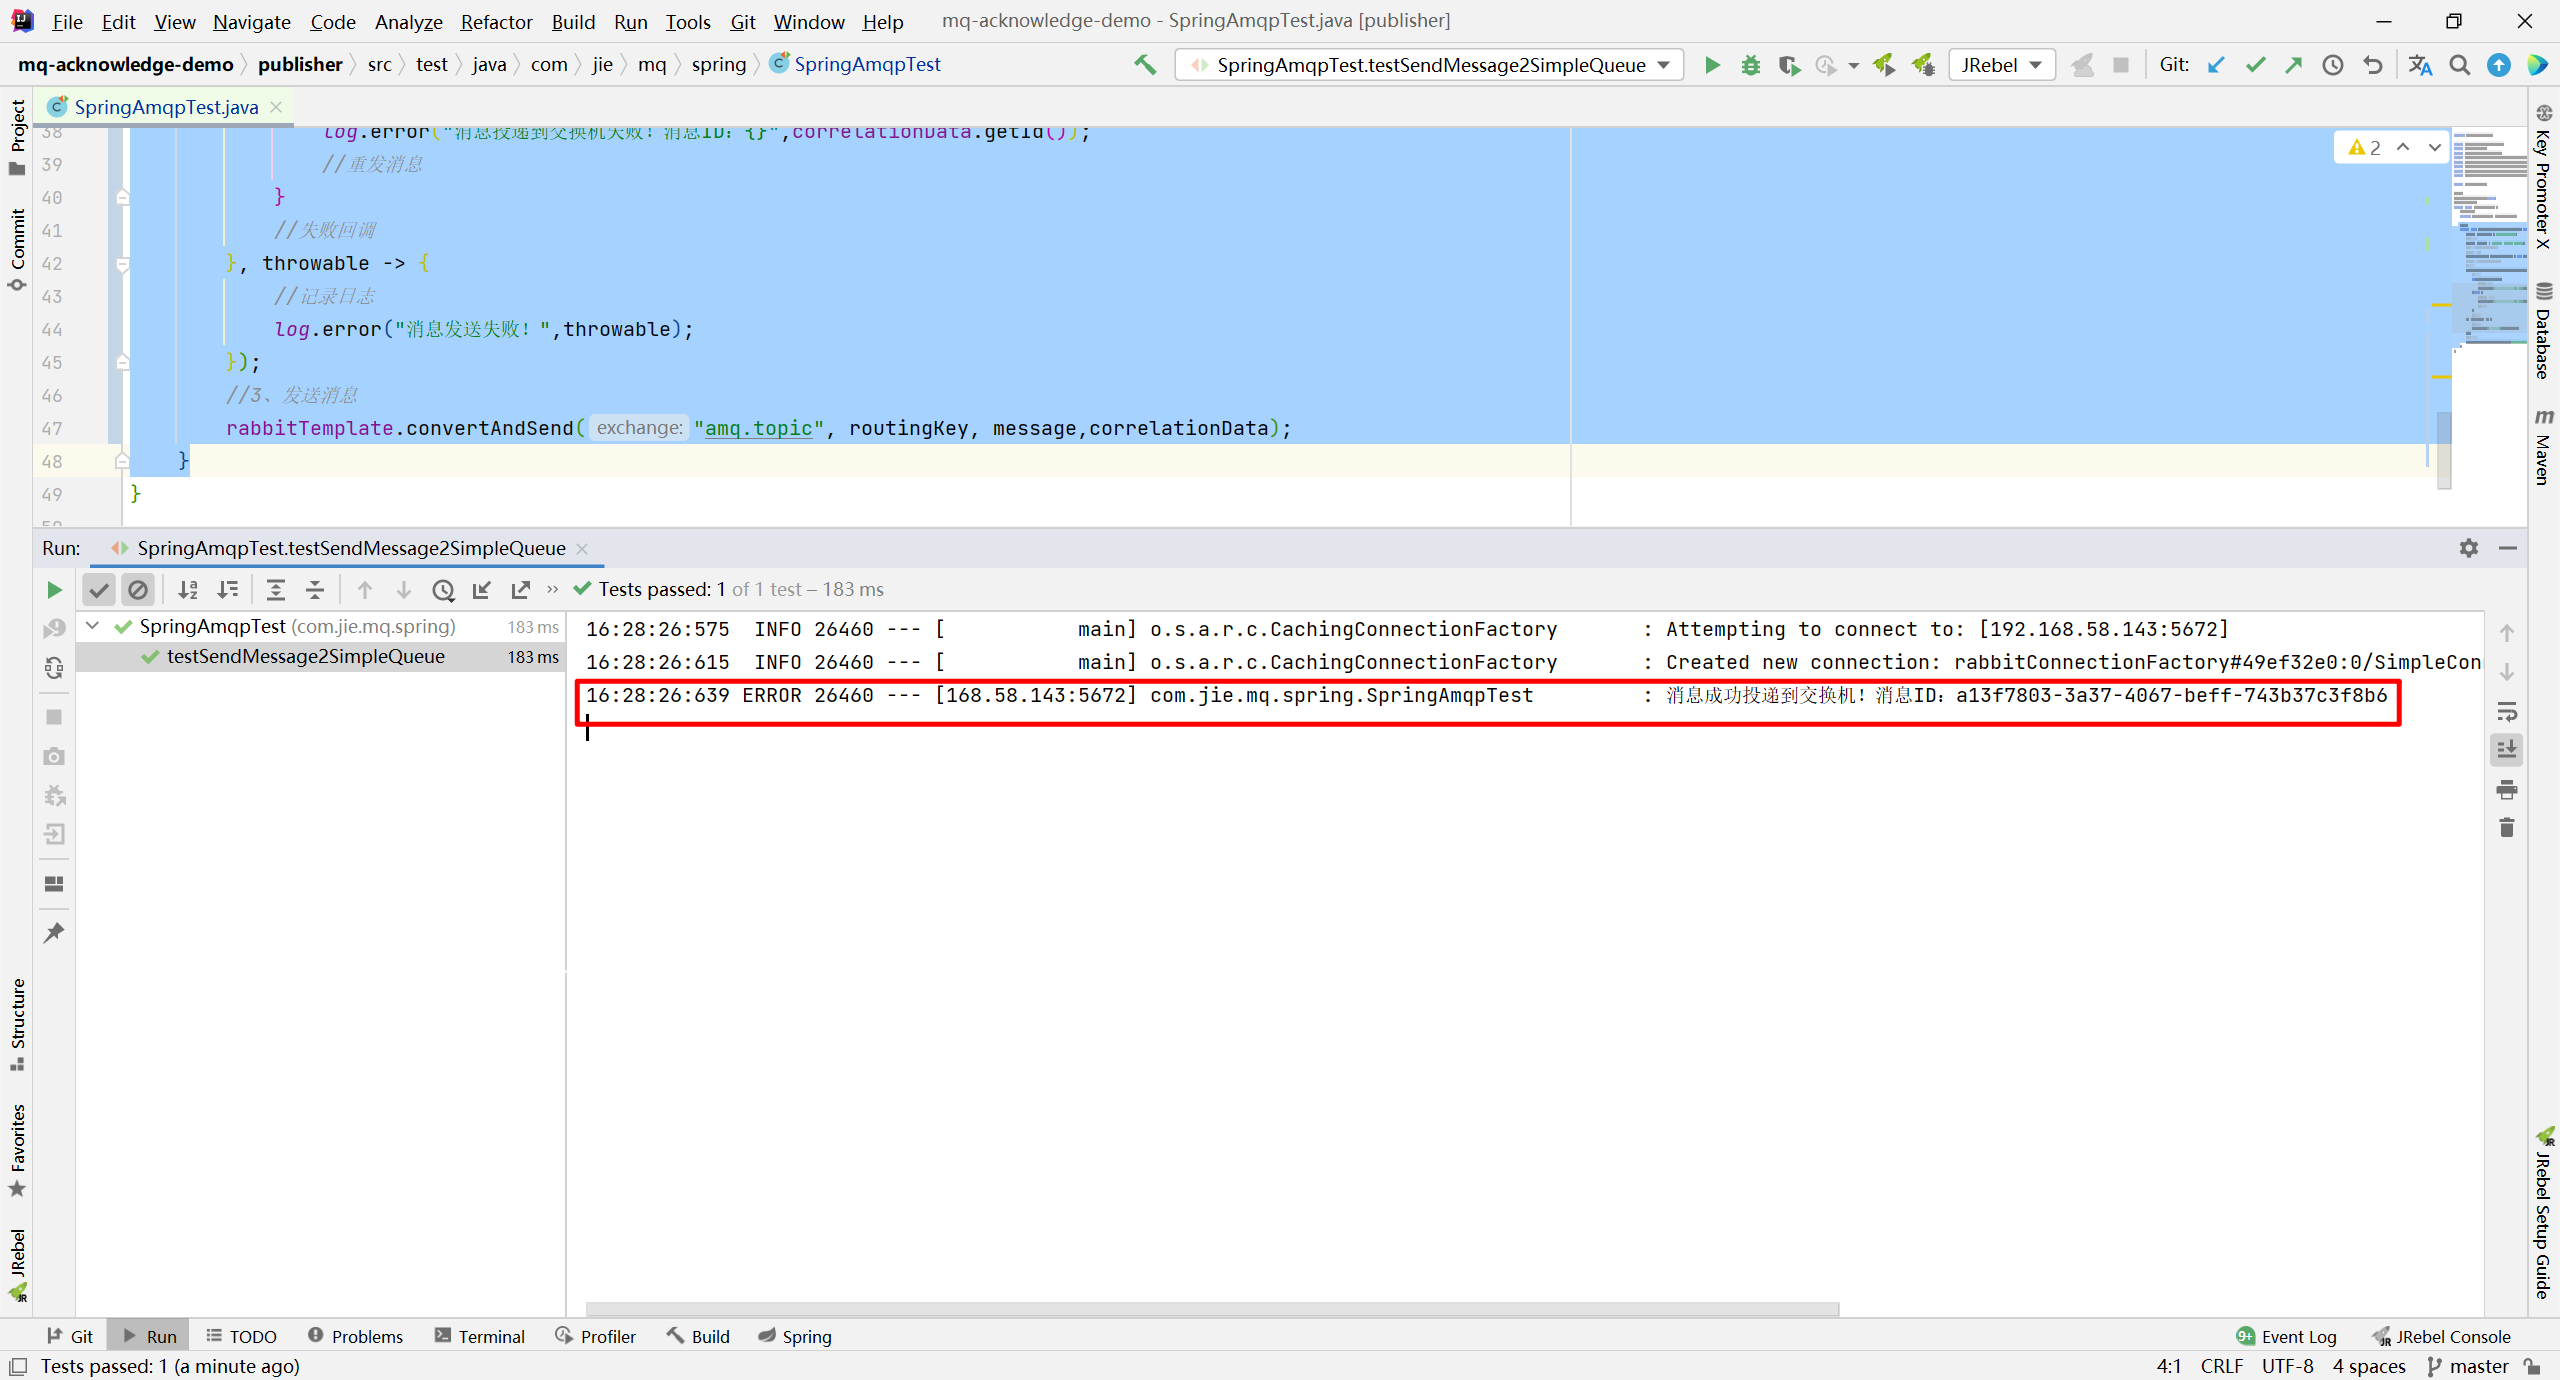 这个是成功的情况,接下来演示一下失败的情况。比如消息根本没有到达交换机,可能是交换机名称填错了。 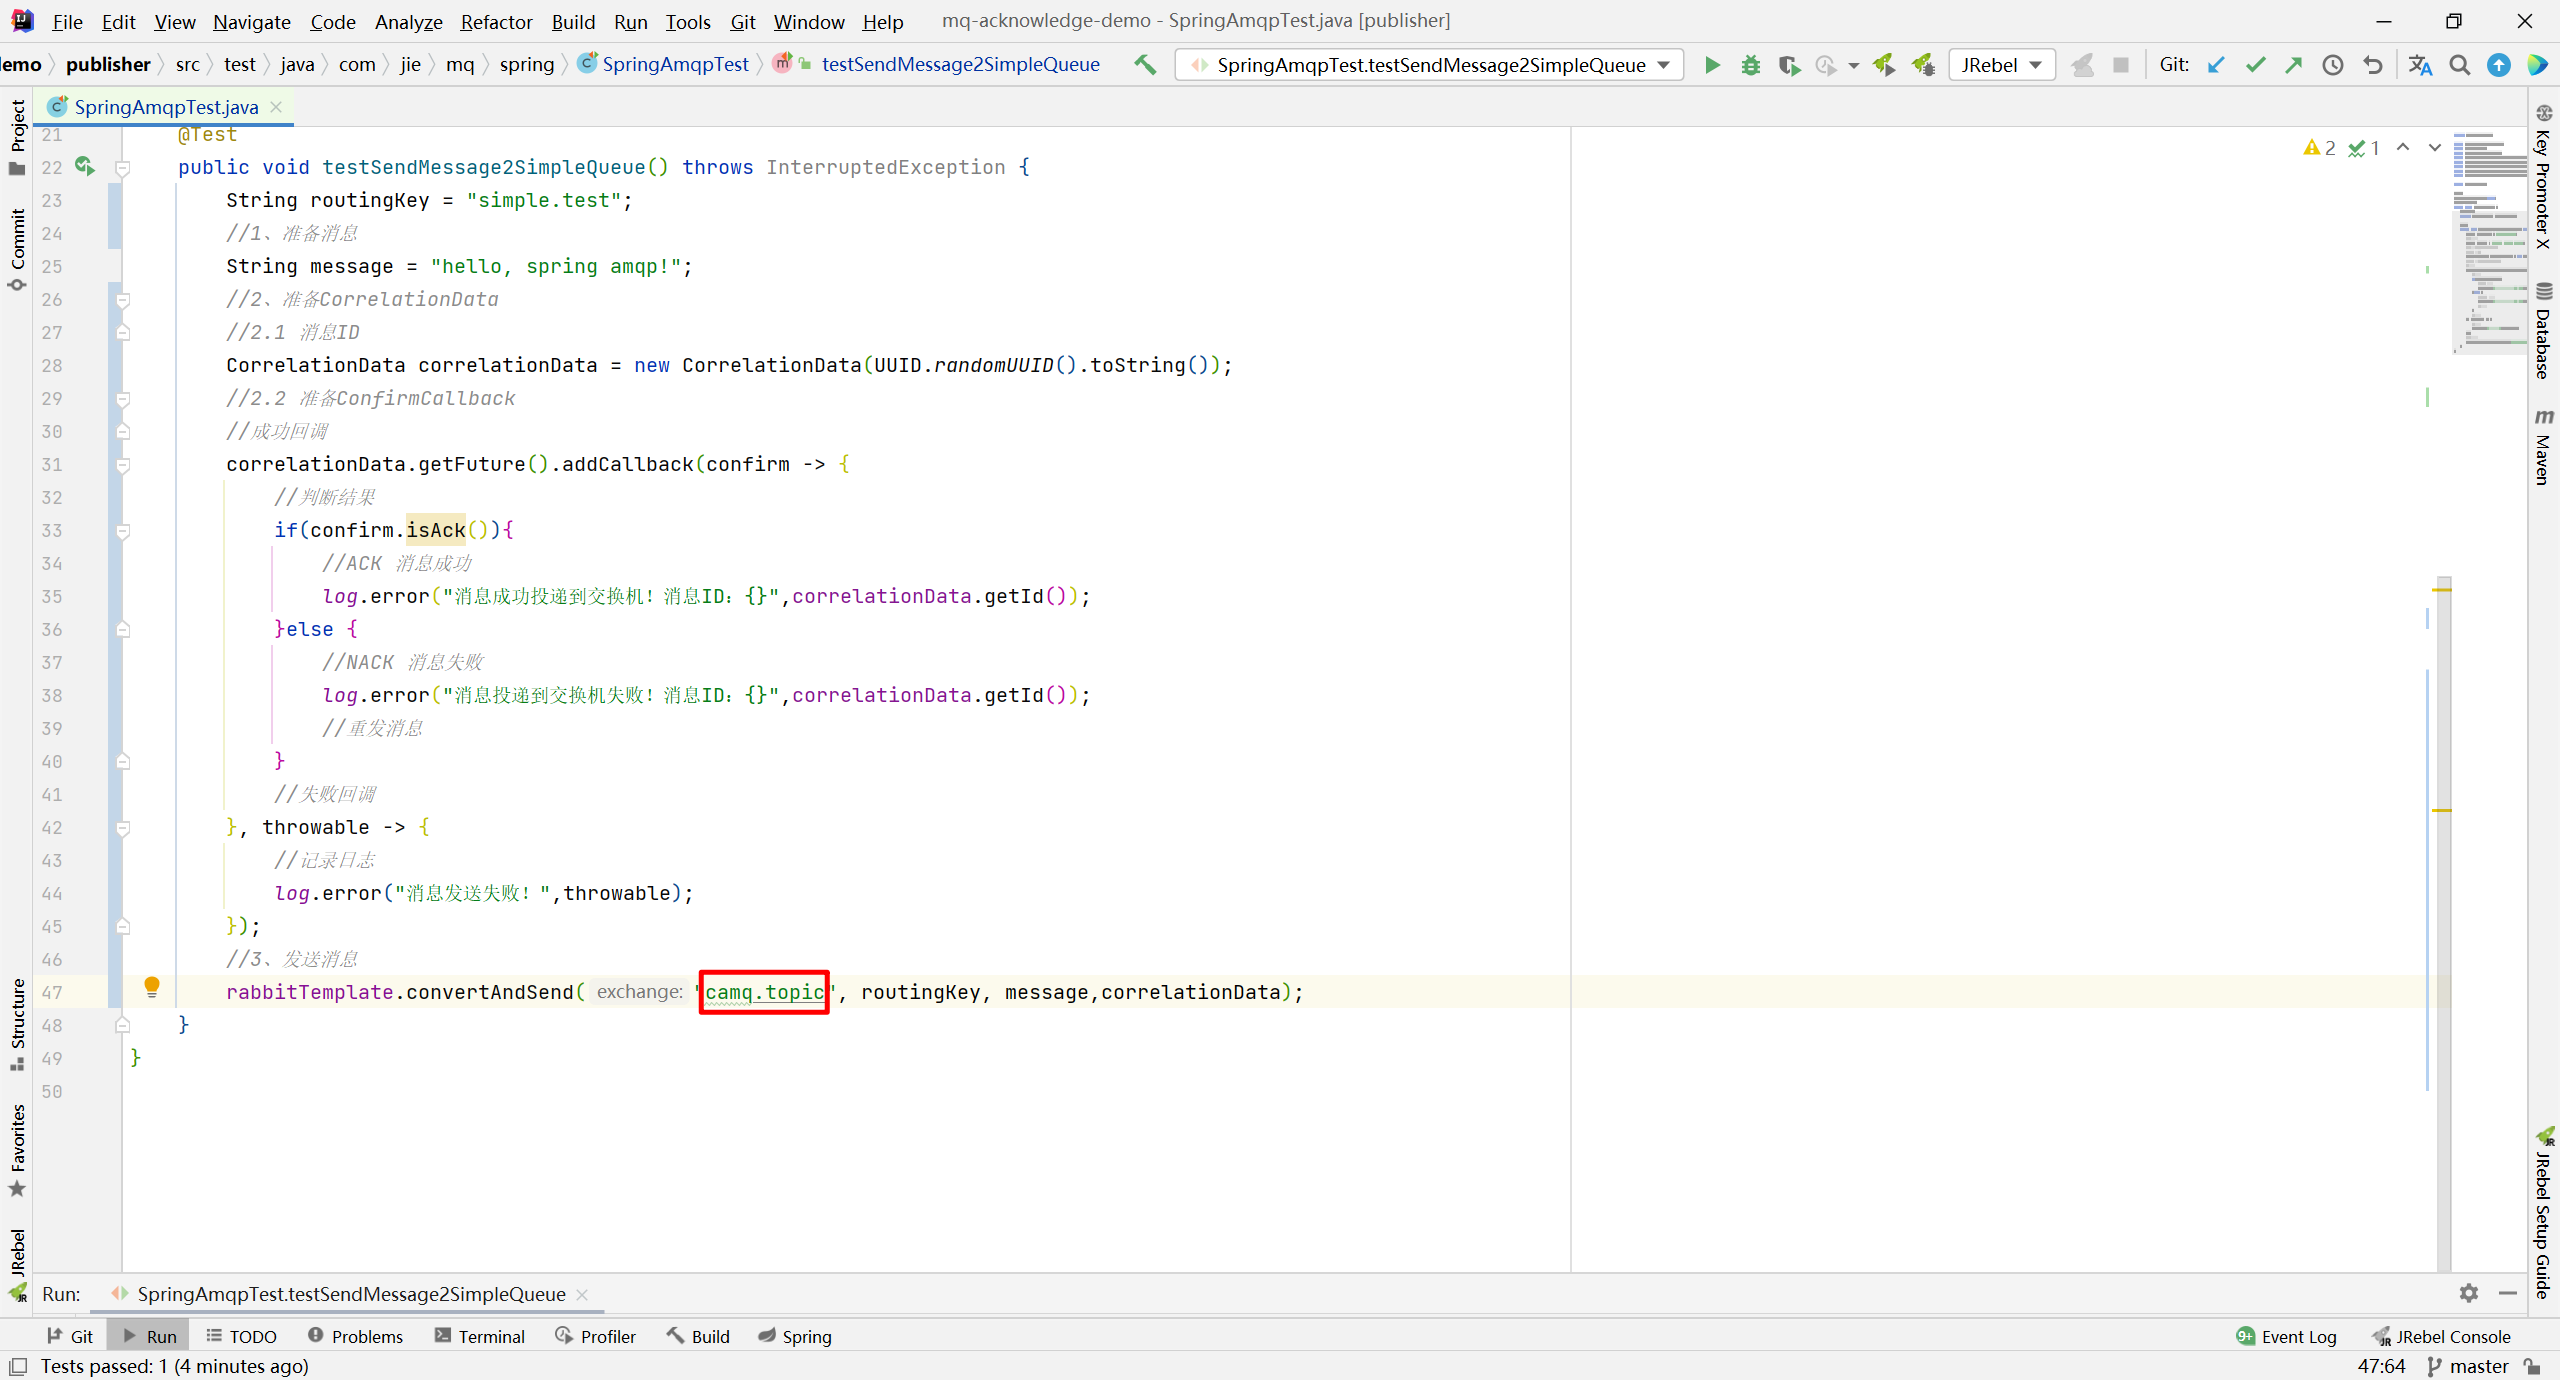 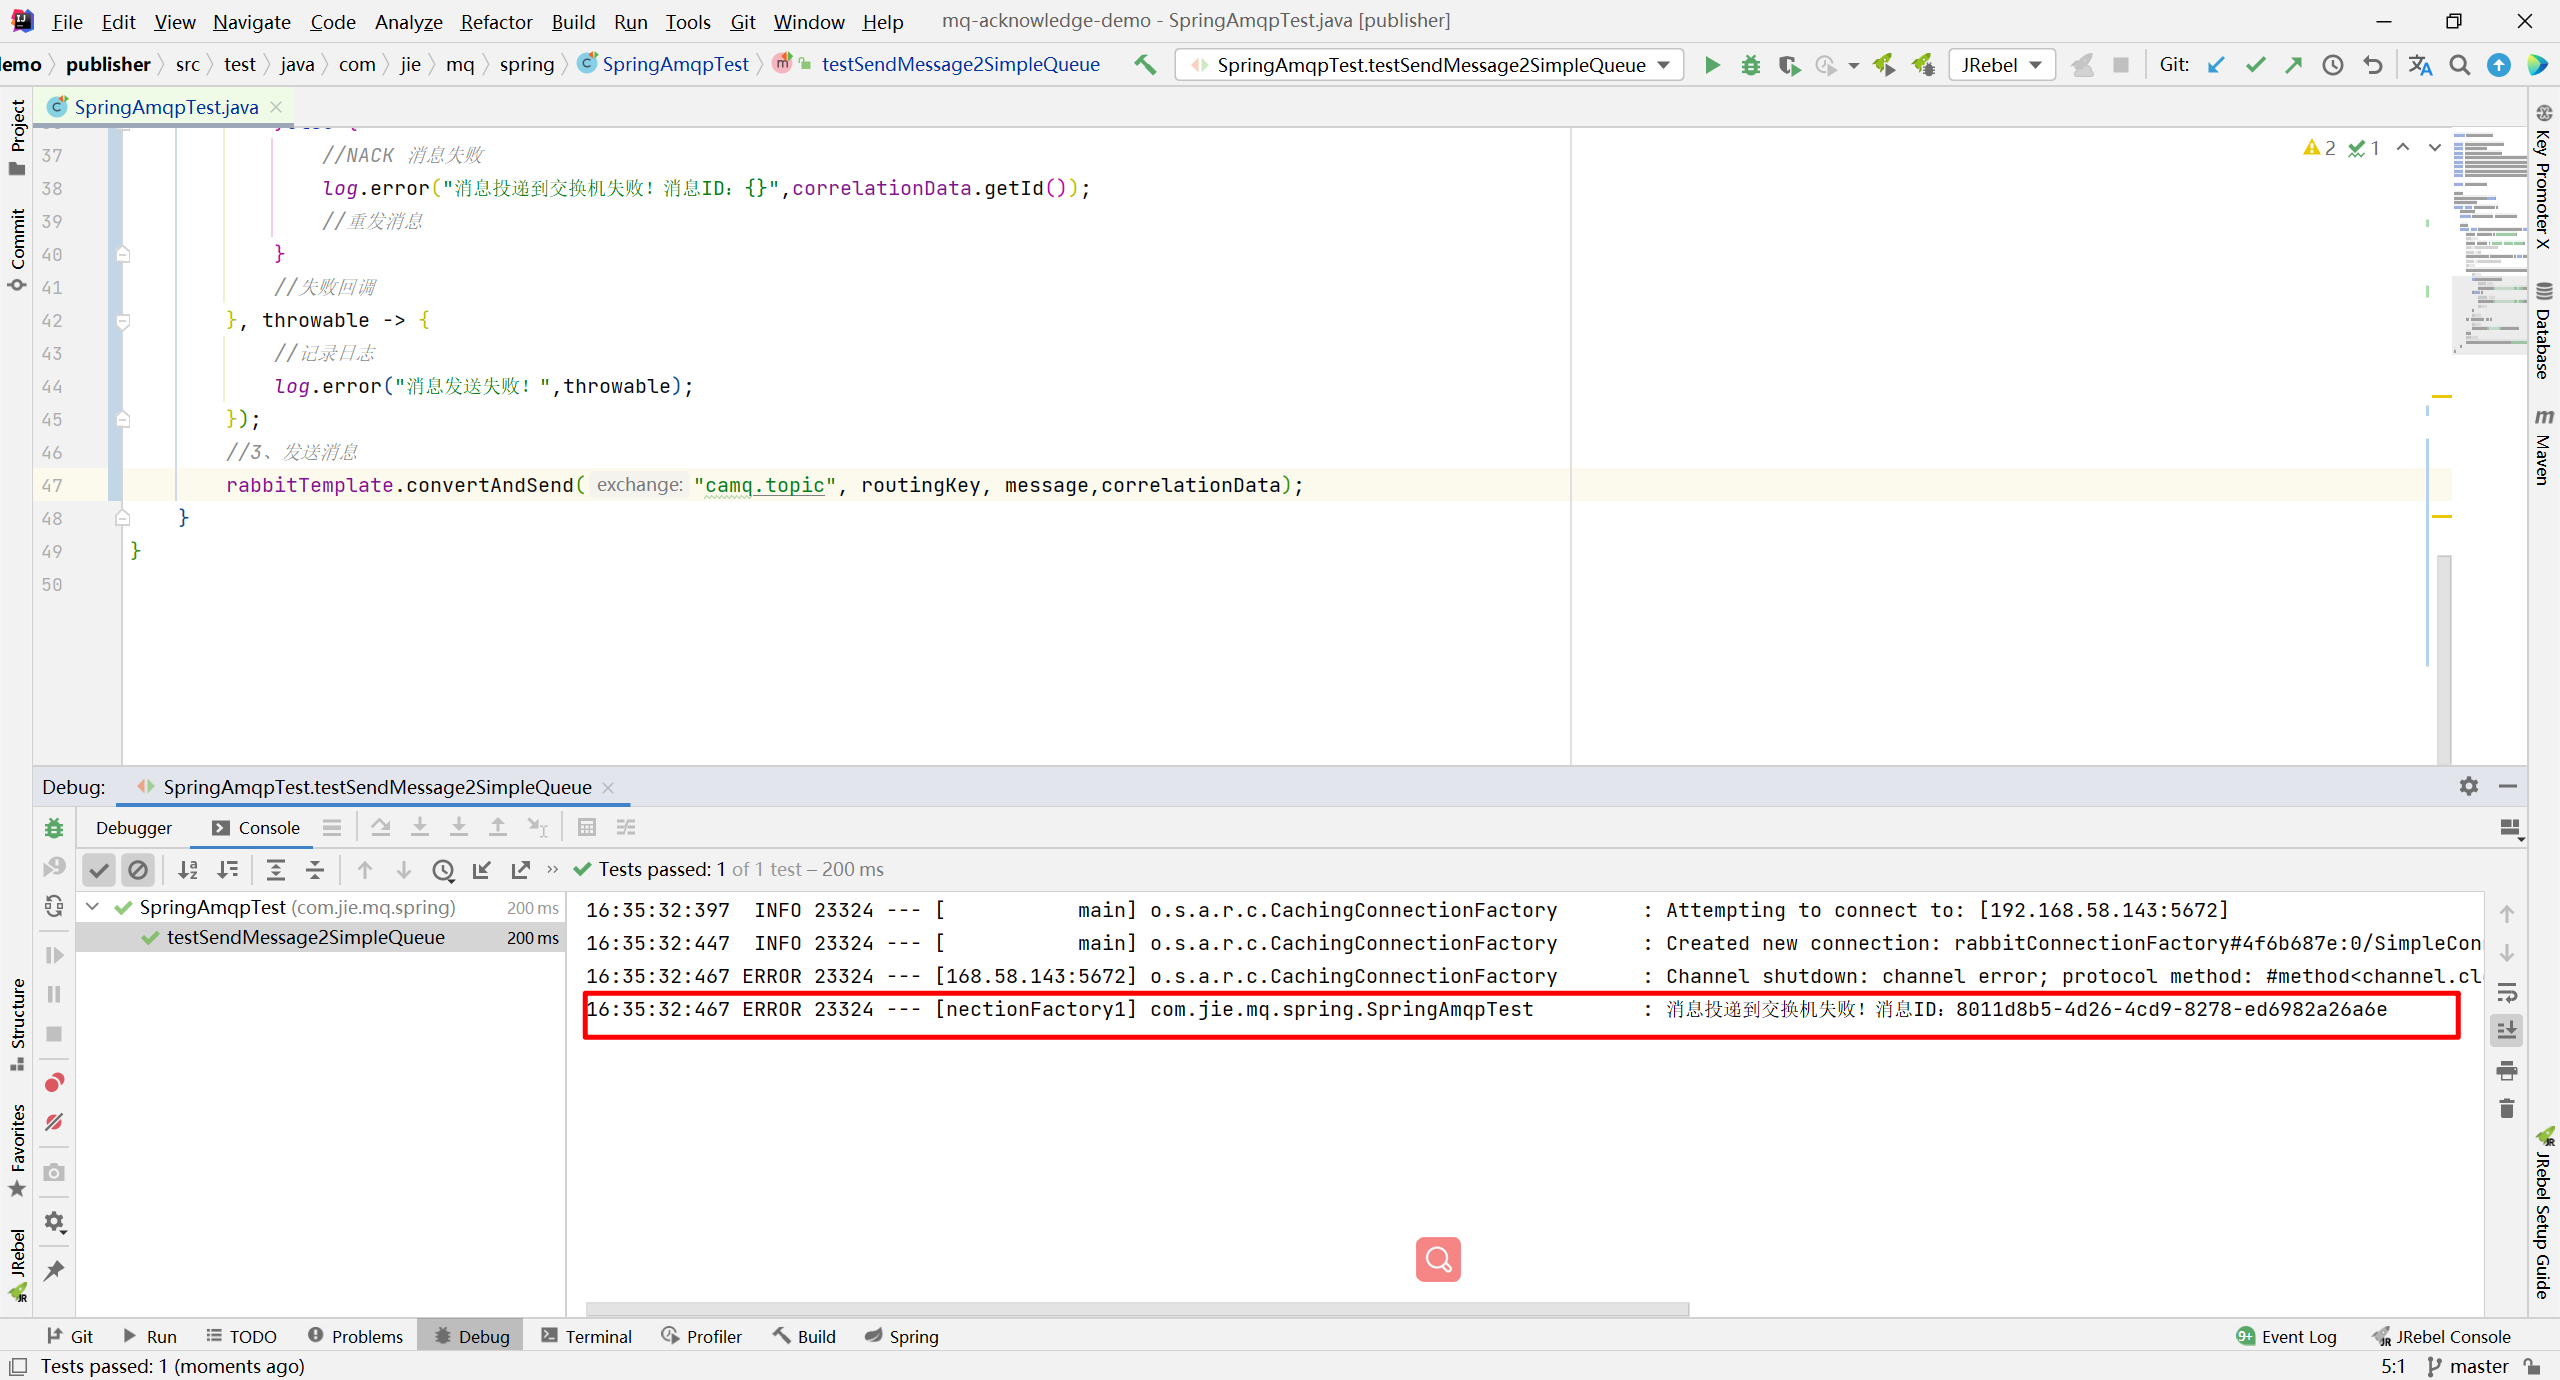 还有一种就是交换机到达了,没有到达队列。比如队列的名称填错了。 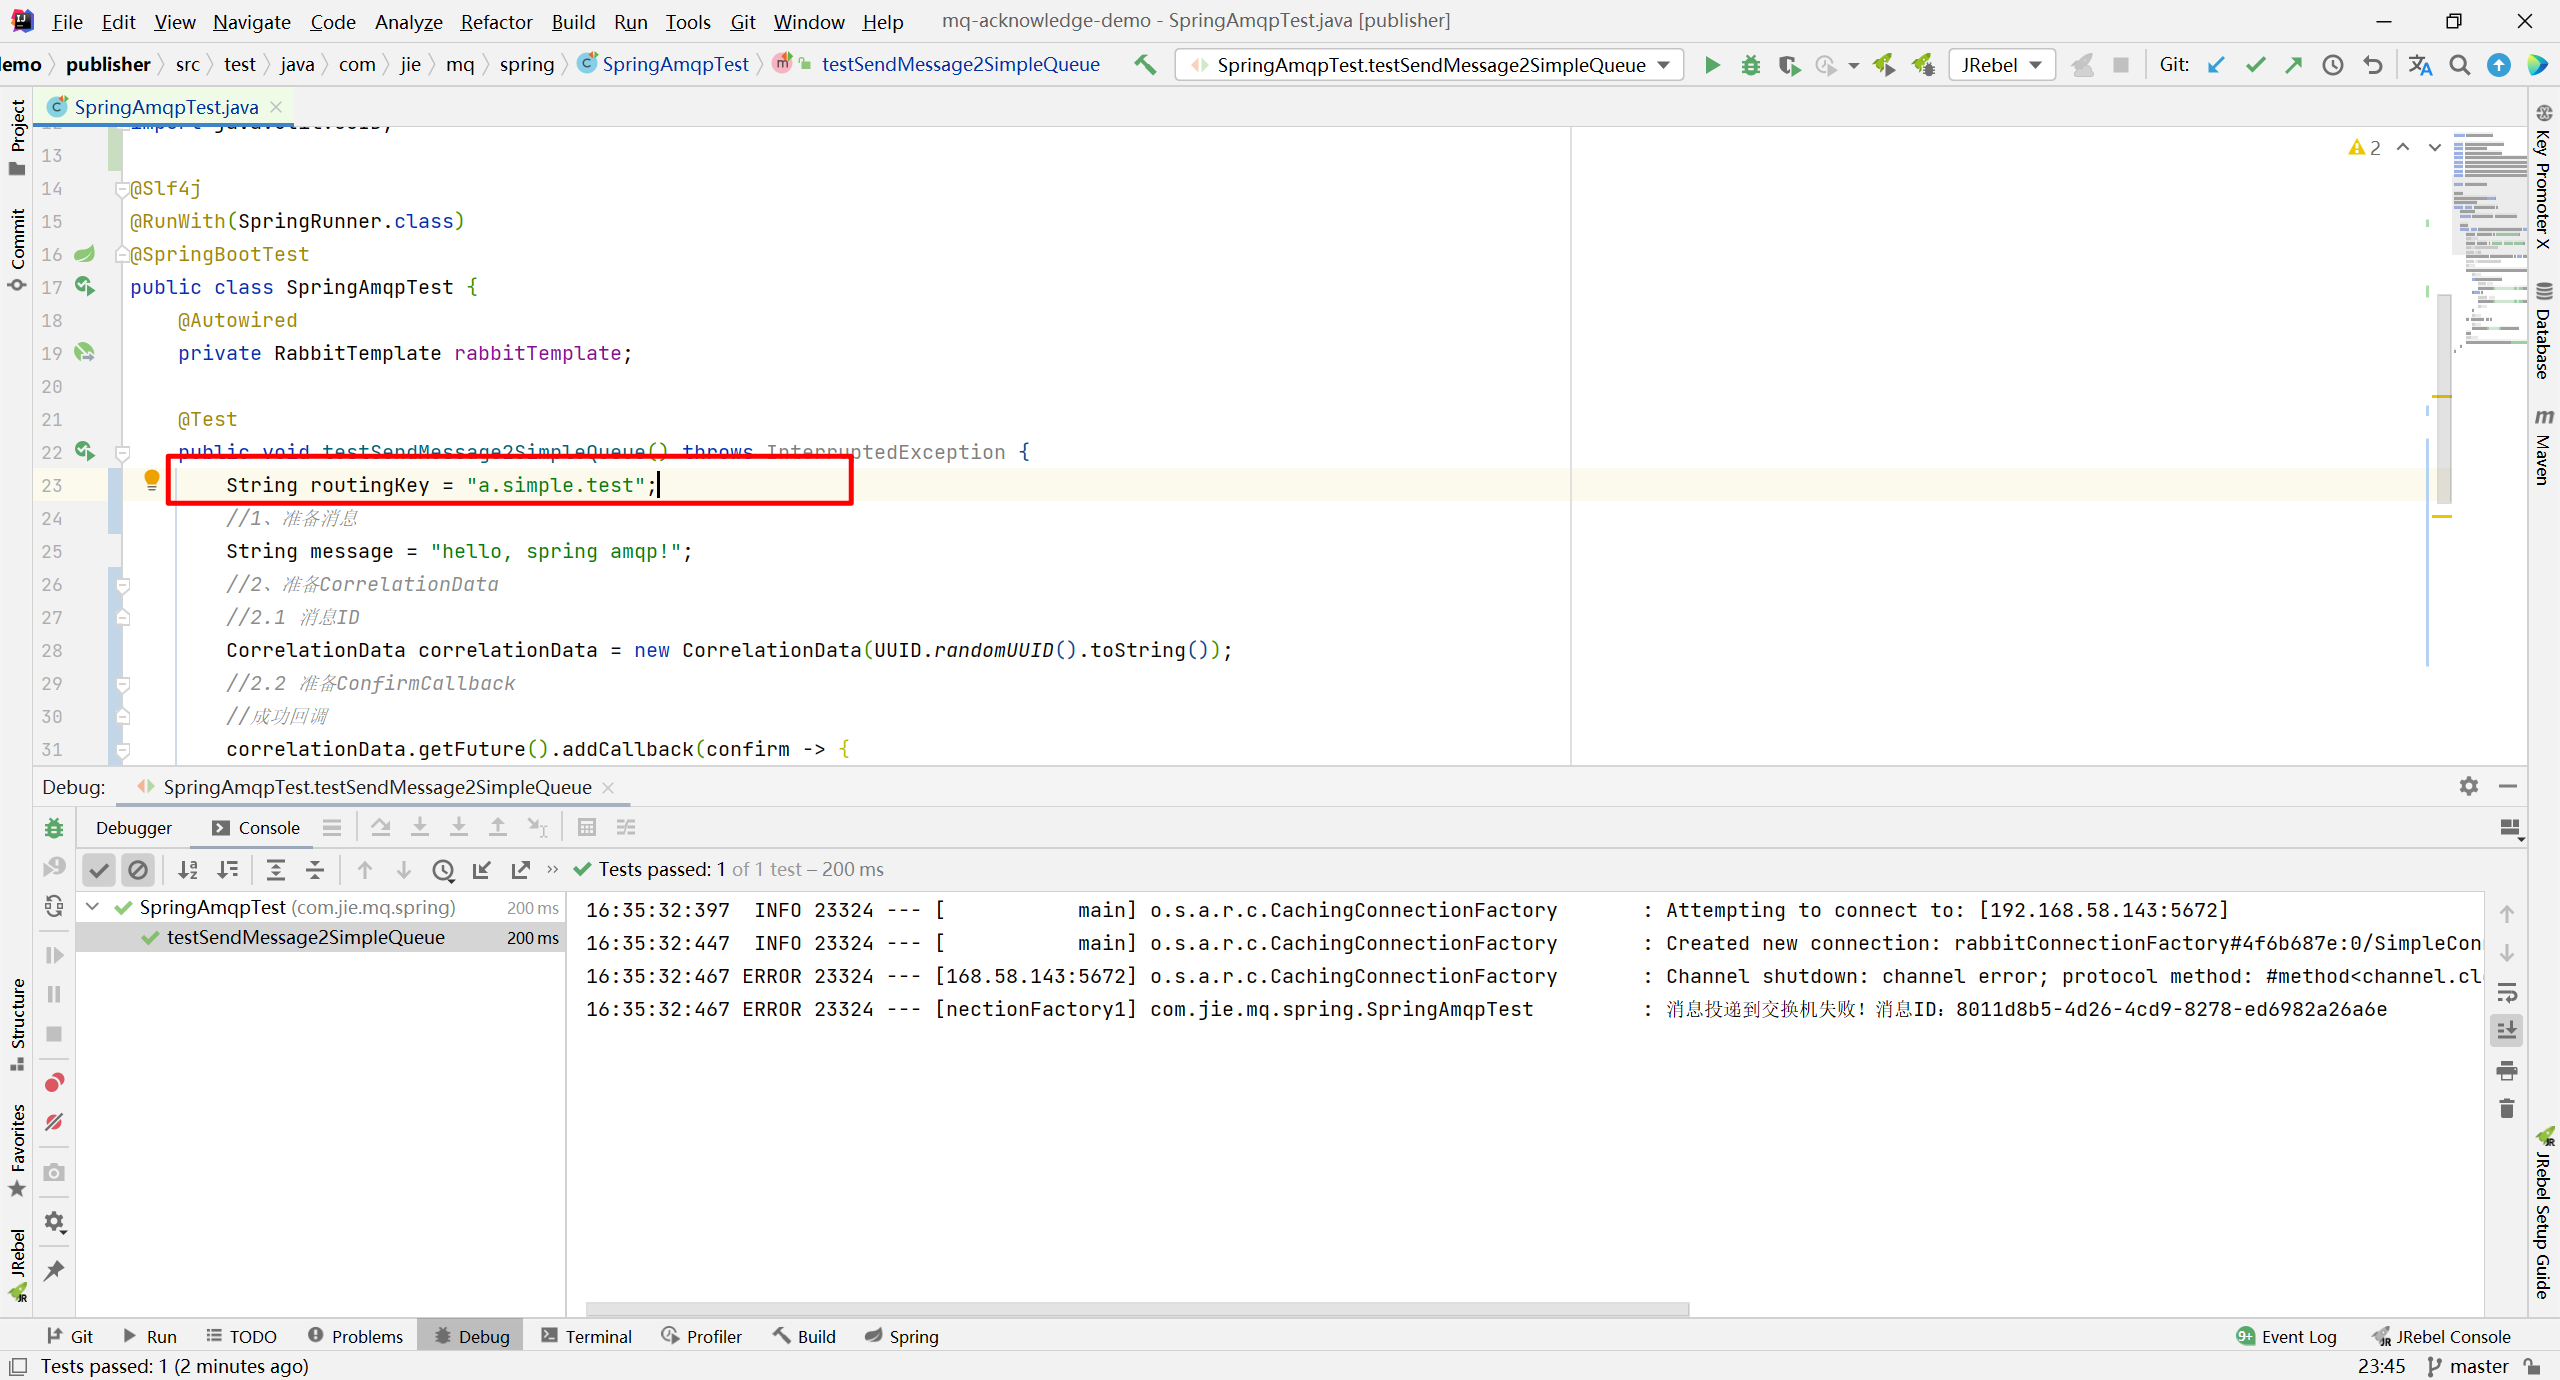 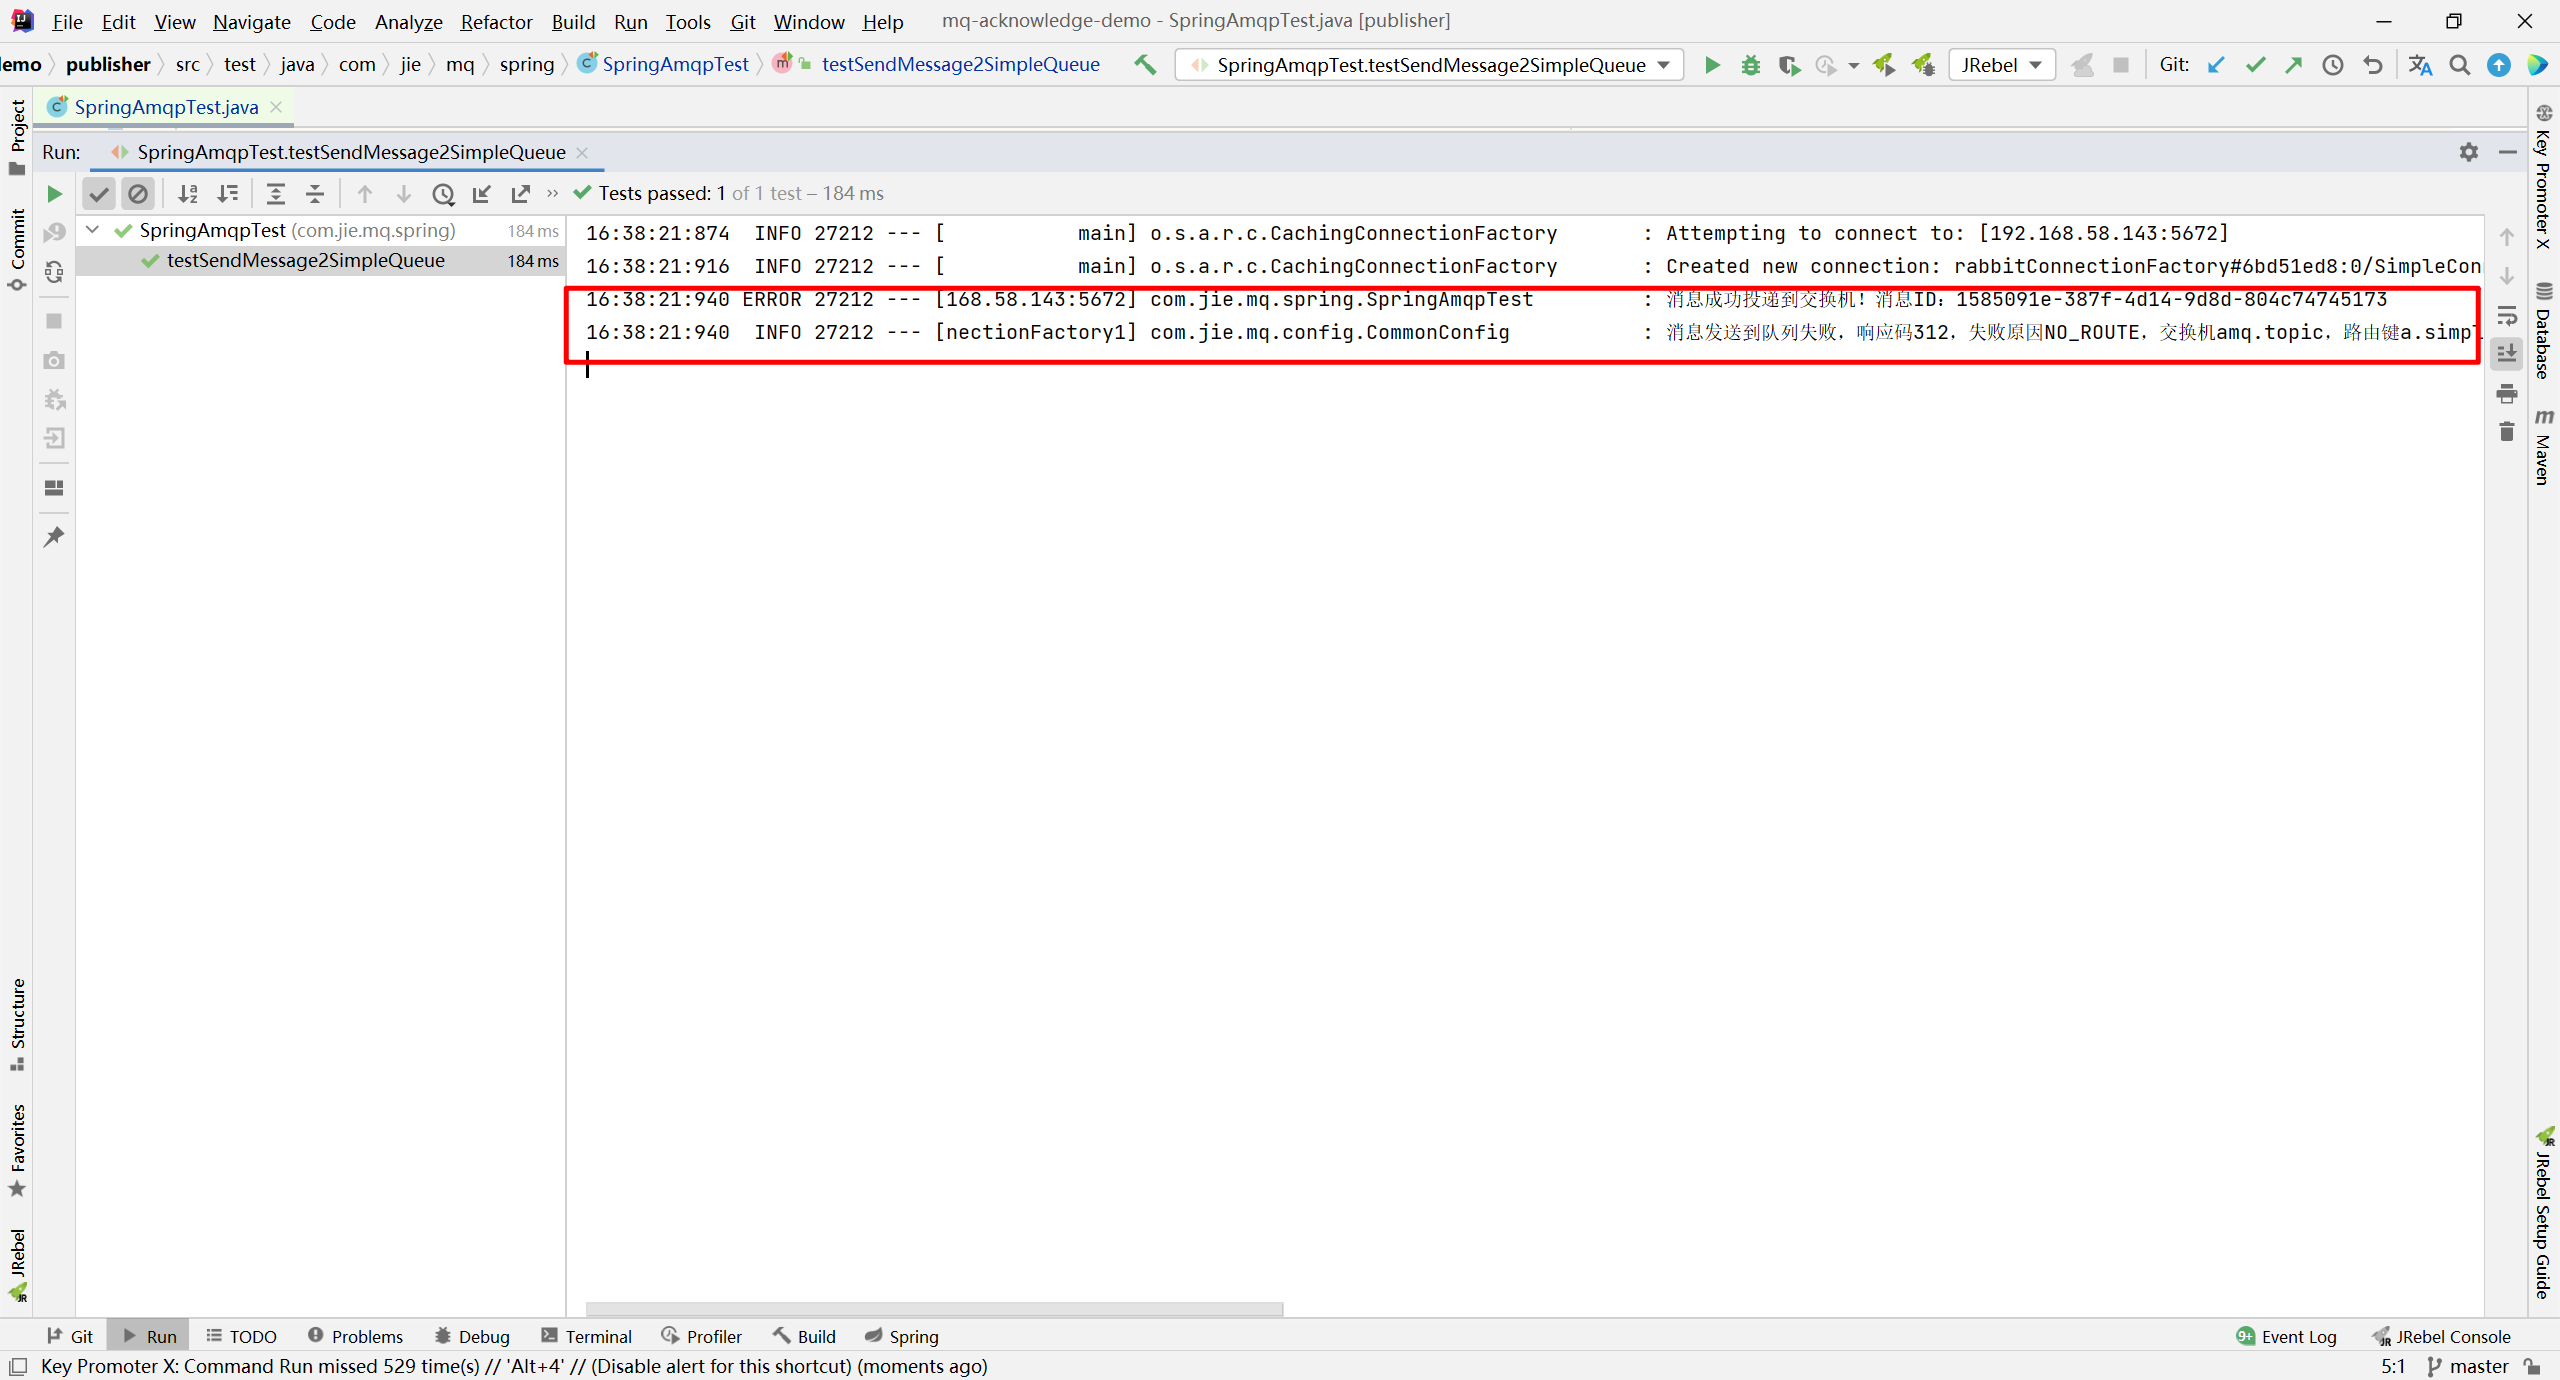 ## 2.4 小结 SpringAMQP中处理消息确认的几种情况: > 1. **publisher-comfirm**: > 消息成功发送到exchange,返回Ack。 > 消息发送失败,没有到达交换机,返回Nack。 > 消息发送过程中出现异常,没有收到回执。 > > 2. 消息成功发送到exchange,但没有路由到queue > > 调用ReturnCallback。 # 3、消息持久化  生产者确认可以确保消息投递到RabbitMQ的队列中,但是消息发送到RabbitMQ以后,如果突然宕机,也可能导致消息丢失。 要想确保消息在RabbitMQ中安全保存,必须开启消息持久化机制。 > - 交换机持久化 > - 队列持久化 > - 消息持久化 > ## 3.1 交换机持久化 RabbitMQ中交换机默认是非持久化的,mq重启后就丢失。 SpringAMQP中可以通过代码指定交换机持久化: ```java @Bean public DirectExchange simpleExchange(){ // 三个参数:交换机名称、是否持久化、当没有queue与其绑定时是否自动删除 return new DirectExchange("simple.direct", true, false); } ``` 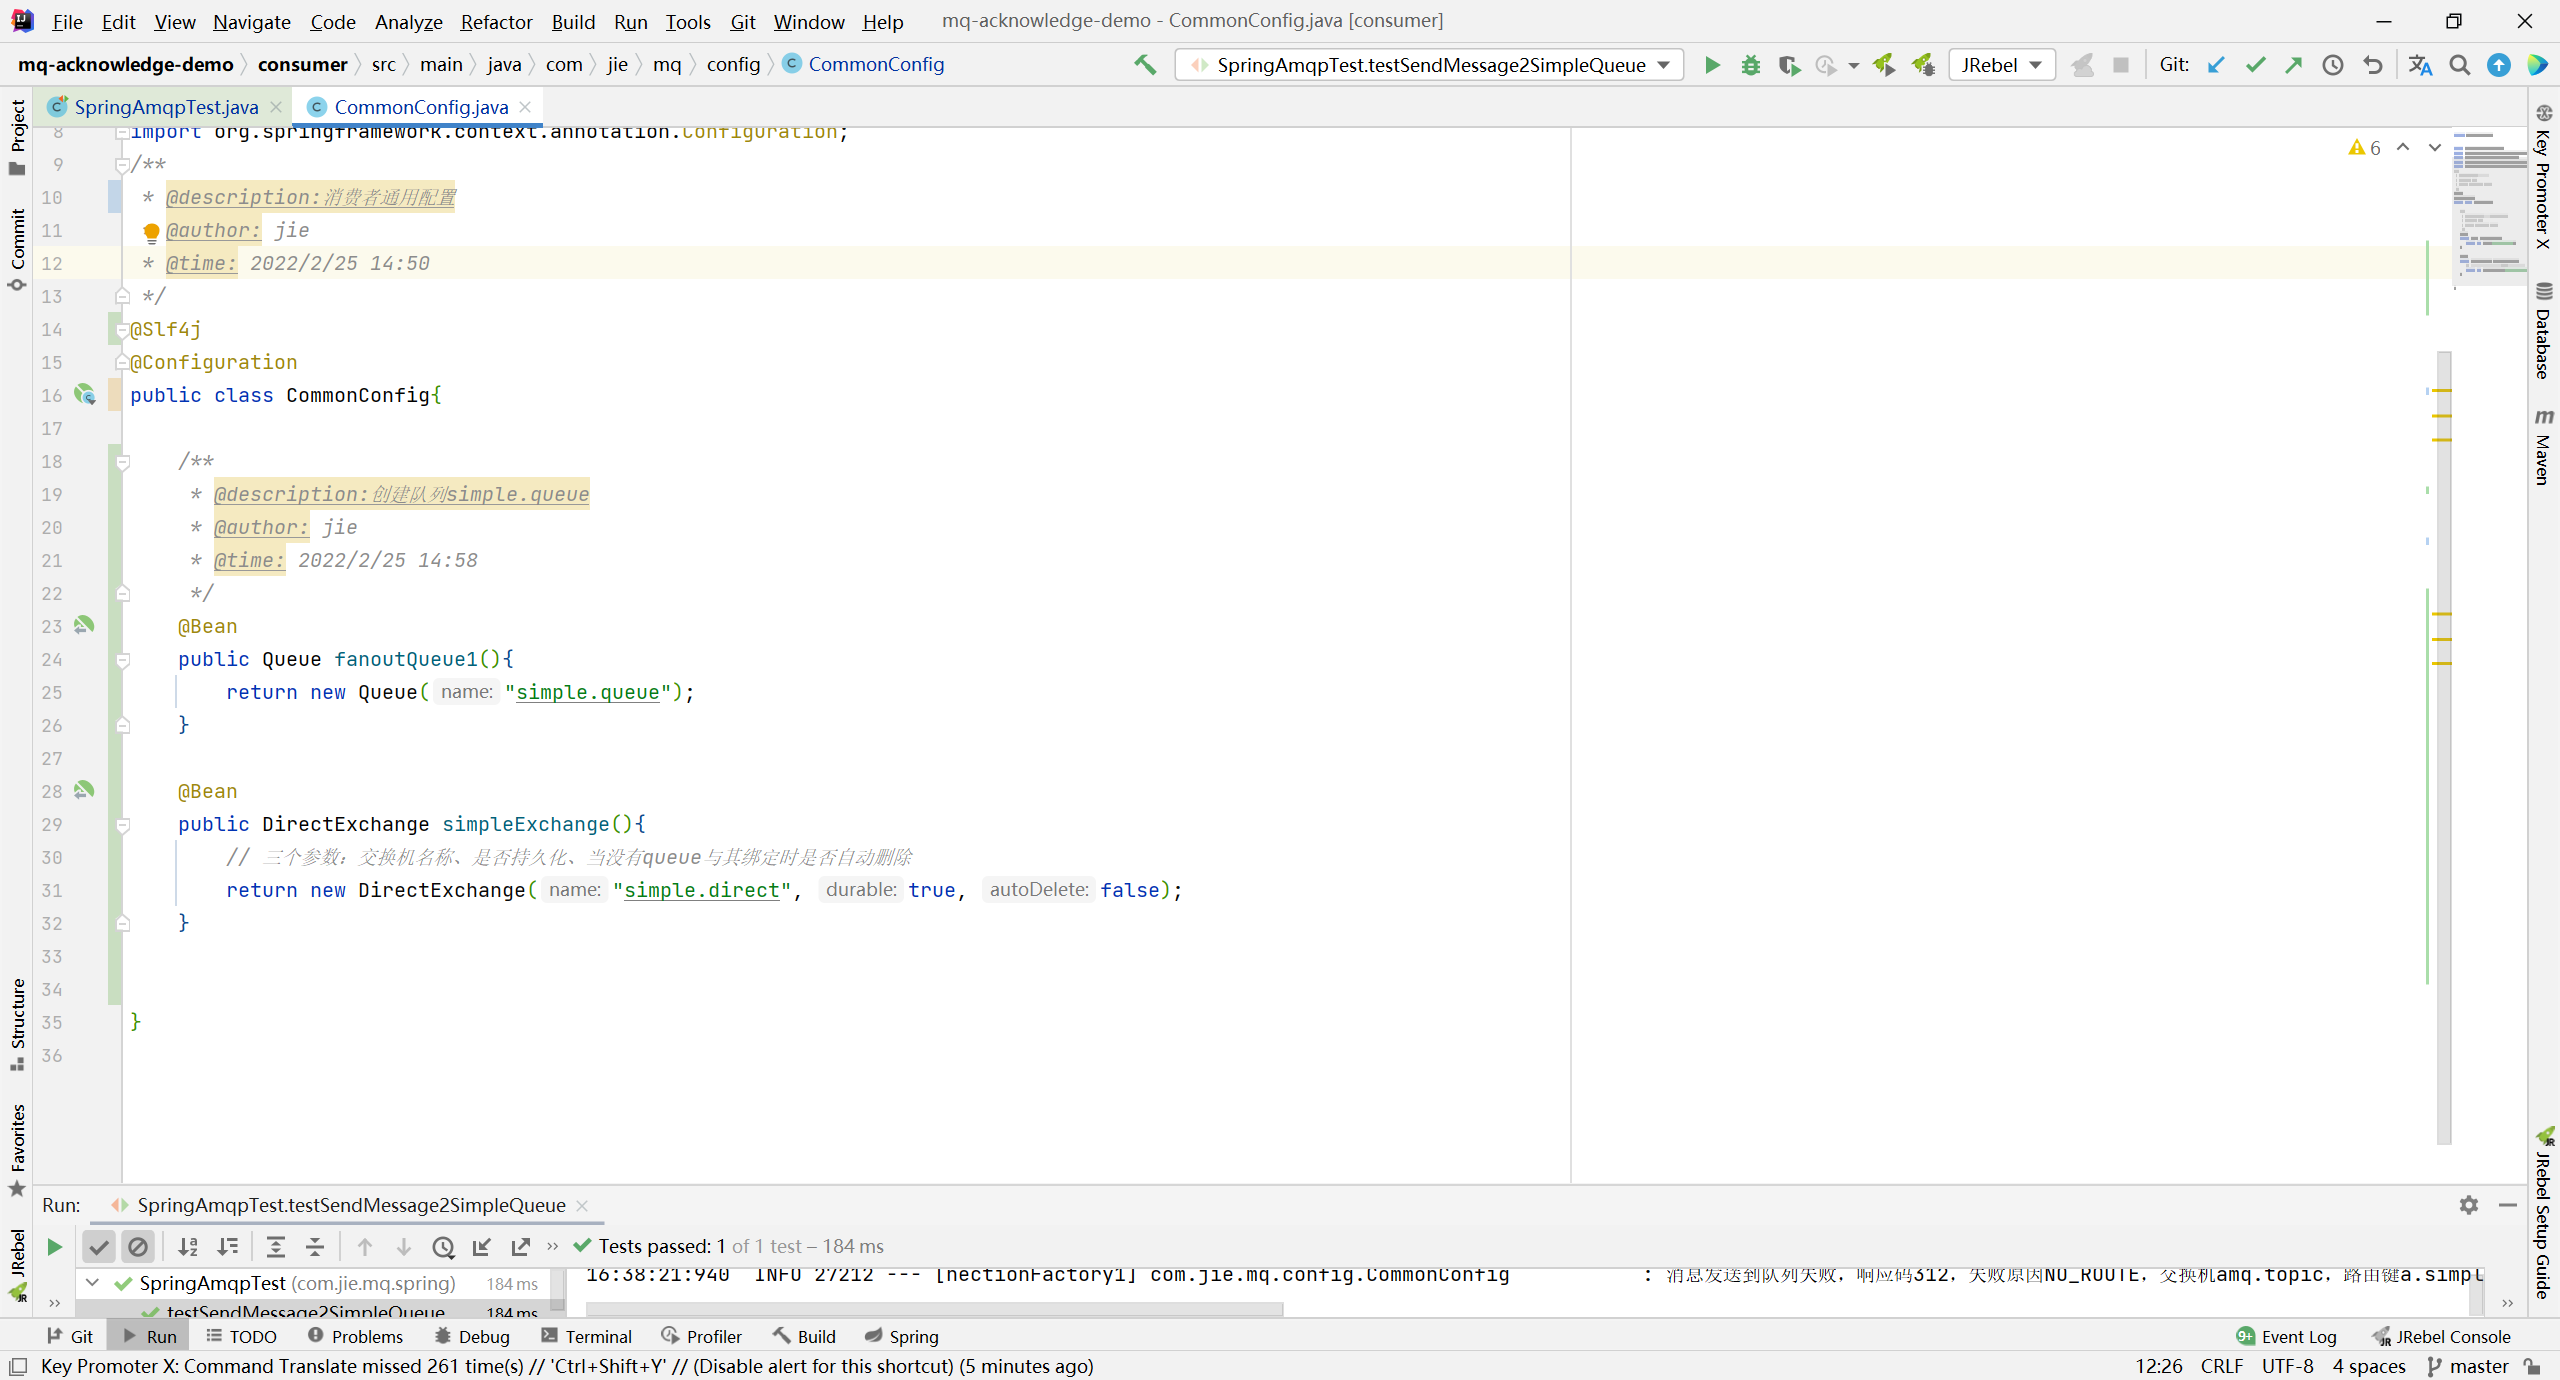 启动服务。  > 注: > > 事实上,默认情况下,由SpringAMQP声明的交换机都是持久化的。 ## 3.2 队列持久化 RabbitMQ中队列默认是非持久化的,mq重启后就丢失。 SpringAMQP中可以通过代码指定交换机持久化: ```java @Bean public Queue simpleQueue(){ // 使用QueueBuilder构建队列,durable就是持久化的 return QueueBuilder.durable("simple.queue").build(); } ``` > 注: > > 事实上,默认情况下,由SpringAMQP声明的队列都是持久化的。 可以在RabbitMQ控制台看到持久化的队列都会带上`D`的标示:  ## 3.3 消息持久化 > 利用SpringAMQP发送消息时,可以设置消息的属性(MessageProperties),指定delivery-mode: > > - 1:非持久化 > - 2:持久化 用java代码指定: ```java @Test public void testDurableMessage() { //准备消息 Message message = MessageBuilder.withBody("hell,spring".getBytes(StandardCharsets.UTF_8)) .setDeliveryMode(MessageDeliveryMode.PERSISTENT) .build(); // 2.发送消息 rabbitTemplate.convertAndSend("simple.queue",message); } ``` > 注:默认情况下,SpringAMQP发出的任何消息都是持久化的,不用特意指定。 ## 3.4 小结 默认情况下,由SpringAMQP声明的交换机和队列还有发出的消息都是默认持久化的。 # 4、消费者消息确认 RabbitMQ是**阅后即焚**机制,RabbitMQ确认消息被消费者消费后会立刻删除。 而RabbitMQ是通过消费者回执来确认消费者是否成功处理消息的:消费者获取消息后,应该向RabbitMQ发送ACK回执,表明自己已经处理消息。 生产者消息确认可以确保消息投递到队列当中,而消息的持久化可以保证不会因为MQ的宕机而导致消息的丢失,经过这两个我们可以保证消息能投递到消费者。 但是这个消费者是不是一定能消费这个消息呢?如果消息投递到消费者的那一刻,消费者挂了,那这样消息还是没有消费,消息就丢失了。 RabbitMQ支持消费者确认机制,即:消费者处理消息后可以向MQ发送Ack回执,MQ收到Ack回执后才会删除该消息。而SpringAMQP则允许配置三种确认模式: > 1. manual:手动ack,需要在业务代码结束后,调用api发送ack。 > 2. auto:自动ack,由spring监测listener代码是否出现异常,没有异常则返回ack;抛出异常则返回nack。 > 3. none:关闭ack,MQ假定消费者获取消息后会成功处理,因此消息投递后立即被删除。 由此可知: > - none模式下,消息投递是不可靠的,可能丢失。 > - auto模式类似事务机制,出现异常时返回nack,消息回滚到mq;没有异常,返回ack。 > - manual:自己根据业务情况,判断什么时候该ack。 > 一般,我们都是使用默认的auto即可。 ## 4.1.演示none模式 修改consumer服务的application.yml文件,添加下面内容: ```yaml spring: rabbitmq: listener: simple: acknowledge-mode: none # 关闭ack ``` 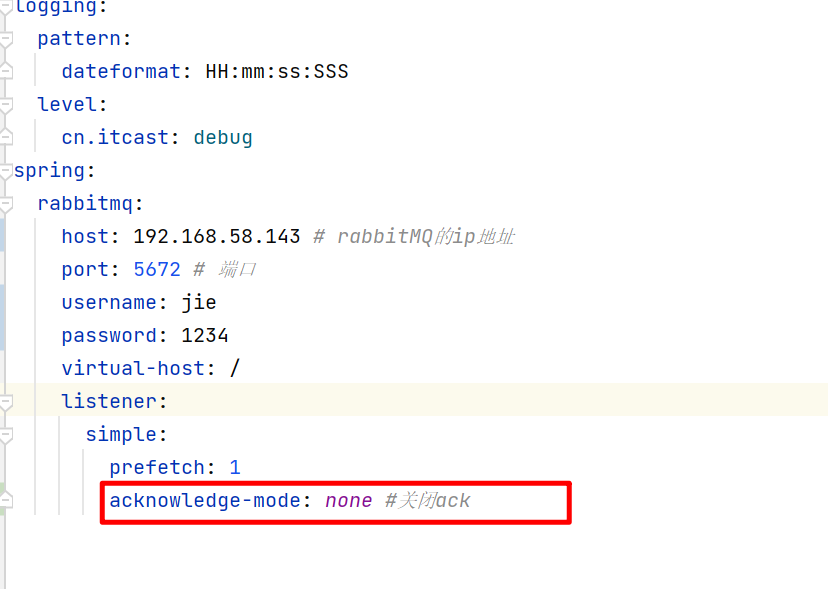 我们在这个队列先发留有一条消息。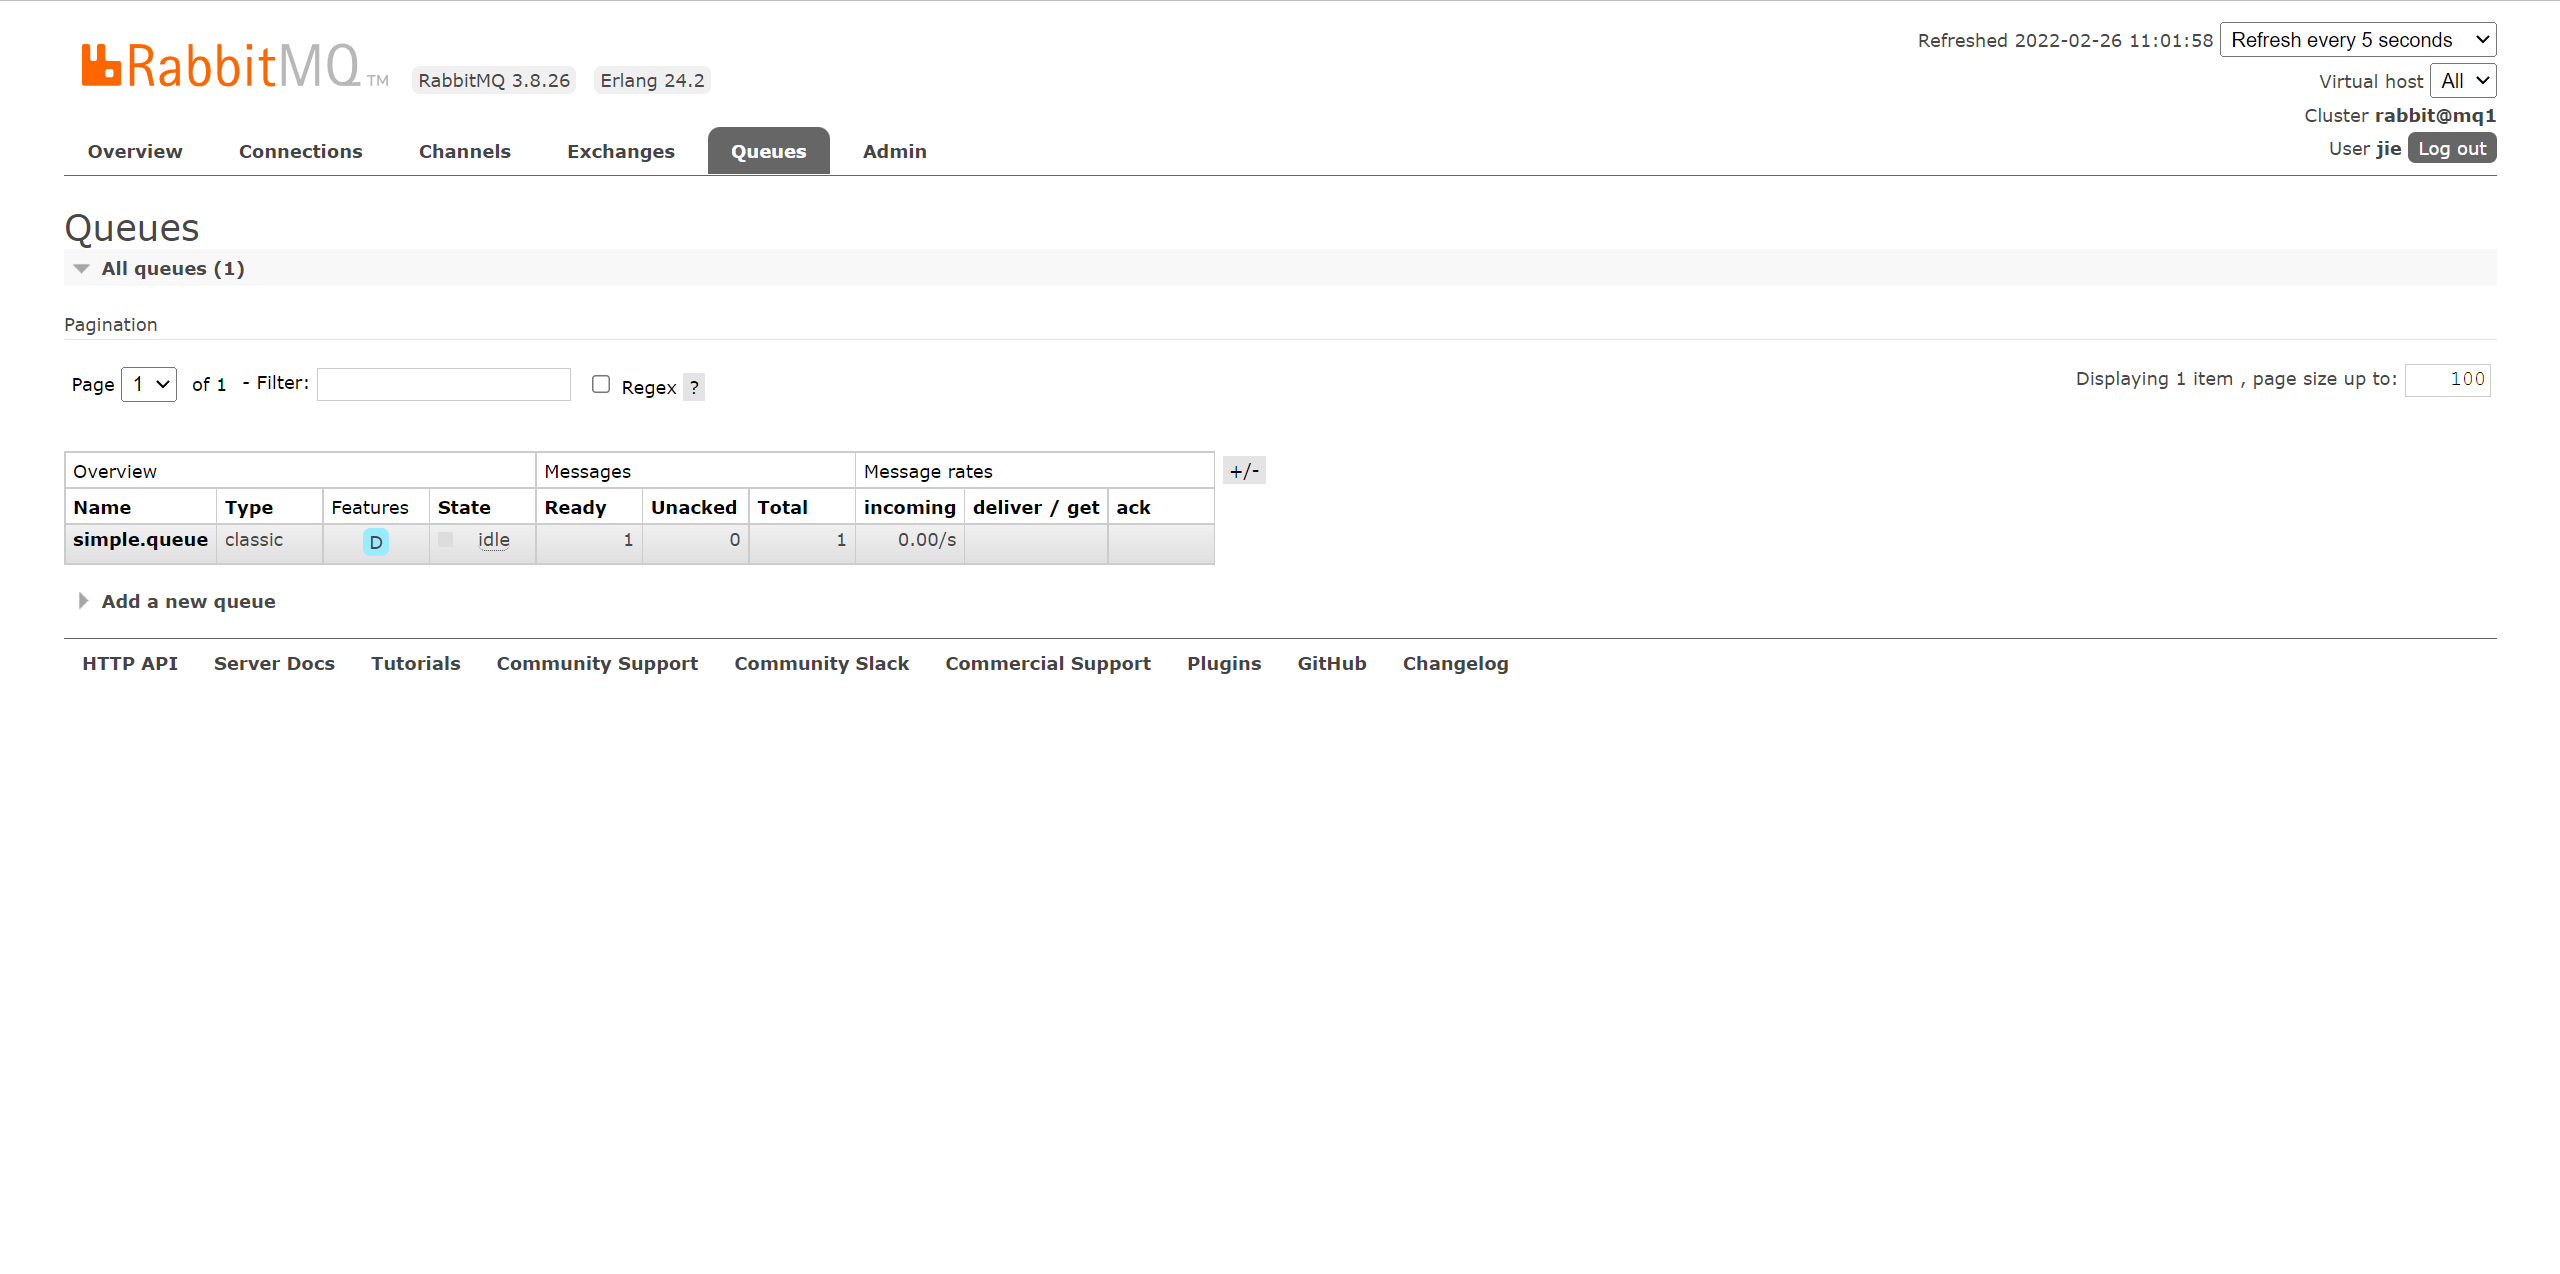 修改consumer服务的SpringRabbitListener类中的方法,模拟一个消息处理异常: 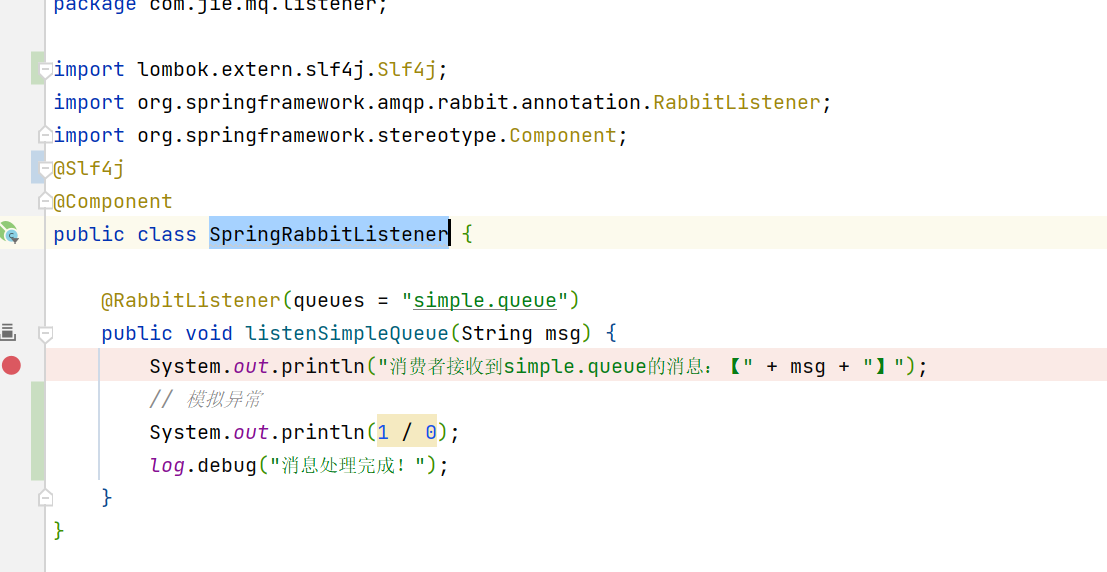 我们打个断点用 Debug运行。再回到浏览器查看,发现消息已经没了。 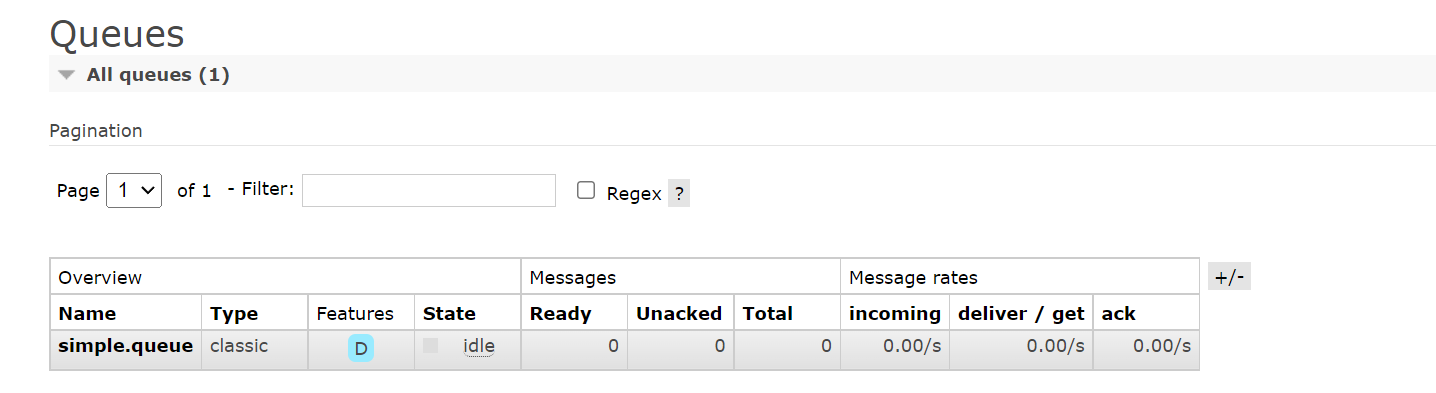 我们回到代码区往下执行。 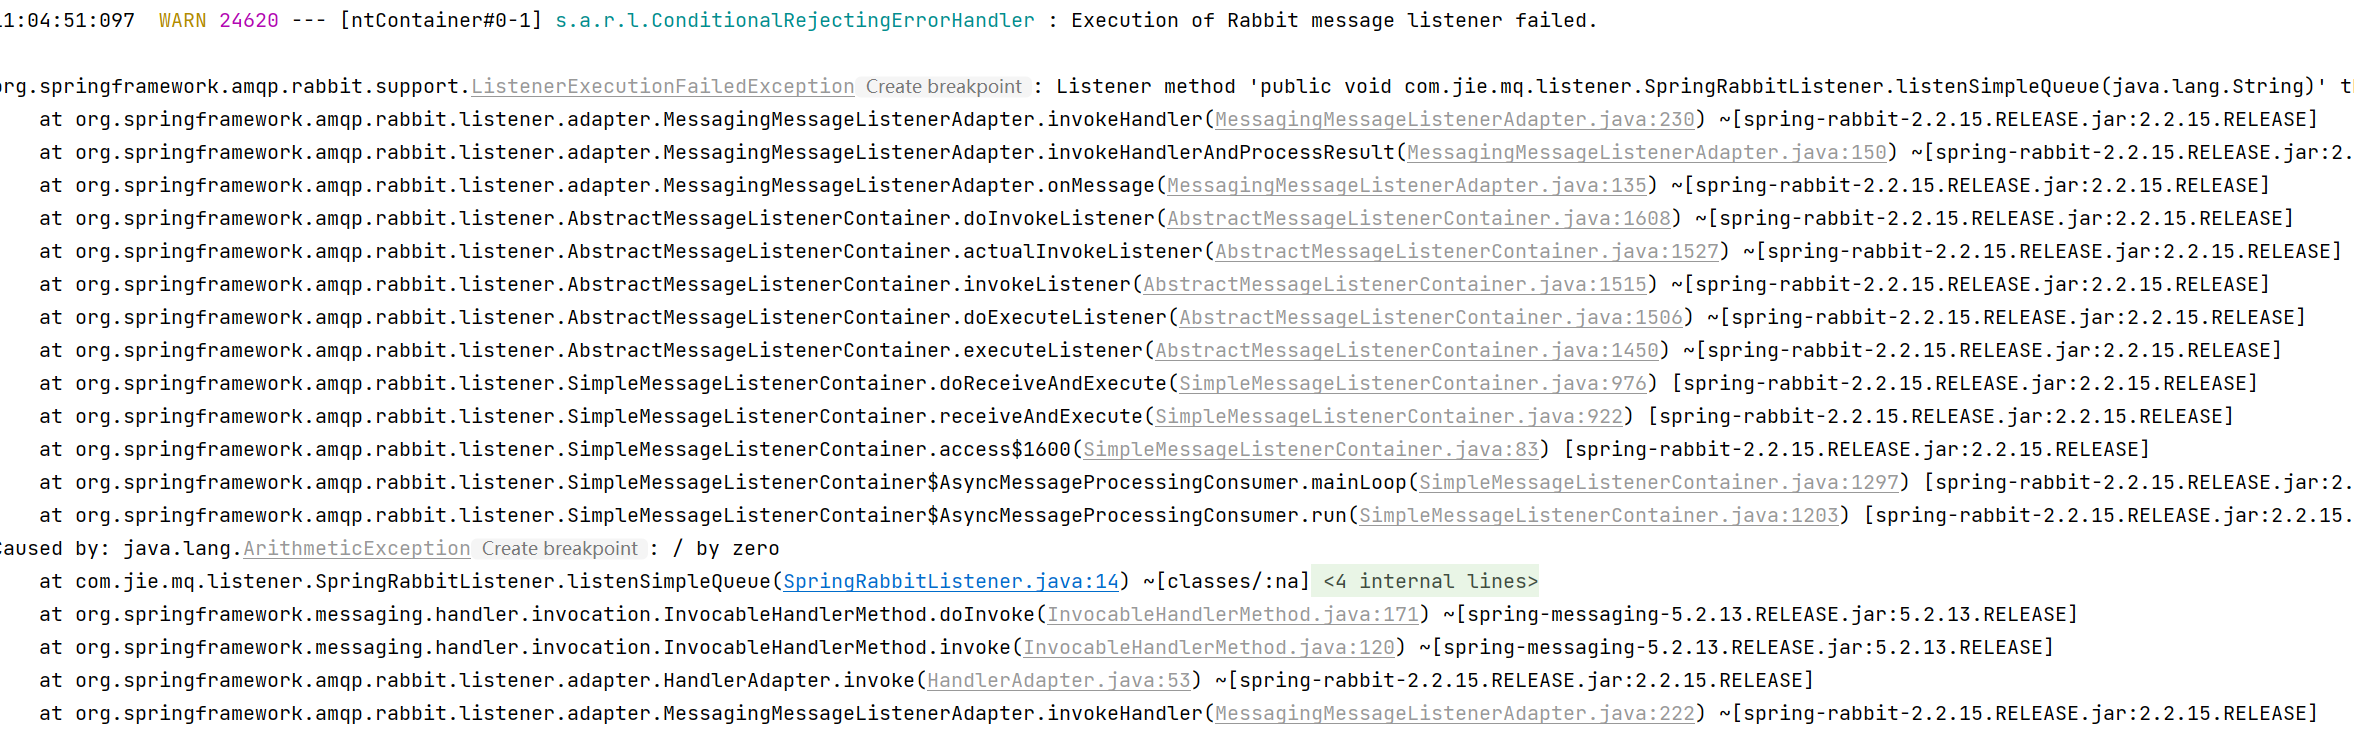 测试可以发现,当消息处理抛异常时,消息依然被RabbitMQ删除了。 ## 4.2.演示auto模式 再次把确认机制修改为auto: 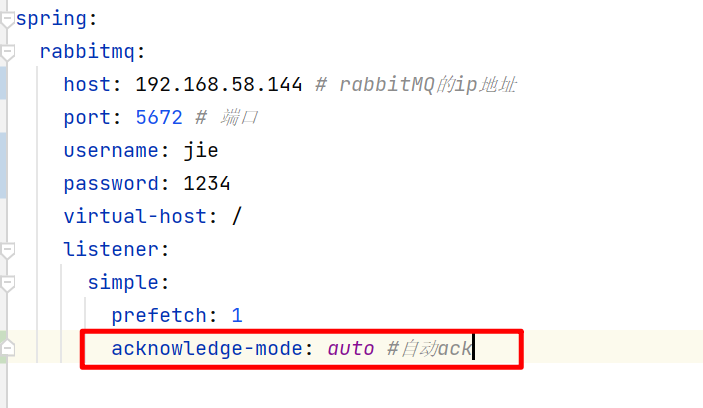 然后我们再往队列发送一条消息。  再次用Debug运行程序。  可以发现此时消息状态为unacked(未确定状态)。这什么意思呢?就是我还没收到Ack,我在等着你给我发呢,所以消息还没有删除。 抛出异常后,因为Spring会自动返回nack,所以消息恢复至Ready状态,并且没有被RabbitMQ删除。  如果我们把断点去掉,就会发生一个恐怖的事情,它就会进去一个死循环,它发现你投递失败了,又给你重新投递,一直重复这个操作。 这个显然也不太好,但是最起码消息不会丢失。 # 5、消费失败重试机制 当消费者出现异常后,消息会不断requeue(重入队)到队列,再重新发送给消费者,然后再次异常,再次requeue,无限循环,导致mq的消息处理飙升,带来不必要的压力:  ## 5.1 本地重试 我们可以利用Spring的retry机制,在消费者出现异常时利用本地重试,而不是无限制的requeue到mq队列。 修改consumer服务的application.yml文件,添加内容: 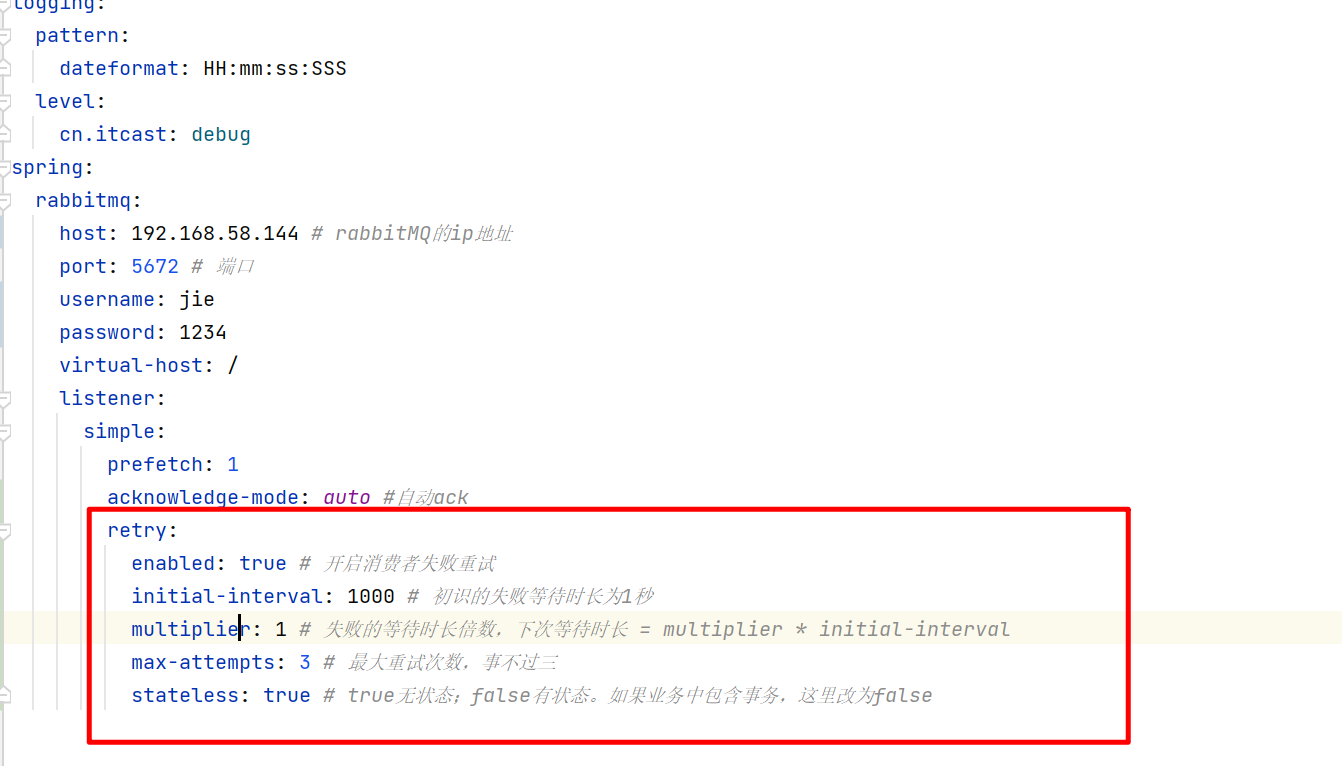 ```yaml retry: enabled: true # 开启消费者失败重试 initial-interval: 1000 # 初识的失败等待时长为1秒 multiplier: 1 # 失败的等待时长倍数,下次等待时长 = multiplier * initial-interval max-attempts: 3 # 最大重试次数,事不过三 stateless: true # true无状态;false有状态。如果业务中包含事务,这里改为false ``` 重启consumer服务,重复之前的测试。可以发现: - 在重试3次后,SpringAMQP会抛出异常,说明本地重试触发了。 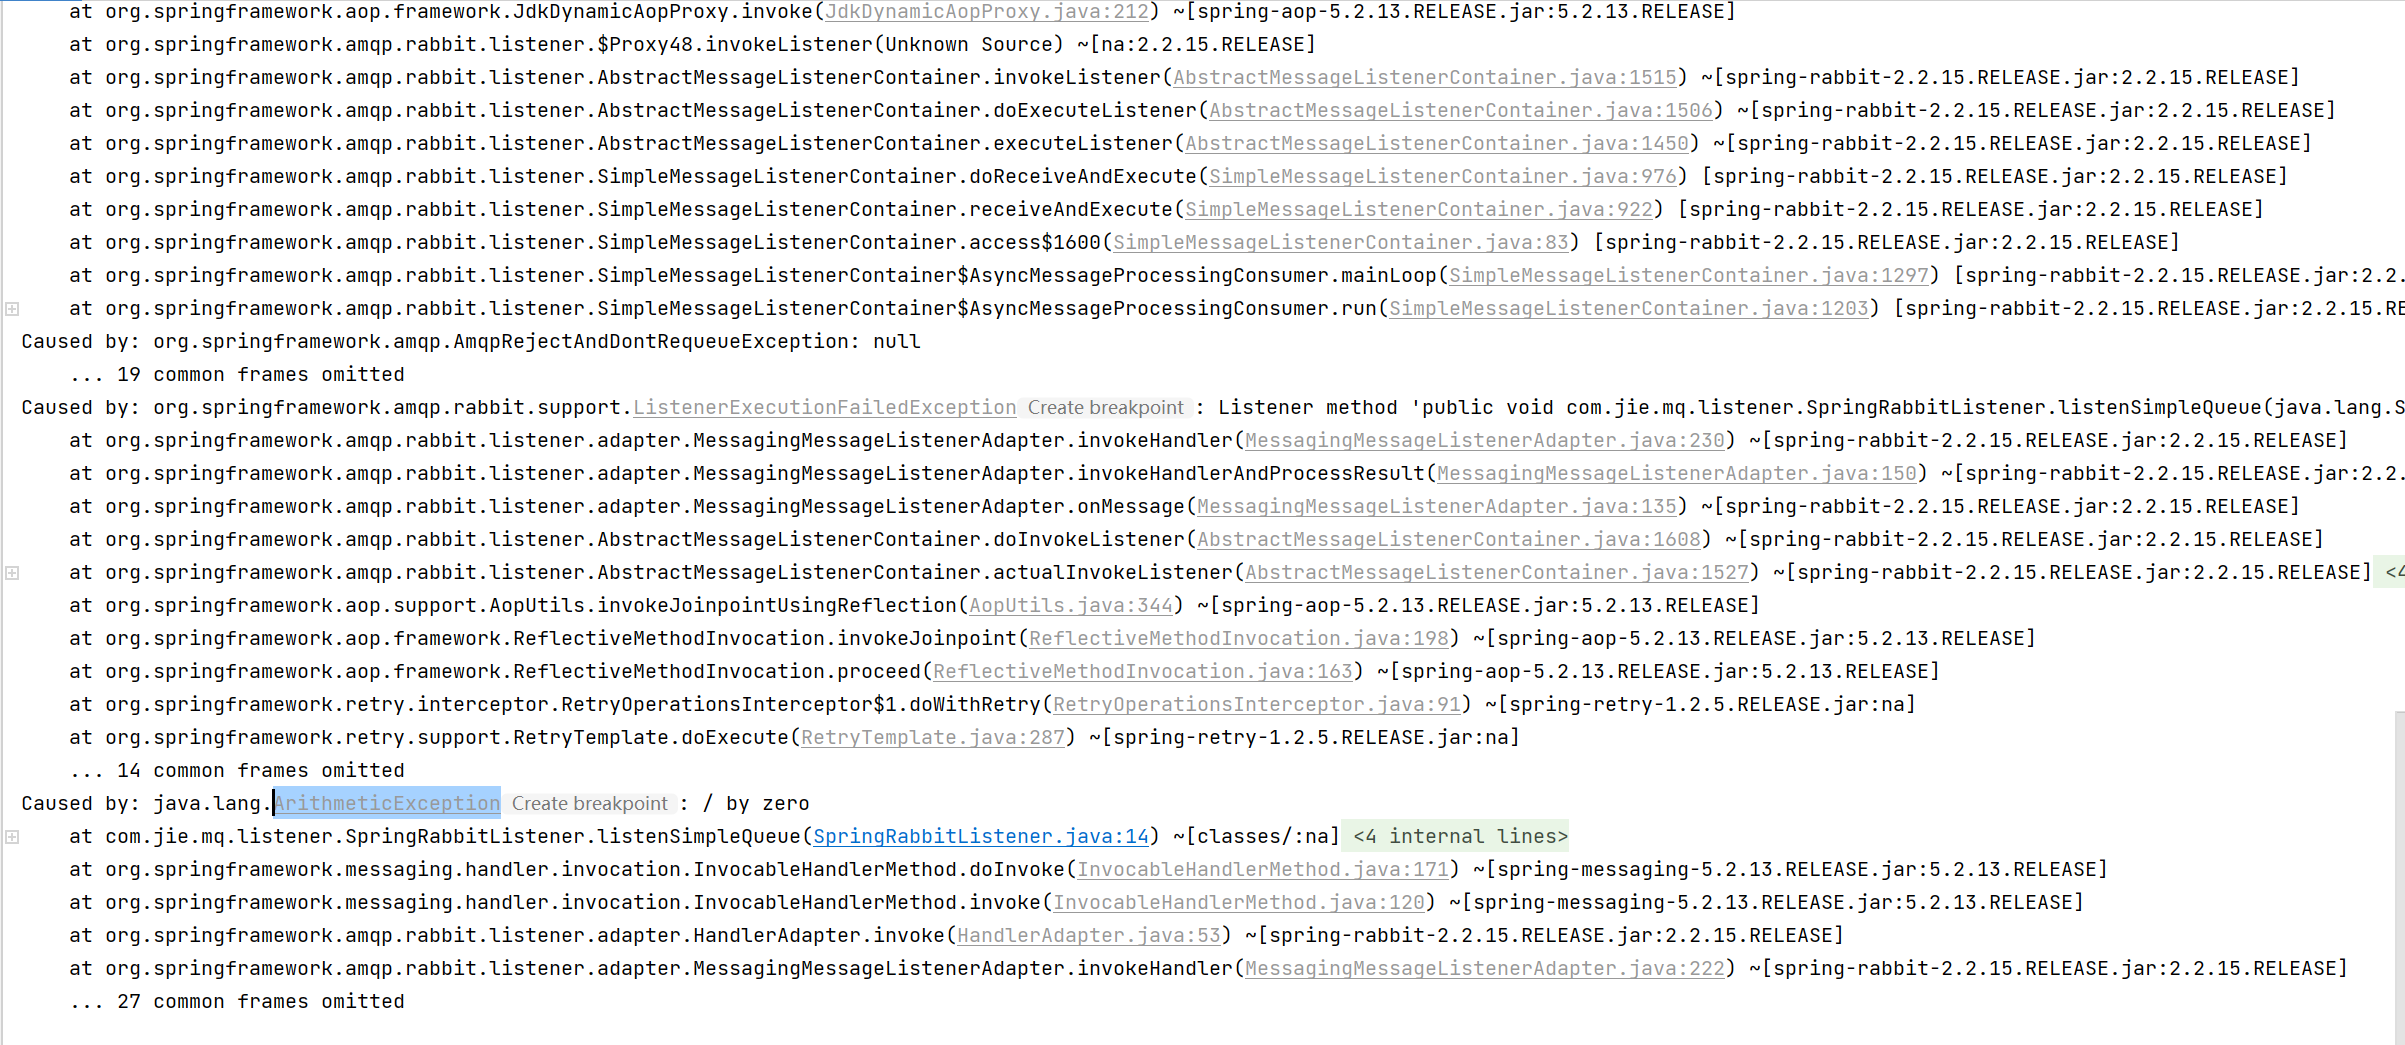 - 查看RabbitMQ控制台,发现消息被删除了,说明最后SpringAMQP返回的是ack,mq删除消息了  ## 5.2.失败策略 在之前的测试中,达到最大重试次数后,消息会被丢弃,这是由Spring内部机制决定的。 在开启重试模式后,重试次数耗尽,如果消息依然失败,则需要有MessageRecovery接口来处理,它包含三种不同的实现: > - RejectAndDontRequeueRecoverer:重试耗尽后,直接reject,丢弃消息。默认就是这种方式。 > > - ImmediateRequeueMessageRecoverer:重试耗尽后,返回nack,消息重新入队。 > > - RepublishMessageRecoverer:重试耗尽后,将失败消息投递到指定的交换机。 比较好的一种处理方案是RepublishMessageRecoverer,失败后将消息投递到一个指定的,专门存放异常消息的队列,后续由人工集中处理。 1、在consumer服务中定义处理失败消息的交换机和队列 ```java package com.jie.mq.config; import org.springframework.amqp.core.Binding; import org.springframework.amqp.core.BindingBuilder; import org.springframework.amqp.core.DirectExchange; import org.springframework.amqp.core.Queue; import org.springframework.amqp.rabbit.core.RabbitTemplate; import org.springframework.amqp.rabbit.retry.MessageRecoverer; import org.springframework.amqp.rabbit.retry.RepublishMessageRecoverer; import org.springframework.context.annotation.Bean; import org.springframework.context.annotation.Configuration; @Configuration public class ErrorMessageConfig { /** * @description:异常消息交换机 * @author: jie * @time: 2022/2/26 18:39 */ @Bean public DirectExchange errorMessageExchange() { return new DirectExchange("error.direct"); } /** * @description:队列 * @author: jie * @time: 2022/2/26 18:39 */ @Bean public Queue errorQueue(){ return new Queue("err.queue"); } /** * @description:将交换机和队列绑定 * @author: jie * @time: 2022/2/26 18:39 */ @Bean public Binding errorMessageBinding(){ return BindingBuilder .bind(errorQueue()) .to(errorMessageExchange()) .with("error"); } /** * @description:异常消息处理器 * @author: jie * @time: 2022/2/26 18:41 */ @Bean public MessageRecoverer republishMessageReciverer(RabbitTemplate rabbitTemplate){ return new RepublishMessageRecoverer(rabbitTemplate,"error.direct","error"); } } ``` 重新启动后我们向simple.queue发送消息。  # 6、总结 如何确保RabbitMQ消息的可靠性? > 1. 开启生产者确认机制,确保生产者的消息能到达队列。 > 2. 开启持久化功能,确保消息未消费前在队列中不会丢失。 > 3. 开启消费者确认机制为auto,由spring确认消息处理成功后完成ack。 > 4. 开启消费者失败重试机制,并设置MessageRecoverer,多次重试失败后将消息投递到异常交换机,交由人工处理。 # 7、项目工程 https://gitee.com/boring-yingjie/rabbit-mq-message-confirmation.git
2、RabbitMQ之SpringAMQP
# 1、什么是SpringAMQP > SpringAMQP是基于RabbitMQ封装的一套模板,并且还利用SpringBoot对其实现了自动装配,使用起来非常方便。 > > SpringAmqp的官方地址:https://spring.io/projects/spring-amqp # 2、简单队列模型 1、在父工程pom.xml中引入依赖 ```xml <!--AMQP依赖,包含RabbitMQ--> <dependency> <groupId>org.springframework.boot</groupId> <artifactId>spring-boot-starter-amqp</artifactId> </dependency> ``` 2、首先在生产者端配置MQ地址,在application.yml中添加配置: <img src="https://pic.code-nav.cn/post_picture/1620630456775032833/Yo4PAeWH9zStIXL6.webp" alt="1" width="747px" /> ```yml spring: rabbitmq: host: 192.168.58.131 #rabbitMQ的ip地址 port: 5672 #端口 username: jie #用户名 password: 1234 #密码 virtual-host: / #虚拟主机 ``` 2、在生产者端编写测试类SpringAmqpTest,并利用RabbitTemplate实现消息发送: ```java package com.jie.mq.helloworld.spring; import org.junit.Test; import org.junit.runner.RunWith; import org.springframework.amqp.rabbit.core.RabbitTemplate; import org.springframework.beans.factory.annotation.Autowired; import org.springframework.boot.test.context.SpringBootTest; import org.springframework.test.context.junit4.SpringRunner; import java.util.HashMap; import java.util.Map; @RunWith(SpringRunner.class) @SpringBootTest public class SpringAmqpTest { @Autowired private RabbitTemplate rabbitTemplate; @Test public void test() { //队列名称 String queueName = "simple.queue"; //消息 String message = "hello, spring amqp!"; //发送消息 rabbitTemplate.convertAndSend(queueName, message); } } ``` 点击运行后可以到浏览器看看。 <img src="https://pic.code-nav.cn/post_picture/1620630456775032833/8zpUhfrOvRcCFNxz.webp" alt="2" width="100%" /> 3、在消费者端配置MQ地址,在application.yml中添加配置(和在生产者端一致) 4、然后在生产者服务新建一个类,代码如下: ```java package com.jie.mq.listener; import org.springframework.amqp.rabbit.annotation.RabbitListener; import org.springframework.stereotype.Component; @Component public class SpringRabbitListener { @RabbitListener(queues = "simple.queue") public void listenSimpleQueue(String msg){ System.out.println("spring 消费者接收到消息 :【" + msg + "】"); } } ``` 5、启动消费者,查看控制台和浏览器。 <img src="https://pic.code-nav.cn/post_picture/1620630456775032833/Ea9xBKqD4UicXOhu.webp" alt="3" width="100%" /> <img src="https://pic.code-nav.cn/post_picture/1620630456775032833/Kk91iOTq6y7d6SBP.webp" alt="4" width="100%" /> # 3、WorkQueue 工作队列 > Work queues,也被称为(Task queues),任务模型。简单来说就是**让多个消费者绑定到一个队列,共同消费队列中的消息**。 > > <img src="https://pic.code-nav.cn/post_picture/1620630456775032833/dvlRTMHE9EgaiRTz.webp" alt="5" width="100%" /> > > 当消息处理比较耗时的时候,可能生产消息的速度会远远大于消息的消费速度。长此以往,消息就会堆积越来越多,无法及时处理。 > > 此时就可以使用work 模型,多个消费者共同处理消息处理,速度就能大大提高了。 ## 3.1 模拟WorkQueue,实现一个队列绑定多个消费者 ### 1、消息发送 这次我们循环发送,模拟大量消息堆积现象。 在生产者服务中添加一个测试方法: ```java /** * @description:向队列中不停发送消息,模拟消息堆积。 * @author: jie * @time: 2022/2/22 9:23 */ @Test public void test2() throws InterruptedException { //队列名称 String queueName = "simple.queue"; //消息 String message = "hello, spring amqp!--"; for (int i = 1; i < 50; i++) { //发送消息 rabbitTemplate.convertAndSend(queueName, message+i); //休眠 Thread.sleep(20); } } ``` ### 2、消息接收 要模拟多个消费者绑定同一个队列,我们在消费者服务的中添加2个新的方法: ```java @RabbitListener(queues = "simple.queue") public void listenWorkQueue1(String msg) throws InterruptedException { System.out.println("spring 消费者1接收到消息 :【" + msg + "】"+ LocalTime.now()); //休眠 Thread.sleep(20); } @RabbitListener(queues = "simple.queue") public void listenWorkQueue2(String msg) throws InterruptedException { System.err.println("消费者2........接收到消息:【" + msg + "】" + LocalTime.now()); //休眠 Thread.sleep(200); } ``` ### 3、测试 启动消费者后,在执行生产者服务中刚刚编写的发送测试方法InterruptedException。 可以看到消费者1很快完成了自己的25条消息。消费者2却在缓慢的处理自己的25条消息。 <img src="https://pic.code-nav.cn/post_picture/1620630456775032833/wEtX2co8TqZLo4NA.webp" alt="6" width="100%" /> 也就是说消息是平均分配给每个消费者,并没有考虑到消费者的处理能力。这样显然是有问题的。 ### 4、能者多劳 在spring中有一个简单的配置,可以解决这个问题。我们修改消费者服务的application.yml文件,添加配置: <img src="https://pic.code-nav.cn/post_picture/1620630456775032833/VJZN8AEPiyn0RIZZ.webp" alt="7" width="860px" /> 重启消费者,再重新发送消息。 <img src="https://pic.code-nav.cn/post_picture/1620630456775032833/Lak5eG2bx1aBZzMm.webp" alt="8" width="100%" /> ### 5、小结 > Work模型的使用: > > - 多个消费者绑定到一个队列,同一条消息只会被一个消费者处理 > - 通过设置prefetch来控制消费者预取的消息数量 # 4、发布/订阅 发布订阅模式与之前案例的区别就是允许将同一消息发送给多个消费者。实现方式是加入了exchange(交换机)。 发布订阅的模型如图: <img src="https://pic.code-nav.cn/post_picture/1620630456775032833/qvhxqhMxRVZdKxmM.webp" alt="9" width="100%" /> 可以看到,在订阅模型中,多了一个exchange角色,而且过程略有变化: > - Publisher:生产者,也就是要发送消息的程序,但是不再发送到队列中,而是发给exchange(交换机) > - Exchange:交换机。一方面,接收生产者发送的消息。另一方面,知道如何处理消息,例如递交给某个特别队列、递交给所有队列、或是将消息丢弃。到底如何操作,取决于Exchange的类型。Exchange有以下3种类型: > - Fanout:广播,将消息交给所有绑定到交换机的队列 > - Direct:路由,把消息交给符合指定routing key 的队列 > - Topic:通配符,把消息交给符合routing pattern(路由模式) 的队列 > - Consumer:消费者,与以前一样,订阅队列,没有变化 > - Queue:消息队列也与以前一样,接收消息、缓存消息。 > **Exchange(交换机)只负责转发消息,不具备存储消息的能力**,因此如果没有任何队列与Exchange绑定,或者没有符合路由规则的队列,那么消息会丢失! ## 4.1 Fanout(广播) Fanout,英文翻译是扇出,在MQ中叫广播更合适。 <img src="https://pic.code-nav.cn/post_picture/1620630456775032833/B5dqSSQaq5jezdJ0.webp" alt="11、5" width="100%" /> > 在广播模式下,消息发送流程是这样的: > > 1. 可以有多个队列。 > 2. 每个队列都要绑定到Exchange(交换机)。 > 3. 生产者发送的消息,只能发送到交换机,交换机来决定要发给哪个队列,生产者无法决定。 > 4. 交换机把消息发送给绑定过的所有队列。 > 5. 订阅队列的消费者都能拿到消息。 ### 1、在消费者中创建一个配置类,声明队列和交换机: ```java package com.jie.mq.config; import org.springframework.amqp.core.Binding; import org.springframework.amqp.core.BindingBuilder; import org.springframework.amqp.core.FanoutExchange; import org.springframework.amqp.core.Queue; import org.springframework.context.annotation.Bean; import org.springframework.context.annotation.Configuration; /** * @description:广播交换机配置类 * @author: jie * @time: 2022/2/22 11:09 */ @Configuration public class FanoutConfig { /** * @description:创建交换机itcast.fanout * @author: jie * @time: 2022/2/12 19:38 */ @Bean public FanoutExchange fanoutExchange(){ return new FanoutExchange("itcast.fanout"); } /** * @description:创建队列fanout.queuel * @author: jie * @time: 2022/2/12 19:40 */ @Bean public Queue fanoutQueue1(){ return new Queue("fanout.queuel"); } /** * @description:绑定队列fanout.queuel到交换机 * @author: jie * @time: 2022/2/12 19:41 */ @Bean public Binding fanoutBinding1(Queue fanoutQueue1,FanoutExchange fanoutExchange){ return BindingBuilder .bind(fanoutQueue1) .to(fanoutExchange); } // fanout.queue2 /** * @description:创建队列fanout.queue2 * @author: jie * @time: 2022/2/12 19:40 */ @Bean public Queue fanoutQueue2(){ return new Queue("fanout.queue2"); } /** * @description:绑定队列fanout.queue2到交换机 * @author: jie * @time: 2022/2/12 19:41 */ @Bean public Binding fanoutBinding2(Queue fanoutQueue2,FanoutExchange fanoutExchange){ return BindingBuilder .bind(fanoutQueue2) .to(fanoutExchange); } } ``` 运行消费者然后查看浏览器。 <img src="https://pic.code-nav.cn/post_picture/1620630456775032833/JVT5Pd41wJphvL33.webp" alt="10" width="100%" /> ### 2、消息发送 在生产者服务的测试类中添加测试方法: ```java /** * @description:测试交换机发送消息 * @author: jie * @time: 2022/2/22 11:18 */ @Test public void testFanoutExchange() { //交换机名称 String exchangeName = "itcast.fanout"; //消息 String message = "hello,every one!"; // 发送消息 rabbitTemplate.convertAndSend(exchangeName,"",message); } ``` ### 3、消息接收 在消费者服务中添加两个方法,作为消费者: ```java @RabbitListener(queues = "fanout.queuel") public void listenFanoutQueue1(String msg){ System.out.println("消费者接收到fanout.queuel的消息 :【" + msg + "】"); } @RabbitListener(queues = "fanout.queue2") public void listenFanoutQueue2(String msg){ System.out.println("消费者接收到fanout.queue2的消息 :【" + msg + "】"); } ``` ### 4、测试 运行生产者消息发送,启动消费者,查看控制台。 <img src="https://pic.code-nav.cn/post_picture/1620630456775032833/WFG858t9yOB3YiFn.webp" alt="11" width="100%" /> ### 5、小结 交换机的作用是什么? > - 接收生产者发送的消息 > - 将消息按照规则路由到与之绑定的队列 > - 不能缓存消息,路由失败,消息丢失 > - FanoutExchange的会将消息路由到每个绑定的队列 > 声明队列、交换机、绑定关系的Bean是什么? > - **Queue(队列)** > - **FanoutExchange(广播交换机)** > - **Binding(绑定)** > ## 4.2、Direct(路由) > 在Fanout模式中,一条消息,会被所有订阅的队列都消费。但是,在某些场景下,我们希望不同的消息被不同的队列消费。这时就要用到Direct类型的Exchange。 Direct Exchange 会将接收到的消息根据规则路由到指定的Queue,因此称为路由模式(routes)。 <img src="https://pic.code-nav.cn/post_picture/1620630456775032833/05cX5aoox0G7m1rS.webp" alt="12" width="100%" /> 在Direct模型下: > - 队列与交换机的绑定,不能是任意绑定了,而是要指定一个`RoutingKey`(路由key) > - 消息的发送方在 向 Exchange发送消息时,也必须指定消息的 `RoutingKey`。 > - Exchange不再把消息交给每一个绑定的队列,而是根据消息的`Routing Key`进行判断,只有队列的`Routingkey`与消息的 `Routing key`完全一致,才会接收到消息 > ### 1、消息接收 基于@Bean的方式声明队列和交换机比较麻烦,Spring还提供了基于注解方式来声明。 在消费者r中添加两个消费者,同时基于注解来声明队列和交换机: ```java @RabbitListener(bindings = @QueueBinding( //队列 value = @Queue(name = "driect.queue1"), //交换机 exchange = @Exchange(name = "itcast.direct",type = ExchangeTypes.DIRECT), key = {"red","blue"} )) public void listenDirectQueue2(String msg){ System.out.println("消费者接收到direct.queue1的消息 :【" + msg + "】"); } @RabbitListener(bindings = @QueueBinding( //队列 value = @Queue(name = "driect.queue2"), //交换机 exchange = @Exchange(name = "itcast.direct",type = ExchangeTypes.DIRECT), key = {"red","yellow"} )) public void listenDirectQueue1(String msg){ System.out.println("消费者接收到direct.queue2的消息 :【" + msg + "】"); } ``` <img src="https://pic.code-nav.cn/post_picture/1620630456775032833/CFx7BxV9Ux2UzZuI.webp" alt="13" width="100%" /> ### 2、消息发送 ```java @Test public void testSendDirectExchange(){ //交换机名称 String exchangeName = "itcast.direct"; //消息 String message = "hello,jie"; // 发送消息 rabbitTemplate.convertAndSend(exchangeName,"blue",message); } ``` <img src="https://pic.code-nav.cn/post_picture/1620630456775032833/JcDeCuLfh3eaRYLj.webp" alt="14" width="100%" /> ### 3、总结 > 描述下Direct交换机与Fanout交换机的差异? > > - Fanout交换机将消息路由给每一个与之绑定的队列 > - Direct交换机根据RoutingKey判断路由给哪个队列 > - 如果多个队列具有相同的RoutingKey,则与Fanout功能类似 > > 基于@RabbitListener注解声明队列和交换机有哪些常见注解? > > - @Queue > - @Exchange ## 4.3 Topic(通配符) > `Topic`类型的`Exchange`与`Direct`相比,都是可以根据`RoutingKey`把消息路由到不同的队列。只不过`Topic`类型`Exchange`可以让队列在绑定`Routing key` 的时候使用通配符! > > > > `Routingkey` 一般都是有一个或多个单词组成,多个单词之间以”.”分割,例如: `item.insert` > > 通配符规则: > > `#`:匹配一个或多个词 > > `*`:匹配不多不少恰好1个词 > > > > 举例: > > `item.#`:能够匹配`item.spu.insert` 或者 `item.spu` > > `item.*`:只能匹配`item.spu` ### 1、消息发送 在生产者服务的中添加测试方法: ```java @Test public void testSendTopicExchange(){ //交换机名称 String exchangeName = "itcast.topic"; //消息 String message = "2022冬奥运在中国开始了!"; // 发送消息 rabbitTemplate.convertAndSend(exchangeName,"china.weather",message); } ``` ### 2、消息接收 在消费者服务中添加方法: ```java @RabbitListener(bindings = @QueueBinding( value = @Queue(name = "topic.queue1"), exchange = @Exchange(name = "itcast.topic",type = ExchangeTypes.TOPIC), key = "china.#" )) public void listenTopicQueue1(String msg){ System.out.println("消费者接收到topic.queue1的消息 :【" + msg + "】"); } @RabbitListener(bindings = @QueueBinding( value = @Queue(name = "topic.queue2"), exchange = @Exchange(name = "itcast.topic",type = ExchangeTypes.TOPIC), key = "#.news" )) public void listenTopicQueue2(String msg){ System.out.println("消费者接收到topic.queue2的消息 :【" + msg + "】"); } ``` <img src="https://pic.code-nav.cn/post_picture/1620630456775032833/Nt7JmEK64N2TiYFP.png" alt="15" width="100%" /> ### 3、小结 > - Topic交换机接收的消息RoutingKey必须是多个单词,以 `**.**` 分割 > - Topic交换机与队列绑定时的bindingKey可以指定通配符 > - `#`:代表0个或多个词 > - `*`:代表1个词 > # 5、消息转换器 Spring会把你发送的消息序列化为字节发送给MQ,接收消息的时候,还会把字节反序列化为Java对象。 默认情况下Spring采用的序列化方式是JDK序列化。众所周知,JDK序列化存在下列问题: > - 数据体积过大 > - 有安全漏洞 > - 可读性差 > 我们来测试一下。 ## 5.1 测试默认转换器 ```java @Test public void test6() { Map<String,Object> msg = new HashMap<>(); msg.put("name","zs"); msg.put("age",24); rabbitTemplate.convertAndSend("object.queue",msg); } ``` 我们修改消息发送的代码,发送一个Map对象: 发送消息后查看浏览器: <img src="https://pic.code-nav.cn/post_picture/1620630456775032833/bkc2usWcbs3Ms5lb.webp" alt="16" width="100%" /> ## 5.2 配置JSON转换器 > 显然,JDK序列化方式并不合适。我们希望消息体的体积更小、可读性更高,因此可以使用JSON方式来做序列化和反序列化。 > 在生产者和消费者两个服务中都引入依赖: ```xml <dependency> <groupId>com.fasterxml.jackson.core</groupId> <artifactId>jackson-databind</artifactId> </dependency> ``` 配置消息转换器。 在启动类中添加一个Bean即可: ``` @Bean public MessageConverter messageConverter(){ return new Jackson2JsonMessageConverter(); } ``` <img src="https://pic.code-nav.cn/post_picture/1620630456775032833/HIADN8CMOjYOTz39.webp" alt="17" width="100%" /> 查看浏览器 <img src="https://pic.code-nav.cn/post_picture/1620630456775032833/V3iQ3EpqiiJALXt4.webp" alt="18" width="100%" />
1、初识MQ
## 1.1 同步和异步通讯 > 微服务间通讯有同步和异步两种方式: > > 同步通讯:就像打电话,需要实时响应。 > > 异步通讯:就像发微信,你给别人发了条消息,别人可能没看到,也可能压根不想理你, 难么你就收不到消息,如果她哪天给你回复了,你就收到了。这种通讯时效性不太好,你不能立即得到回复。 <img src="https://pic.code-nav.cn/post_picture/1620630456775032833/DQr81jdaHaqrPpb2.webp" alt="0" width="100%" /> 既然异步通讯这么差,为什么还要用这种,那是因为它有自己的一些长处,同步通讯,像打电话,你正在跟一个妹子打电话,现在又有两个妹子给你打来电话,抱歉打不通,因为你只能同一时刻和一个妹子聊天。 但是微信聊天不一样啊,你发消息,不管是2个妹子还是3个妹子你都可以同时聊,所以异步通讯就是时间管理大师的必备技能啊。 小结: > 两种方式各有优劣,打电话可以立即得到响应,但是你却不能跟多个人同时通话。发送微信可以同时与多个人收发信息,但是往往响应会有延迟。 ### 1.1.1 同步调用的问题 微服务间基于Feign的调用就属于同步方式,存在一些问题。 <img src="https://pic.code-nav.cn/post_picture/1620630456775032833/I9asJeDj9URBkNo1.webp" alt="1" width="100%" /> 小结: > 同步调用的优点: > > - 时效性较强,可以立即得到结果 > > 同步调用的问题: > > - 耦合度高 > - 性能和吞吐能力下降 > - 有额外的资源消耗 > - 有级联失败问题 ### 1.1.2 异步通讯 > 异步调用则可以避免上述问题: 异步调用常见实现就是事件驱动模式,什么是事件驱动呢?我们看一个案例。 <img src="https://pic.code-nav.cn/post_picture/1620630456775032833/QrqdZwWMKByAcp14.webp" alt="3" width="100%" /> 用户支付时,肯定会调用我们的支付服务,而我们的支付服务完成支付以后,就需要订单服务,仓储服务,短信服务各自完成自己的业务。 但是我们是事件驱动模式,不能由支付服务来调用这三个服务,那怎么办呢?所以引入了一个东西叫做Broker(事件代理者)。 <img src="https://pic.code-nav.cn/post_picture/1620630456775032833/1E2XZisjBG80idq4.webp" alt="4" width="100%" /> 什么是事件代理?代理什么事件?在我们这个业务当中,一旦有人支付成功就是一个事件,那么这个事件将来自然就交给了我们的broker 去管理,那订单服务仓储服务和短信服务就会去找broker 呀,说大哥将来真有人支付了,你得通知我们一下啊,这就叫做事件订阅。 <img src="https://pic.code-nav.cn/post_picture/1620630456775032833/x6UiCRec7tcqu89j.webp" alt="5" width="100%" /> 那好了,一旦完成订阅,将来支付服务发现有人支付成功发布一个事件出去说,我这有人支付了订单是1001。 <img src="https://pic.code-nav.cn/post_picture/1620630456775032833/biDE68R6pTdTXwwE.webp" alt="6" width="100%" /> 那broker 就会拿起大喇叭通知这三个服务订单支付了。 <img src="https://pic.code-nav.cn/post_picture/1620630456775032833/xqHdHNOorfU0H5os.webp" alt="" width="100%" /> 这三个服务就去完成各自任务。 在事件模式中,支付服务是事件发布者(publisher),在支付完成后只需要发布一个支付成功的事件(event),事件中带上订单id。 订单服务和物流服务是事件订阅者(Consumer),订阅支付成功的事件,监听到事件后完成自己业务即可。 为了解除事件发布者与订阅者之间的耦合,两者并不是直接通信,而是有一个中间人(Broker)。发布者发布事件到Broker,不关心谁来订阅事件。订阅者从Broker订阅事件,不关心谁发来的消息。 <img src="https://pic.code-nav.cn/post_picture/1620630456775032833/D5O0miSIPubHTp1z.webp" alt="" width="848px" /> Broker 是一个像数据 总线一样的东西,所有的服务要接收数据和发送数据都发到这个总线上,这个总线就像协议一样,让服务间的通讯变得标准和可控。 > 小结 > > 好处: > > - 吞吐量提升:无需等待订阅者处理完成,响应更快速 > > - 故障隔离:服务没有直接调用,不存在级联失败问题 > - 调用间没有阻塞,不会造成无效的资源占用 > - 耦合度极低,每个服务都可以灵活插拔,可替换 > - 流量削峰:不管发布事件的流量波动多大,都由Broker接收,订阅者可以按照自己的速度去处理事件 > > > > 缺点: > > - 架构复杂了,业务没有明显的流程线,不好管理 > - 需要依赖于Broker的可靠、安全、性能 > ## 1.2 什么是MQ > MQ (MessageQueue),中文是消息队列,字面来看就是存放消息的队列。也就是事件驱动架构中的Broker。 比较常见的MQ实现: - ActiveMQ - RabbitMQ - RocketMQ - Kafka 几种常见MQ的对比: <img src="https://pic.code-nav.cn/post_picture/1620630456775032833/cZ29kXtQBb6lulV0.webp" alt="9" width="100%" /> 追求可用性:Kafka、 RocketMQ 、RabbitMQ 追求可靠性:RabbitMQ、RocketMQ 追求吞吐能力:RocketMQ、Kafka 追求消息低延迟:RabbitMQ、Kafka # 2、RabbitMQ快速入门 > RabbitMQ概述 > > RabbitMQ是基于Erlang语言开发的开源消息通信中间件,官网地址:https://www.rabbitmq.com/ ## 2.1 安装RabbitMQ ### 2.1.1 单机部署 1、下载镜像 ``` docker pull rabbitmq:3-management ``` 2、安装MQ ``` docker run \ -e RABBITMQ_DEFAULT_USER=jie \ -e RABBITMQ_DEFAULT_PASS=123456 \ --name mq \ --hostname mq1 \ -p 15672:15672 \ -p 5672:5672 \ -d \ rabbitmq:3-management ``` > 命令解读 > > -e RABBITMQ_DEFAULT_USER:环境变量,用户名 > > -e RABBITMQ_DEFAULT_PASS:环境变量,密码 > > -- name:起个名字 > > --hostname:主机名 > > -p:端口映射,第一个是管理平台的端口,第二个是消息通信端口 > > -d:后台运行 > > rabbitmq:镜像名称 3、浏览器访问(如果防火墙未关闭,记得开启端口号) <img src="https://pic.code-nav.cn/post_picture/1620630456775032833/dB7pfe87mU2JJmL3.webp" alt="10" width="100%" /> ### 2.1.2 RabbitMQ的结构和概念 <img src="https://pic.code-nav.cn/post_picture/1620630456775032833/vJt0FQCDmTSns9lT.webp" alt="11" width="100%" /> > RabbitMQ中的几个概念: > > Channels:操作MQ的工具 > Exchanges:路由消息到队列中 > Queues:缓存消息 > virtual host:虚拟主机,是对queue、exchange等资源的逻辑分组 <img src="https://pic.code-nav.cn/post_picture/1620630456775032833/IgvGbn28mdrqPXIi.webp" alt="12" width="100%" /> > RabbitMQ中的一些角色: > > - publisher:生产者 > - consumer:消费者 > - exchange个:交换机,负责消息路由 > - queue:队列,存储消息 > - virtualHost:虚拟主机,隔离不同租户的exchange、queue、消息的隔离 ## 2.2 常见消息模型 > MQ的官方文档中给出了5个MQ的Demo示例 [RabbitMQ Tutorials — RabbitMQ](https://www.rabbitmq.com/getstarted.html) ,对应了几种不同的用法: <img src="https://pic.code-nav.cn/post_picture/1620630456775032833/HcA1gcvws2gwfxBD.webp" alt="13" width="100%" /> <img src="https://pic.code-nav.cn/post_picture/1620630456775032833/pgUzmIEax7Yo1KnV.webp" alt="14" width="100%" /> ## 2.3 入门案例 > 简单队列模式的模型图: > > <img src="https://pic.code-nav.cn/post_picture/1620630456775032833/jjAOYVGCe49zaqI8.png" alt="15" width="100%" />官方的HelloWorld是基于最基础的消息队列模型来实现的,只包括三个角色: > > - publisher:消息发布者,将消息发送到队列queue > - queue:消息队列,负责接受并缓存消息 > - consumer:订阅队列,处理队列中的消息 ### 2.3.1 导入demo工程 码云提供了一个Demo工程,mq-demo: https://gitee.com/boring-yingjie/mq-demo.git 导入后可以看到结构如下: <img src="https://pic.code-nav.cn/post_picture/1620630456775032833/Hlq3u3o5pszjV0ro.png" alt="16" width="502px" /> 包括三部分: - mq-demo:父工程,管理项目依赖 - publisher:消息的发送者 - consumer:消息的消费者 ### 2.3.2 publisher 我们进入 PublisherTest,在ConnectionFactory factory = new ConnectionFactory();打一个断点,用Debug运行,进入断点。 1、在这里我们要做的第一件是就是创建ConnectionFactory(连接工厂),你要向MQ发送消息,就要建立连接,而建立连接就要用到连接工厂。 <img src="https://pic.code-nav.cn/post_picture/1620630456775032833/oTwenIRTy3sAdUSS.webp" alt="17" width="100%" /> 2、 创建好连接工厂,设置地址信息,就是MQ的地址信息。记得改成你的IP地址。还有端口号、主机名、vhost、用户名、密码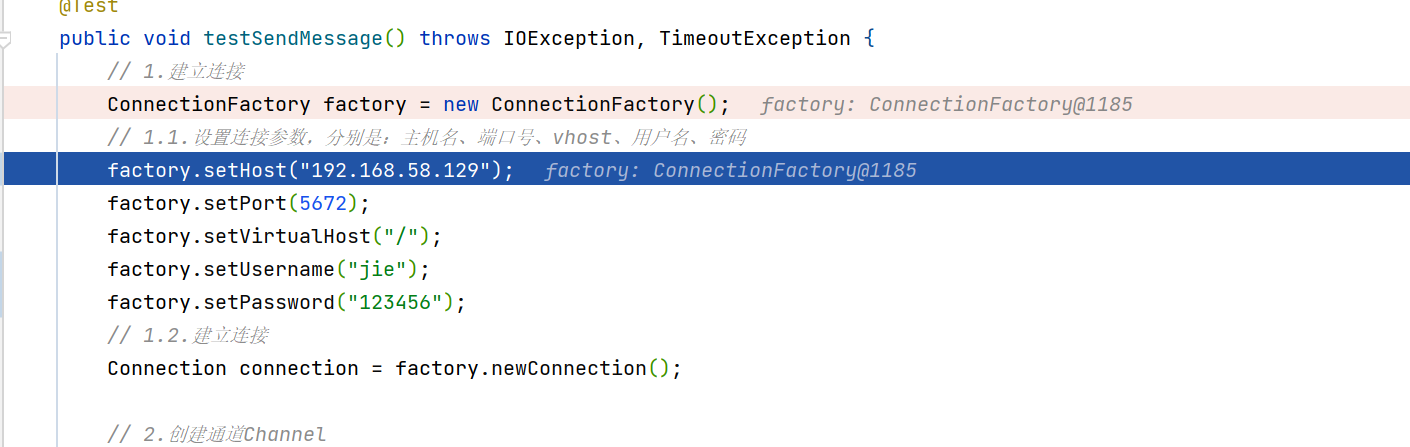 2、 创建好连接工厂,设置地址信息,就是MQ的地址信息。记得改成你的IP地址。还有端口号、主机名、vhost、用户名、密码<img src="https://pic.code-nav.cn/post_picture/1620630456775032833/BPVf2pnCNLGTaQ0j.webp" alt="18" width="100%" /> 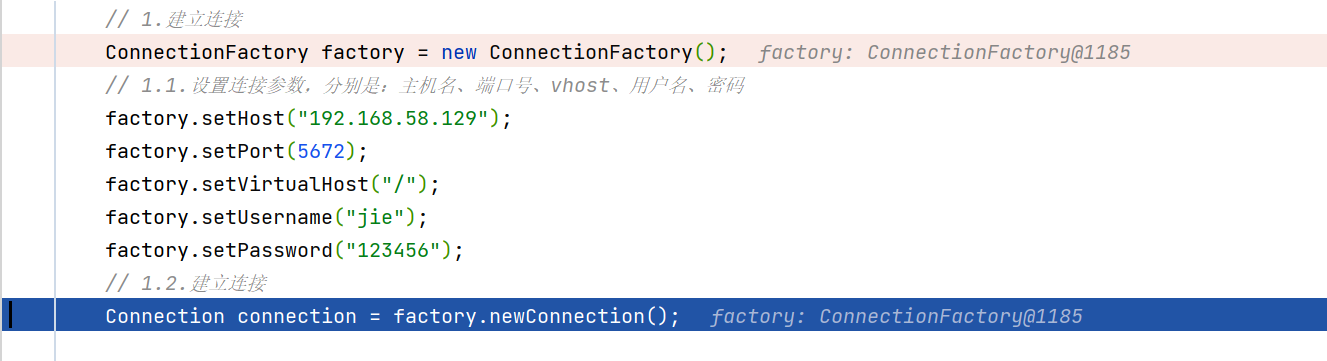 <img src="https://pic.code-nav.cn/post_picture/1620630456775032833/QmahfE7gF6eVHnu0.webp" alt="19" width="100%" /> 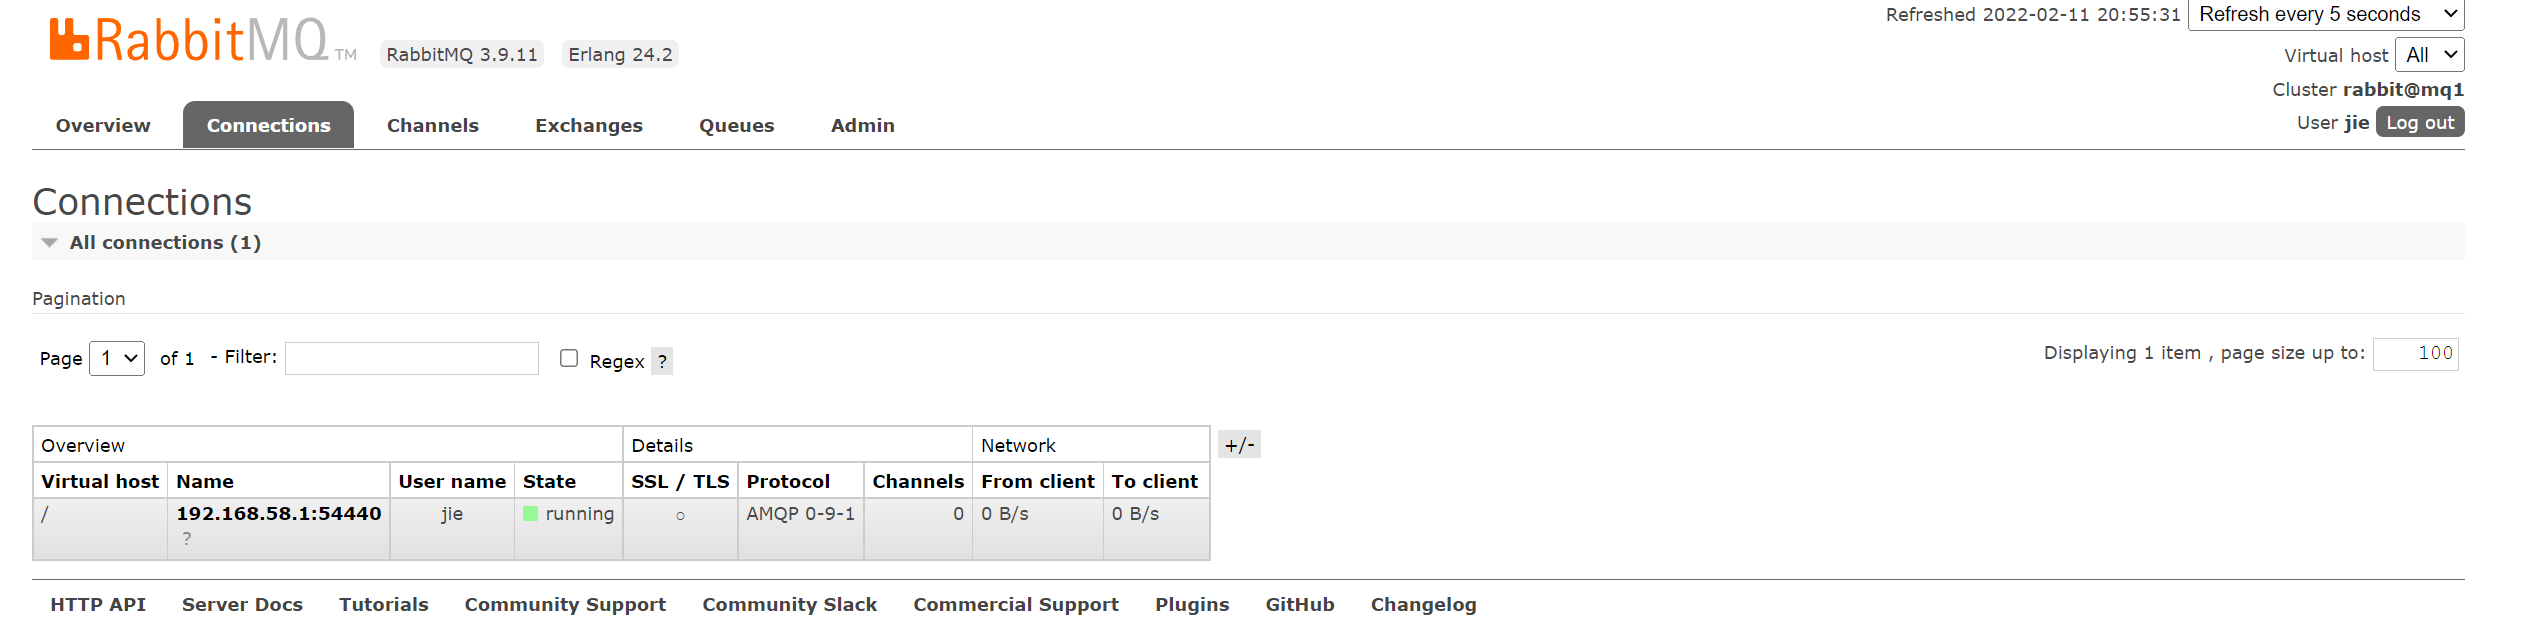 <img src="https://pic.code-nav.cn/post_picture/1620630456775032833/WHHW1tPtvRAU4TOH.webp" alt="20" width="100%" /> 已经成功的连上来了,我们回到代码区。 <img src="https://pic.code-nav.cn/post_picture/1620630456775032833/Xi2Ky1g8mNOiRqhM.webp" alt="21" width="100%" /> 这行代码就是在创建我们的代码通道,我们往下走,通道已经创建,我们去浏览器看一下。 <img src="https://pic.code-nav.cn/post_picture/1620630456775032833/rxsJxe7DbXP7OdzS.webp" alt="22" width="100%" /> 通道有了,就可以基于通道向队列当中发送消息了。 4、创建队列 <img src="https://pic.code-nav.cn/post_picture/1620630456775032833/H4QdswdsL77kSK12.webp" alt="23" width="100%" /> 我们再看看浏览器。 <img src="https://pic.code-nav.cn/post_picture/1620630456775032833/ayZItaWu2xnJARkV.webp" alt="24" width="100%" /> 这样子就完成了队列的创建,有了队列,下一步生产者就可以向队列发送消息了。 5、发送消息 <img src="https://pic.code-nav.cn/post_picture/1620630456775032833/7orrjp1SQuCboG2r.webp" alt="25" width="100%" /> 6、关闭通道和连接 <img src="https://pic.code-nav.cn/post_picture/1620630456775032833/uvndic9vkFsbe0ZM.png" alt="26" width="100%" /> 我们回到浏览器看看 <img src="https://pic.code-nav.cn/post_picture/1620630456775032833/O7Yez1KGaxtMb5gO.webp" alt="27" width="100%" /> 我们就会发现里面有一条消息了,我们点击Name进去看看。 点击Get messages ,我们可以看一下消息。 <img src="https://pic.code-nav.cn/post_picture/1620630456775032833/6ZdcIIJSwuJ7bk0j.webp" alt="28" width="100%" /> 我们在第六步的时候,已经关闭通道和连接了,那我们的发送者已经结束了,连接都断开了,也就是说,我发完了,我的事也就没了,我不用管谁收到了没有,这就是解除耦合。 那谁来结束呢?消费者,consumer。 ### 2.3.3 consumer 我们进入 ConsumerTest,ConsumerTest的代码跟PublisherTest非常的像,在ConnectionFactory factory = new ConnectionFactory();打一个断点,用Debug运行,进入断点。 前面的操作都是一样的,我们直接看创建队列。 <img src="https://pic.code-nav.cn/post_picture/1620630456775032833/d7ONt2N1F4NiEcMG.png" alt="29" width="100%" /> 为什么又要创建一次队列?PublisherTest不是已经创建过了嘛。 这是因为生产者和消费者和消费者的启动顺序是不确定的,万一是消费者先启动了, 我想来找这个队列不存在怎么办?所以为了避免这个问题的发生,所以生产者和消费者都要各自去创建队列。 那么我们再执行这个代码它会不会再生成一个队列呢?我们去浏览器看一下。 <img src="https://pic.code-nav.cn/post_picture/1620630456775032833/TWbyynBZHRrcL6gV.webp" alt="30" width="100%" /> 答案是没有,我们这个代码重复执行不要紧,这是一个保险措施。 往下走。<img src="https://pic.code-nav.cn/post_picture/1620630456775032833/AVcCJBc1AYlqnvsO.webp" alt="31" width="100%" /> basicConsume(消费),消费一条消息,这里采用了一个匿名内部类的方法,里面还重写了一个方法handleDelivery,顾名思义,处理头例的消息。利用channel将消费者与队列绑定,我们再往下走。 <img src="https://pic.code-nav.cn/post_picture/1620630456775032833/xCDcQJNWWAedgVoM.webp" alt="32" width="100%" /> 控制台就打印了生产者发送的消息,我们再看浏览器。 <img src="https://pic.code-nav.cn/post_picture/1620630456775032833/YfERHRm5NfC1Fczw.webp" alt="33" width="100%" /> 发现这块的消息也没了,也就是说,一旦消费,消息会立即删除。 ## 2.4 总结 > 基本消息队列的消息发送流程: > > 1. 建立connection > 2. 创建channel > 3. 利用channel声明队列 > 4. 利用channel向队列发送消息 > > 基本消息队列的消息接收流程: > > 1. 建立connection > 2. 创建channel > 3. 利用channel声明队列 > 4. 定义consumer的消费行为handleDelivery() > 5. 利用channel将消费者与队列绑定
智能 BI 项目后端运行&部署
# 环境准备 + [源码](https://www.codefather.cn/course/1790980531403927553/section/1790990660274794498?contentType=text¤t=1&sortField=thumbNum&tabKey=note&type=#) + Java >= 8 + Maven [安装教程](https://www.codefather.cn/post/1828379004995489793) + IDEA [你懂的教程](https://www.codefather.cn/essay/1837021571340648449) + Redis 安装包 链接: https://pan.baidu.com/s/1-QhCv0Crg2zvwG3ODxvv-Q 提取码: vmty + MySQL 安装包 链接:https://pan.baidu.com/s/1uIDAzBtxBXHq8YZOfhlI9w?pwd=bbr5 提取码:bbr5 + RabbitMQ 3.1.2 安装包 [官方链接](https://github.com/rabbitmq/rabbitmq-server/releases/download/v3.12.13/rabbitmq-server-3.12.13.exe) + Erlang 安装包 OTP25.3 [官方链接](https://erlang.org/download/otp_versions_tree.html) + RabbitMQ + Erlang [百度网盘链接](https://pan.baidu.com/s/1QVANK7qBAHFnMLlAzBdt4w?pwd=3sgd) 提取码:3sgd # 本地启动 + MySQL[教程](https://zhuanlan.zhihu.com/p/37152572) + Redis 下载下来直接默认下一步就行 + RabbitMQ 安装运行教程 + 配置 IDEA Maven 配置 [教程](https://www.codefather.cn/post/1836689783992958977) --- 安装 Redis <img src="https://pic.code-nav.cn/post_picture/1608460212774109186/cL3d4VzSTZZAAR69.webp" alt="image-20240927142356752" width="495px" /> <img src="https://pic.code-nav.cn/post_picture/1608460212774109186/2MR2ZVAih407Qdh0.webp" alt="image-20240927142420727" width="495px" /> <img src="https://pic.code-nav.cn/post_picture/1608460212774109186/f2soTVnvOaL3mxli.png" alt="image-20240927142458789" width="495px" /> > 如果想要修改端口号可以把上面的 6379 修改成对应的端口号 <img src="https://pic.code-nav.cn/post_picture/1608460212774109186/dpxVUhaqqE5MmE1t.png" alt="image-20240927142517509" width="495px" /> <img src="https://pic.code-nav.cn/post_picture/1608460212774109186/siXBVbuukh6y5ow6.png" alt="image-20240927142554824" width="495px" /> <img src="https://pic.code-nav.cn/post_picture/1608460212774109186/uGFnu2Kat026qJxS.webp" alt="image-20240927142615083" width="461px" /> <img src="https://pic.code-nav.cn/post_picture/1608460212774109186/06H0LuTtkrYeXXps.webp" alt="image-20240927142632154" width="495px" /> 验证 Redis 是否安装成功 win +R 输入 `services.msc` <img src="https://pic.code-nav.cn/post_picture/1608460212774109186/Bt7ogy61KK3w0xS3.png" alt="image-20240927145432858" width="399px" /> <img src="https://pic.code-nav.cn/post_picture/1608460212774109186/18yZhXKpFZMAWRPU.webp" alt="image-20240927143108862" width="100%" /> --- 1、安装 Erlang + RabbitMQ 先安装 `Erlang` <img src="https://pic.code-nav.cn/post_picture/1608460212774109186/x3j36uGaudmCtcZ9.webp" alt="image-20240927005741030" width="449px" /> > 选择 是 <img src="https://pic.code-nav.cn/post_picture/1608460212774109186/To0vLxAVevdvfTBk.png" alt="image-20240927005735279" width="491px" /> <img src="https://pic.code-nav.cn/post_picture/1608460212774109186/VqblKz6dbNwEDnMd.png" alt="image-20240927005819602" width="499px" /> <img src="https://pic.code-nav.cn/post_picture/1608460212774109186/VWA7EB1so63AM0vP.png" alt="image-20240927005835856" width="499px" /> <img src="https://pic.code-nav.cn/post_picture/1608460212774109186/FnLlkUvEeiyQq51X.png" alt="image-20240927005847403" width="499px" /> <img src="https://pic.code-nav.cn/post_picture/1608460212774109186/kp4ha4mlwNt6MWzT.png" alt="image-20240927005941421" width="499px" /> 2、安装 RabbitMQ 直接双击 exe 程序即可安装 <img src="https://pic.code-nav.cn/post_picture/1608460212774109186/fXTyDdUEMAyKq16o.webp" alt="" width="449px" /> <img src="https://pic.code-nav.cn/post_picture/1608460212774109186/EEPMg0oMYzunyvLC.png" alt="image-20240927010036491" width="499px" /> <img src="https://pic.code-nav.cn/post_picture/1608460212774109186/32ht10GtObhhEyBl.png" alt="image-20240927010100135" width="494px" /> <img src="https://pic.code-nav.cn/post_picture/1608460212774109186/eYoYhecKLRw6kPKL.png" alt="image-20240927010111401" width="499px" /> <img src="https://pic.code-nav.cn/post_picture/1608460212774109186/ftGQdwTJTYaCpm88.webp" alt="image-20240927010146493" width="554px" /> <img src="https://pic.code-nav.cn/post_picture/1608460212774109186/UnjPZrhSmiPjnVx4.webp" alt="image-20240927010330897" width="623px" /> <img src="https://pic.code-nav.cn/post_picture/1608460212774109186/ZXKTykR7bh929mWQ.png" alt="image-20240927010355970" width="499px" /> <img src="https://pic.code-nav.cn/post_picture/1608460212774109186/HYEknNDDUEJzjnL7.png" alt="image-20240927010409998" width="499px" /> --- 3、启动 RabbitMQ 1)搜索 cmd -> 以管理员身份运行 <img src="https://pic.code-nav.cn/post_picture/1608460212774109186/7xW669URqHs78rwH.webp" alt="image-20240927013101415" width="100%" /> 2)进入 MQ 安装路径:`C:\Program Files\RabbitMQ Server\rabbitmq_server-3.12.13\sbin` ``` cd "C:\Program Files\RabbitMQ Server\rabbitmq_server-3.12.13\sbin" ``` 3)输入 `rabbitmq-plugins.bat enable rabbitmq_management` ``` rabbitmq-plugins.bat enable rabbitmq_management ``` <img src="https://pic.code-nav.cn/post_picture/1608460212774109186/lLqZP750mIipfVgP.png" alt="image-20240927014128347" width="100%" /> 4)依次输入下面的命令 ``` rabbitmq-service.bat stop rabbitmq-service.bat install rabbitmq-service.bat start ``` <img src="https://pic.code-nav.cn/post_picture/1608460212774109186/9ePFPQkPAVpX5wsY.png" alt="image-20240927014336375" width="100%" /> <img src="https://pic.code-nav.cn/post_picture/1608460212774109186/HrfIpKakC6FxUJ81.png" alt="image-20240927014510092" width="100%" /> <img src="https://pic.code-nav.cn/post_picture/1608460212774109186/6ZM9qBxCcZA9NUg1.png" alt="image-20240927014536826" width="100%" /> 5)然后可以直接在浏览器上 `http://localhost:15672/mgmt` 账号:`guest` 密码:`guest` <img src="https://pic.code-nav.cn/post_picture/1608460212774109186/AwdVcol0Ifqf1srk.webp" alt="image-20240927014655951" width="100%" /> 6)重启后这么启动呢?一般默认重启之后自启动 win + R 输入 `services.msc` 找到 `RabbitMQ ` 右键 `Start` <img src="https://pic.code-nav.cn/post_picture/1608460212774109186/IK8m0SRN6NZH3Gnp.webp" alt="image-20240927183034440" width="100%" /> 启动成功 <img src="https://pic.code-nav.cn/post_picture/1608460212774109186/JBEXIfrz5HHXAM0j.webp" alt="image-20240927183109001" width="100%" /> ## 安装依赖 正常项目启动右下角会有下面的提示,可以直接确认 `Automatically` <img src="https://pic.code-nav.cn/post_picture/1608460212774109186/RYLDH4zY2BBALwNU.png" alt="image-20240920220528840" width="368px" /> 点击之后,会弹出一个框点同意就好了 <img src="https://pic.code-nav.cn/post_picture/1608460212774109186/NMsWE2Fj9ZCi9deM.webp" alt="image-20240920225429979" width="100%" /> --- 如果发现自己 idea 右侧没有 Maven 插件,那么应该就是打开的路径有些小问题,确保自己打开的是路径下包含下面的内容 <img src="https://pic.code-nav.cn/post_picture/1608460212774109186/T3ElugaWl2JHvwjA.webp" alt="image-20240927131824965" width="100%" /> --- 确保自己 IDEA Maven 的配置,点击侧边栏的 Maven 进行安装 Maven 依赖 + Maven 选着自己安装的不是 IDEA 内置的 + config 文件选着已经配置镜像的 `setting.xml` + `Use setting from .mvc/maven.conf` 这个是非选择状态 <img src="https://pic.code-nav.cn/post_picture/1608460212774109186/mg7AcnzMd1PAeaQ1.webp" alt="image-20240927133332996" width="100%" /> <img src="https://pic.code-nav.cn/post_picture/1608460212774109186/RiQ7RwM674yjt9xb.webp" alt="image-20240920211634275" width="100%" /> <img src="https://pic.code-nav.cn/post_picture/1608460212774109186/s3YAj8aejYwe7H4k.webp" alt="image-20240920211804624" width="100%" /> 这样操作之后可以看到,正在下载依赖 > 下载的速度慢的话,看上面 Maven 环境准备安装教程里面有如何配置国内镜像 <img src="https://pic.code-nav.cn/post_picture/1608460212774109186/Y3aM6u0V0V6leCj2.webp" alt="image-20240927131904171" width="100%" /> 下载依赖完成之后: <img src="https://pic.code-nav.cn/post_picture/1608460212774109186/OXQNRUuYBbFhVDmC.webp" alt="image-20240920225545152" width="100%" /> --- 下载中途断网,可能会出现下面的情况 <img src="https://pic.code-nav.cn/post_picture/1608460212774109186/6HKCQq5kMHC1FV47.webp" alt="image-20240927133141396" width="100%" /> <img src="https://pic.code-nav.cn/post_picture/1608460212774109186/Cs2svAueBmiTIOCs.webp" alt="image-20240927133444194" width="100%" /> > 直接点击 `Try to run Maven import with -U flag (force update snapshots)` 恢复下载! <img src="https://pic.code-nav.cn/post_picture/1608460212774109186/C1XvpQtYKEVZjeLi.webp" alt="image-20240927133608680" width="100%" /> ## MySQL + 已经安装 MySQL + 有 SQL 文件(根目录下 sql) <img src="https://pic.code-nav.cn/post_picture/1608460212774109186/e5f4H5EMNp7eKrxq.webp" alt="image-20240827214247374" width="652px" /> 先下载 IDEA 连接 MySql 所需要的依赖 <img src="https://pic.code-nav.cn/post_picture/1608460212774109186/0cFgrP7JdYB4Nnvz.webp" alt="image-20240827214523819" width="100%" /> <img src="https://pic.code-nav.cn/post_picture/1608460212774109186/ZktL1Xjn1D39pZmQ.webp" alt="image-20240827214916326" width="100%" /> 链接成功,链接成功之后就可以执行下面操作 <img src="https://pic.code-nav.cn/post_picture/1608460212774109186/JyL22c2ySm3X2yRp.webp" alt="image-20240927140403815" width="100%" /> 先执行创建库表 SQL, Ctrl + A 右键 `Execute` <img src="https://pic.code-nav.cn/post_picture/1608460212774109186/z7vBeb4blfsDaw1k.webp" alt="image-20240927140556671" width="100%" /> <img src="https://pic.code-nav.cn/post_picture/1608460212774109186/4KeUUZvIY7oo2CGw.webp" alt="image-20240927141024590" width="648px" /> 执行成功之后,可以 SQL 语句左侧会有 √ <img src="https://pic.code-nav.cn/post_picture/1608460212774109186/MetcmwJGSfzmnT0D.webp" alt="image-20240927141143260" width="100%" /> <img src="https://pic.code-nav.cn/post_picture/1608460212774109186/SFskfYOwrBMJphz2.webp" alt="image-20240927141223861" width="100%" /> 如果没有看到` yubi` 数据库,点击 localhost 后面的框,在下拉框找到 `yubi` 点击前面方框就可以看到 `yubi` 数据库了 <img src="https://pic.code-nav.cn/post_picture/1608460212774109186/q2jpUH07fR29e6s9.png" alt="image-20240927141334337" width="381px" /> ## 配置文件 <img src="https://pic.code-nav.cn/post_picture/1608460212774109186/ZUrfuZsdyUJL1VrG.webp" alt="image-20240920232741118" width="100%" /> + 如果 Redis 直接一路默认,那么 application.yml 关于 Redis 的配置就不用修改 + application.yml 默认是本地运行时生效的配置 + application-prod.yml 当在服务器指定 ` --spring.profiles.active=prod` 才会生效,一般写线上配置,比如:线上 MySQL、Redis ... + application-test.yml 当在服务器指定 ` --spring.profiles.active=test` 才会生效 1、注意格式: + 冒号是英文的 + 具体的值和冒号之间有一个空格,字符串不需要加 “” ```yml spring: application: name: yubi-backend ``` 2、想要修改项目运行的端口? ```yml server: port: 8101 # 修改端口 ``` 前端请求后端的 baseUrl 就是 `http://localhost:端口/api` 具体可以后端提供的接口文档在后面的 启动项目 有接口文档部分 3、修改自己 MySQL、Redis 配置 MySQL ```yml spring: # 数据库配置 datasource: driver-class-name: com.mysql.cj.jdbc.Driver url: jdbc:mysql://localhost:3306/yubi # yudada 是数据库的名称 如果是远程 MySQL 例如: jdbc:mysql://192.129.11.11:3306/yudada username: root # 用户名 password: 123456 # MySQL 设置的密码 ``` Redis ```yml spring: redis: database: 1 host: localhost # 如果线上改成线上 IP port: 6379 # Redis 具体运行端口,默认安装 6379 timeout: 5000 # password: 123456 # 密码,默认安装没有密码,如果服务器 Redis 有密码就修改这个 ``` 注意: 还需要修改一个地方 Redis 才能真正的启动 <img src="https://pic.code-nav.cn/post_picture/1608460212774109186/ILn3KMzPKPyKc8xg.webp" alt="image-20240927135850323" width="100%" /> 修改后的效果 <img src="https://pic.code-nav.cn/post_picture/1608460212774109186/7XH2rMSr8k3UeZzs.webp" alt="image-20240927135914314" width="100%" /> 如果服务器 Redis 有密码还需要修改 `Redisson` 配置 ```java @Configuration @ConfigurationProperties(prefix = "spring.redis") @Data public class RedissonConfig { private Integer database; private String host; private String password; private String port; @Bean public RedissonClient redissonClient() { Config config = new Config(); config.useReplicatedServers() .setDatabase(database) .setPassword("".equals(password) ? null : password) // 这样没有密码就用默认值 null 有密码就用密码更加灵活 .addNodeAddress(String.format("redis://%s:%s", host, port)); return Redisson.create(config); } } ``` 4、RabbitMQ 配置 ```yml spring: rabbitmq: host: localhost port: 5672 password: guest username: guest ``` 等到部署到服务器上的时候 + `host` 服务器 IP 或者 域名 + `port` 端口默认 `5672` + `password` 密码 + `username` 账号 --- 这里如果是后面自己在服务器上的 RabbitMQ 创建的新的用户,本地有很大概率连接不上 具体原因是因为没开启允许远程访问的权限 [解决办法](https://www.codefather.cn/post/1806571807984234497) > 具体 BUG 效果是这样的: <img src="https://pic.code-nav.cn/post_picture/1608460212774109186/4ve32TkizykqSnfg.png" alt="image-20240927190618800" width="742px" /> 5、使用 `星火AI` 进行 AI 生成 [配置教程](https://www.codefather.cn/post/1806571470552477698) ## 初始化 RabbitMQ <img src="https://pic.code-nav.cn/post_picture/1608460212774109186/Y4n7kmneGNpE4rK8.webp" alt="image-20241019164149537" width="100%" /> <img src="https://pic.code-nav.cn/post_picture/1608460212774109186/rGQKN2CBGgDoQO9l.webp" alt="image-20241019164143410" width="100%" /> <img src="https://pic.code-nav.cn/post_picture/1608460212774109186/HwWq32scVzbHtGUF.webp" alt="image-20241019165025347" width="100%" /> 执行完这两个 初始化的 Main 方法之后,打开本地 web 管理页面 <img src="https://pic.code-nav.cn/post_picture/1608460212774109186/zwKvu5fik2u8okuS.webp" alt="image-20241019165053691" width="100%" /> <img src="https://pic.code-nav.cn/post_picture/1608460212774109186/U5aC5XMLGljMkT7J.webp" alt="image-20241019165112166" width="100%" /> ## 启动项目 <img src="https://pic.code-nav.cn/post_picture/1608460212774109186/OuRxSxxEg2fodFL6.webp" alt="image-20240927141956973" width="100%" /> <img src="https://pic.code-nav.cn/post_picture/1608460212774109186/T6pWhoCiUKEwRQXc.webp" alt="image-20240927142025347" width="100%" /> > 直接点击 `Enable annotation processing` <img src="https://pic.code-nav.cn/post_picture/1608460212774109186/Cv05WqtIa9ivbG9p.webp" alt="image-20241019165255285" width="100%" /> 访问接口文档: http://localhost:8101/api/doc.html <img src="https://pic.code-nav.cn/post_picture/1608460212774109186/Dzt6ZXsXHJEnRD0Y.webp" alt="image-20240921215204817" width="100%" /> # 部署 ## 安装必备环境 ### 放行服务器端口 服务器 <img src="https://pic.code-nav.cn/post_picture/1608460212774109186/2q8zwo9rl8GBqumw.webp" alt="image-20241019165518596" width="100%" /> 宝塔(如果有的话) <img src="https://pic.code-nav.cn/post_picture/1608460212774109186/BiEyyUuvWet5Qxob.webp" alt="image-20241019165455919" width="100%" /> 下面几个端口是需要放行的 - 3306 MySQL - 6379 Redis - 15672 RabbitMQ web 面板 - 5672 RabbitMQ - 22 端口 SSH - 443 HTTPS - 80 HTTP ### 服务器安装 RabbitMQ #### 安装 DNF 1、 ``` yum install epel-release ``` <img src="https://pic.code-nav.cn/post_picture/1608460212774109186/cMeEMgZEcibvfq9I.webp" alt="image-20241009203545454" width="100%" /> 2、 ``` yum install dnf ``` <img src="https://pic.code-nav.cn/post_picture/1608460212774109186/bGP6yCtaGmtC185W.webp" alt="image-20241009203632789" width="100%" /> 安装成功 <img src="https://pic.code-nav.cn/post_picture/1608460212774109186/UD4lMeOlNctS0GvX.webp" alt="image-20241009203651254" width="100%" /> #### 安装 RabbitMQ 1、指定仓库 ``` sudo dnf install -y https://packagecloud.io/install/repositories/rabbitmq/rabbitmq-server/script.rpm ``` 2、安装 `rabbitmq` 默认会安装 `erlang` ``` sudo dnf install -y rabbitmq-server-3.3.5-34.el7 ``` <img src="https://pic.code-nav.cn/post_picture/1608460212774109186/KG3zSRMf50UA22dB.webp" alt="image-20241009211123061" width="100%" /> 3、开启 web 管理页面 ``` sudo rabbitmq-plugins enable rabbitmq_management ``` 4、启动 RabbitMQ ``` sudo systemctl start rabbitmq-server ``` 5、查看运行状态 ``` systemctl status rabbitmq-server ``` <img src="https://pic.code-nav.cn/post_picture/1608460212774109186/jpeoiMY0PmoNOZyU.webp" alt="image-20241009212252468" width="100%" /> 6、设置开机自启动 ``` sudo systemctl enable rabbitmq-server ``` #### 登录 web 管理界面 http://服务器IP:15672 <img src="https://pic.code-nav.cn/post_picture/1608460212774109186/yKAUH42iQAxj2umH.png" alt="image-20241009214139890" width="100%" /> 默认账号、密码都是 `guest` 要是报错就自己再仔细看看是不是输入错误了 #### 创建用户&禁用默认用户远程访问 + 创建用户 + 允许远程连接 <img src="https://pic.code-nav.cn/post_picture/1608460212774109186/Xz4VDOud0Af15VkO.webp" alt="image-20241009200510767" width="100%" /> <img src="https://pic.code-nav.cn/post_picture/1608460212774109186/TWZHR3tQzsiYCvVJ.webp" alt="image-20241009200822956" width="100%" /> <img src="https://pic.code-nav.cn/post_picture/1608460212774109186/PKdmAuwJ4ryL57I6.webp" alt="image-20241009200851259" width="100%" /> 执行好之后添加好的用户 `Can access virtual hosts` 那一栏就不会是黄颜色的了 --- **重要** 关闭允许 `guest` 用户远程访问,为了安全 <img src="https://pic.code-nav.cn/post_picture/1608460212774109186/Sz8Rp661Tj4NSsbF.webp" alt="image-20241009201040420" width="100%" /> <img src="https://pic.code-nav.cn/post_picture/1608460212774109186/mCgeR9oA922m4jjr.webp" alt="image-20241009201140735" width="100%" /> ### Docker 安装 RabbitMQ Docker 安装就**相对简单**很多了! 1、下载 rabbitmq ``` docker pull rabbitmq:3.12.13-management ``` 2、运行 rabbitmq ``` docker run -d --name=rabbitmq -p 15672:15672 -p 5672:5672 rabbitmq:3.12.13-management ``` <img src="https://pic.code-nav.cn/post_picture/1608460212774109186/SzpP94VFtIVI2Ofq.png" alt="image-20241009213651818" width="100%" /> 3、登录 web 管理界面 地址: `http://服务器IP:15672` 账号、密码默认 `guest` <img src="https://pic.code-nav.cn/post_picture/1608460212774109186/VXstpRLS47OPqOk9.png" alt="image-20241009214146062" width="100%" /> 4、看上面关于 创建用户&禁用默认用户远程访问 章节 ## 初始化 RabbitMQ <img src="https://pic.code-nav.cn/post_picture/1608460212774109186/unWLvRiKCJHPIrgp.webp" alt="image-20241019170307233" width="100%" /> <img src="https://pic.code-nav.cn/post_picture/1608460212774109186/cvmwY0EX7AFTrEDZ.webp" alt="image-20241019170419540" width="100%" /> 执行完这两个 Main 方法,查看 web 管理页面,就可以发现多了 <img src="https://pic.code-nav.cn/post_picture/1608460212774109186/lMo5raJ7DZ0D23dP.webp" alt="image-20241019170914842" width="100%" /> <img src="https://pic.code-nav.cn/post_picture/1608460212774109186/GcZApJOnN8XVG9nm.webp" alt="image-20241019165112166" width="100%" /> ## 制作 + 上传 JAR 包 <img src="https://pic.code-nav.cn/post_picture/1608460212774109186/XBc3vtFRKBw8TPkR.webp" alt="image-20240920234801067" width="100%" /> > Lifecycle -> package 双击 之后我们就可以在 `target` 目录下面找到打包好的 jar 包 如果报错的话: 1. 删除 `target` 目录(IDEA 右键删除即可),重新打包尝试 2. Maven -> Lifecyle -> clean 3. 退出 IDEA 在`文件管理器`找到该项目的 `.idea` 文件右键删除 ,然后重新打开 IDEA 重新走一遍流程 <img src="https://pic.code-nav.cn/post_picture/1608460212774109186/MNyszuHkfnZZEKa0.webp" alt="image-20240928104016670" width="100%" /> <img src="https://pic.code-nav.cn/post_picture/1608460212774109186/jVxX9np8dvUM0AHg.webp" alt="image-20240928104101415" width="375px" /> <img src="https://pic.code-nav.cn/post_picture/1608460212774109186/1LDLHH9UrIxYO8hu.webp" alt="image-20241019171110800" width="100%" /> ## 部署 后面可以参考这篇文章 [『 后端部署(通用) 』](https://www.codefather.cn/post/1837499403858690049)
面试题:rabbitmq如何保证顺序消费
**为什么要保证顺序消费?** 要保证mq顺序消费的实际场景比较少见。假设有3个用户发送三个订单,这里每个订单要先后完成insert,update,delete操作,如果我们先执行delete就会出问题。 rabbitmq的队列是先进先出的原则,所以只要是发送给同一个队列的消息,都能保证消费时顺序一致;**因此三个用户的三组订单操作要分别发送给三个队列来消费;** ```java //创建三个队列 @Configuration public class TripleQueueConfig { @Bean public DirectExchange directExchange(){ DirectExchange directExchange = new DirectExchange("triple_exchange"); return directExchange; } @Bean public Queue tripleQueueOne(){ Queue queue = new Queue("triple_queue_one"); return queue; } @Bean public Queue tripleQueueTwo(){ Queue queue = new Queue("triple_queue_two"); return queue; } @Bean public Queue tripleQueueThree(){ Queue queue = new Queue("triple_queue_three"); return queue; } @Bean public Binding bindingOne(){ return BindingBuilder.bind(tripleQueueOne()).to(directExchange()).with("triple-one"); } @Bean public Binding bindingTwo(){ return BindingBuilder.bind(tripleQueueTwo()).to(directExchange()).with("triple-two"); } @Bean public Binding bindingThree(){ return BindingBuilder.bind(tripleQueueThree()).to(directExchange()).with("triple-three"); } } ``` ```java //创建三个队列对应的消费者 @Component @RabbitListener(queues = {"triple_queue_one"}) public class TripleQueueOneListener { @RabbitHandler public void handler(Message message){ System.out.println("TripleQueueOneListener 消费"+message.getMsg()); } } @Component @RabbitListener(queues = {"triple_queue_three"}) public class TripleQueueThreeListener { @RabbitHandler public void handler(Message message){ System.out.println("TripleQueueThreeListener 消费"+message.getMsg()); } } @Component @RabbitListener(queues = {"triple_queue_two"}) public class TripleQueueTwoListener { @RabbitHandler public void handler(Message message){ System.out.println("TripleQueueTwoListener 消费"+message.getMsg()); } } ``` ```java //发送消息 @GetMapping("/sendMsgToTripleQueue") public String sendMsgToTripleQueue() { //这是我们将消息发给三个队列,来提高并发处理能力,查看消息处理结果 for (int i = 1; i <= 3; i++) { Message message = new Message(); message.setId(i); for (int j = 1; j <= 3; j++) { message.setGroupId(j); message.setMsg("订单操作id:" + i + " 用户id:" + j); if (j==1){ rabbitTemplate.convertAndSend("triple_exchange","triple-one", message); } if (j==2){ rabbitTemplate.convertAndSend("triple_exchange","triple-two", message); } if (j==3){ rabbitTemplate.convertAndSend("triple_exchange","triple-three", message); } } } return "消息发送成功"; } ``` ```shell TripleQueueTwoListener 消费订单操作id:1 用户id:2 TripleQueueThreeListener 消费订单操作id:1 用户id:3 TripleQueueOneListener 消费订单操作id:1 用户id:1 TripleQueueTwoListener 消费订单操作id:2 用户id:2 TripleQueueThreeListener 消费订单操作id:2 用户id:3 TripleQueueOneListener 消费订单操作id:2 用户id:1 TripleQueueTwoListener 消费订单操作id:3 用户id:2 TripleQueueThreeListener 消费订单操作id:3 用户id:3 TripleQueueOneListener 消费订单操作id:3 用户id:1 ``` 可以看到消费者的执行顺序是不一定的,有时TripleQueueOneListener先执行,有时TripleQueueTwoListener先执行,这就是为什么要限制同一个用户的一组操作要发送给同一个队列的原因,因为在一个队列里就能保证消息的先进先出; **简称:一个队列只有一个消费者** 但是在分布式系统中我们一般会对消费者设置集群部署,就是一个队列会有多个消费者实例,那我们如何保证一组信息只会有一个消费者处理呢? 为了方便测试,我创建一个消费者来同时处理3个队列的消息 ```java @Component @RabbitListener(id = "SingleActiveListener1", queues = {"triple_queue_one", "triple_queue_two", "triple_queue_three"}) public class SingleActiveListener { @RabbitHandler public void handler(Message message) { System.out.println("SingleActiveListener1 消费" + message.getMsg()); } } ``` 消息消费结果 ```shell SingleActiveListener1 消费订单操作id:1 用户id:3 SingleActiveListener1 消费订单操作id:2 用户id:3 SingleActiveListener1 消费订单操作id:3 用户id:3 SingleActiveListener1 消费订单操作id:1 用户id:1 SingleActiveListener1 消费订单操作id:2 用户id:1 SingleActiveListener1 消费订单操作id:3 用户id:1 SingleActiveListener1 消费订单操作id:1 用户id:2 SingleActiveListener1 消费订单操作id:2 用户id:2 SingleActiveListener1 消费订单操作id:3 用户id:2 ``` 可以发现当所有队列只有一个消费者时就可以严格保证消息的先进先出 此时我们再创建一个消费者来模拟分布式系统中创建多个消费者实例来提供并发处理能力 ```java @Component @RabbitListener(id = "SingleActiveListener2", queues = {"triple_queue_one", "triple_queue_two", "triple_queue_three"}) public class SingleActiveListener2 { @RabbitHandler public void handler(Message message) { System.out.println("SingleActiveListener2 消费" + message.getMsg()); } } ``` <img src="https://pic.code-nav.cn/post_picture/1806124154751594498/YmVXVLYNPIkbckhi.webp" alt="img" width="100%" /> 此时每个队列都会有两个消费者实例,来看看消息消费结果 ```shell SingleActiveListener1 消费订单操作id:1 用户id:1 SingleActiveListener2 消费订单操作id:2 用户id:1 SingleActiveListener2 消费订单操作id:2 用户id:2 SingleActiveListener1 消费订单操作id:1 用户id:2 SingleActiveListener2 消费订单操作id:2 用户id:3 SingleActiveListener1 消费订单操作id:1 用户id:3 SingleActiveListener1 消费订单操作id:3 用户id:2 SingleActiveListener1 消费订单操作id:3 用户id:3 SingleActiveListener1 消费订单操作id:3 用户id:1 ``` 可以看到用户id为2的操作发生了乱序的问题,id=2的订单操作发生在了id=1之前。那么如何解决呢? 这时候就要用到我们的**单活模式队列**来保证每个队列存在多个消费者实例,但是只会有一个实例起作用 我们只需要在创建队列时指定队列属性即可 ```java @Configuration public class TripleQueueConfig { @Bean public DirectExchange directExchange(){ DirectExchange directExchange = new DirectExchange("triple_exchange"); return directExchange; } @Bean public Queue tripleQueueOne(){ Queue queue = creatQueue("triple_queue_one"); return queue; } @Bean public Queue tripleQueueTwo(){ Queue queue = creatQueue("triple_queue_two"); return queue; } @Bean public Queue tripleQueueThree(){ Queue queue = creatQueue("triple_queue_three"); return queue; } @Bean public Binding bindingOne(){ return BindingBuilder.bind(tripleQueueOne()).to(directExchange()).with("triple-one"); } @Bean public Binding bindingTwo(){ return BindingBuilder.bind(tripleQueueTwo()).to(directExchange()).with("triple-two"); } @Bean public Binding bindingThree(){ return BindingBuilder.bind(tripleQueueThree()).to(directExchange()).with("triple-three"); } private Queue creatQueue(String name) { // 创建一个 单活模式 队列 HashMap<String, Object> args = new HashMap<>(); args.put("x-single-active-consumer", true); return new Queue(name, true, false, false, args); } } ``` 此时可以看到mq将一个消费者标记为了single active,表示只有这一个消费者起作用,另一个标记为了waiting <img src="https://pic.code-nav.cn/post_picture/1806124154751594498/xxiN7CNzxbamvM67.webp" alt="img" width="100%" /> 查看消费结果: ```shell SingleActiveListener1 消费订单操作id:1 用户id:3 SingleActiveListener1 消费订单操作id:2 用户id:3 SingleActiveListener1 消费订单操作id:3 用户id:3 SingleActiveListener1 消费订单操作id:1 用户id:2 SingleActiveListener1 消费订单操作id:2 用户id:2 SingleActiveListener1 消费订单操作id:3 用户id:2 SingleActiveListener1 消费订单操作id:1 用户id:1 SingleActiveListener1 消费订单操作id:2 用户id:1 SingleActiveListener1 消费订单操作id:3 用户id:1 ``` 可以看到此时就和只配置一个消费者的情况一样了 那么问题来了 我为了提高并发处理能力创建了多个消费者,但是呢我为了保证消息消费顺序我又只能让一个消费者起作用 emmmm.......